

You're checking a newly hung wall and finding both problems: screw heads that catch the knife and others buried through the paper. A drywall drill gun is a high-speed, depth-controlled screwdriver built for that repetitive fastening work. It earns its place when you're hanging panels regularly, while a standard drill with a properly adjusted drywall stop can handle occasional repairs.
Why Drywall Screw Depth Matters
A line of proud screws means stopping before finishing to correct the fastening. Torn paper creates a different problem: the screw may look recessed, but the fastening point has been weakened. Both mistakes turn a seemingly fast installation into extra work, as described in USG's Sheetrock installation guidance.
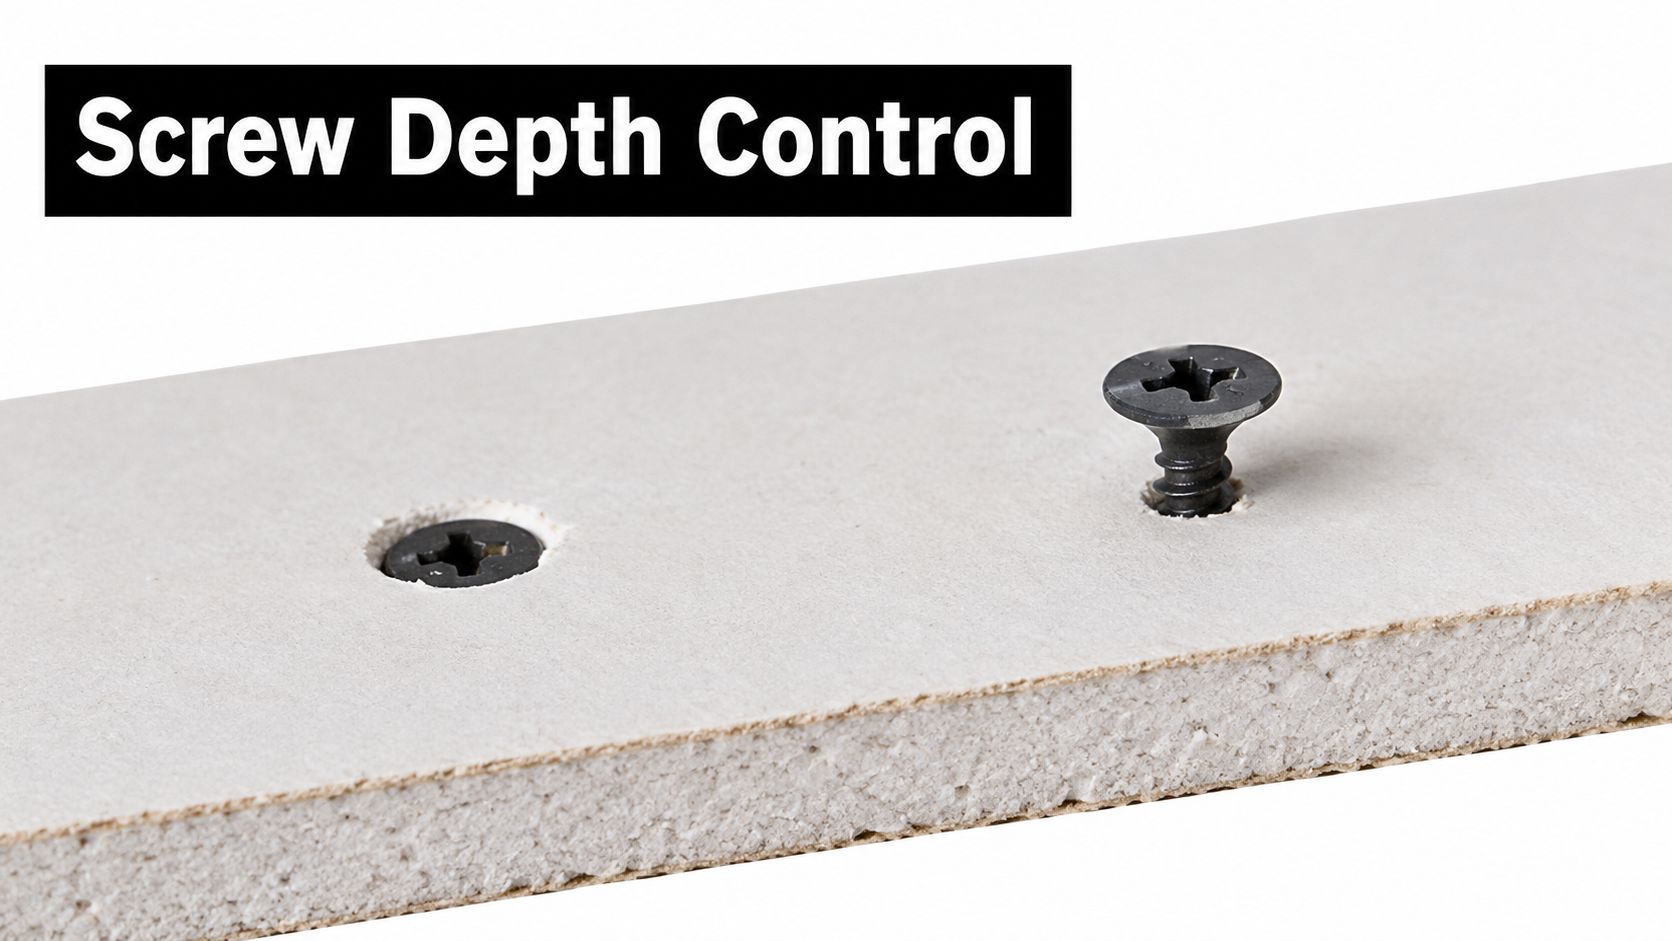
The target is a shallow, compound-ready dimple, not a countersunk hole. The screw head needs to sit below the face while the surrounding paper stays intact. That distinction matters more than whether the tool sounds powerful or drives aggressively.
The close-up below illustrates the seating detail you should inspect before continuing across a panel.
Buy for the fastening system
A dedicated drywall screwdriver isn't just a drill with a different chuck. Its purpose is repeated fastening with a controlled stopping point, rather than general drilling or maximum driving force.
That specialization grew alongside the shift from plaster and lath to gypsum wallboard and screw fastening. The history of drywall development and installation connects the screw gun's role to faster, more repeatable wall construction.
Your buying decision should start with the panel, framing, fastener, and workload. A remodeler hanging rooms needs something different from a property manager replacing a damaged patch.
Practical rule: Judge a drywall tool by the fastening it leaves behind, not by how quickly it disappears into the board.
The clutch, nose, bit, and screw head all contribute to that result. Buying more speed won't correct a poor match between those parts.
How a Drywall Drill Gun Controls Fasteners
Start at the screw head and work backward. The bit transfers rotation into the fastener, while the adjustable nose establishes the bit's working position relative to the panel. The clutch or ratcheting mechanism then controls continued driving when the selected depth is reached.
This process diagram shows how those components work together.
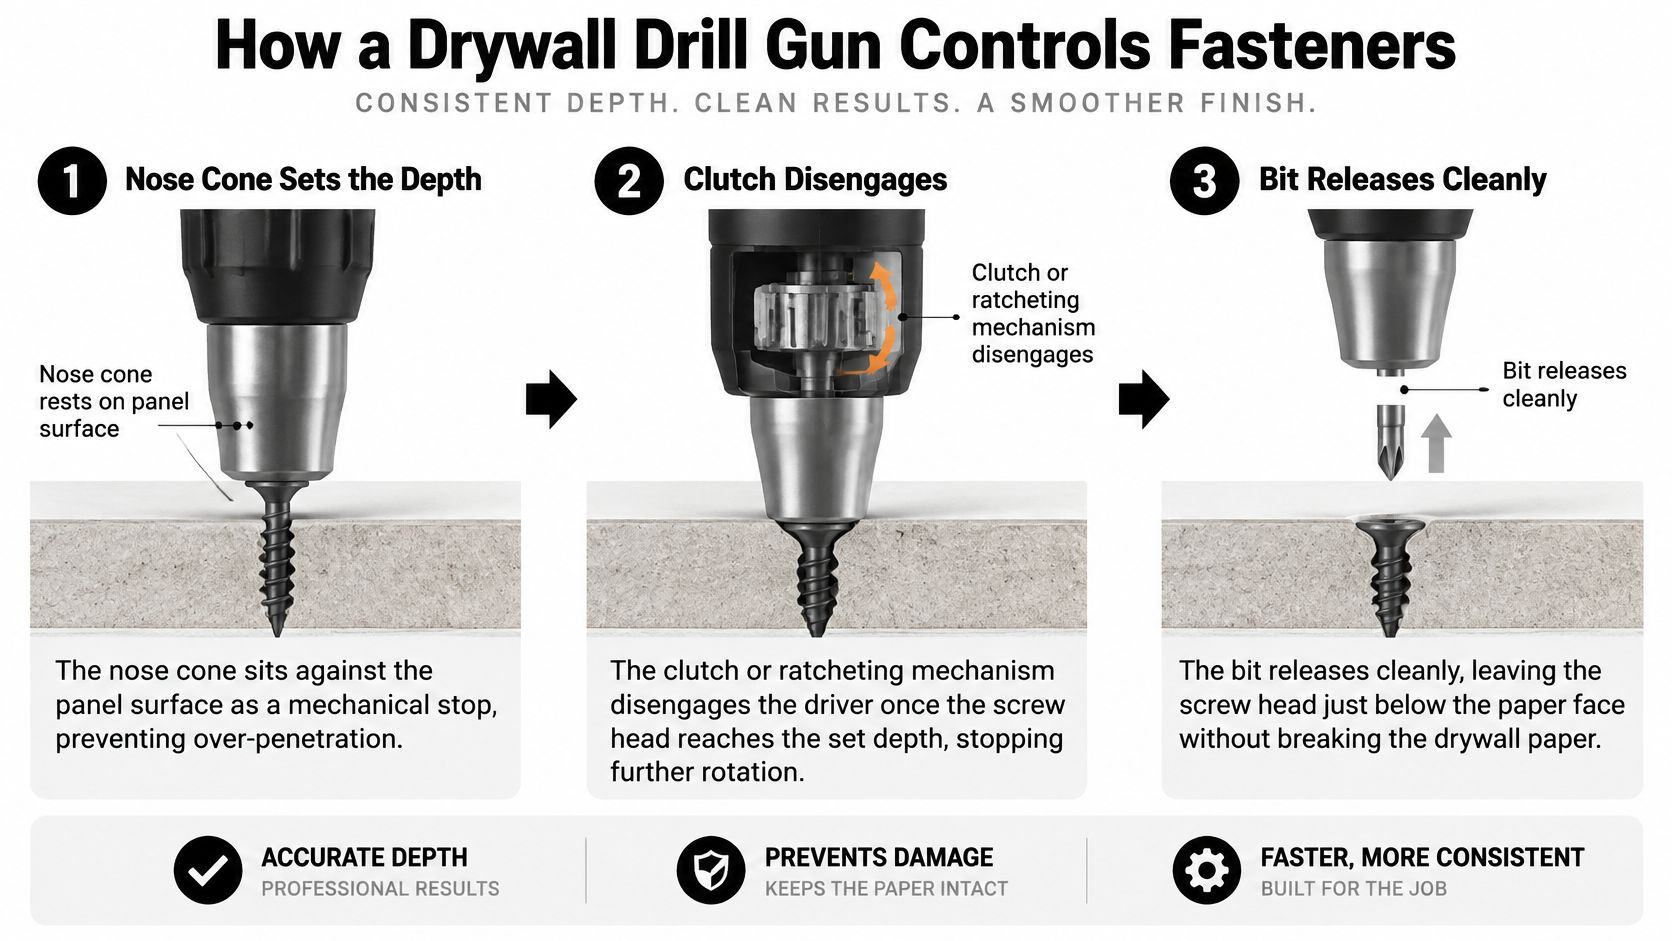
A useful mental model is a controlled stop, not a judgment of force. You provide steady forward pressure and alignment; the locator and clutch establish the endpoint. Depending on the design, the motor may continue running while the driving mechanism disengages or ratchets.
Depth control isn't torque control
A torque setting responds to resistance. A depth locator references the panel surface. Those aren't interchangeable functions, especially when the resistance changes between wood framing, metal framing, or different screws.
The Black & Decker screwdriver service manual describes adjusting the collar, test-driving in scrap, and correcting the setting as needed. It also describes maintaining engagement until the locator reaches the work and the screwdriver ratchets.
Don't assume every unfamiliar gun adjusts in the same direction. Follow its manual, and confirm the result with a test rather than relying on the collar's markings alone.
- Under-driving: The head remains proud and requires correction before finishing.
- Over-driving: The head damages the paper or core instead of leaving a controlled recess.
- Inconsistent seating: The results vary despite an unchanged setup, which calls for inspection rather than more trigger pressure.
The operating sequence is easier to recognize when you watch the tool engage and release.
Treat a change in board thickness, framing, screw length, or fastener geometry as a reason to verify the setup again. An adjustment that worked on the previous assembly isn't proof that the next assembly will behave the same way.
Drywall Drill Gun Versus Standard Drill and Impact Driver
For production hanging, choose a dedicated drywall screw gun. For occasional panel repairs, a drill with a suitable drywall depth stop is often the more practical purchase. An impact driver / atornillador de impacto remains useful for mixed fastening work, but its driving action isn't a substitute for a mechanical drywall locator.
The distinction is between convenience across different tasks and repeatability within one task. A specialized gun makes sense when you keep returning to the same fastening operation. A general-purpose tool makes sense when drywall is only a small part of the day.
Drywall fastening tool comparison
| Tool | Depth control | Best use | Main advantage | Main limitation | Ideal user |
|---|---|---|---|---|---|
| Dedicated drywall drill gun | Adjustable nose with purpose-built clutch or ratcheting action | Repeated panel hanging | Repeatable seating with less manual correction | Limited versatility outside its intended work | Drywall installers and regular remodelers |
| Standard drill with drywall stop | Attachment supplies the physical stop | Patches and occasional panel installation | Uses a versatile tool you may already own | Attachment setup and condition need attention | DIY homeowners and maintenance workers |
| Impact driver | Operator control unless equipped with a suitable stop | Mixed construction fastening and limited repair work | Practical when general fastening dominates | Doesn't inherently provide drywall depth control | Tradespeople who only occasionally repair drywall |
What works on actual jobs
For a repair surrounded by finished surfaces, a familiar drill and a calibrated stop can be easier to justify than another dedicated tool. Its advantage is versatility, not an assumption that the drill's torque clutch will somehow establish the correct recess.
For room-after-room hanging, repeatedly judging screw depth by eye becomes an unnecessary burden. A dedicated gun is the stronger choice because the tool is designed around that repetitive task.
An impact driver can be practical when you're already doing mixed construction work and have only limited drywall fastening to complete. The trade-off is that you must manage seating carefully rather than expect automatic depth control.
A tool that can drive a drywall screw isn't necessarily the right tool for driving drywall screws all day.
If your purchase also needs to cover drilling and general repairs, use this cordless drill buying guide to evaluate the broader tool requirement.
My buying recommendation is straightforward: dedicated gun for production, drill with a stop for occasional drywall, impact driver primarily for general fastening. Don't buy a specialized tool merely because it resembles professional equipment, and don't avoid one when repeated correction is already slowing your work.
Key Features That Change Drywall Performance
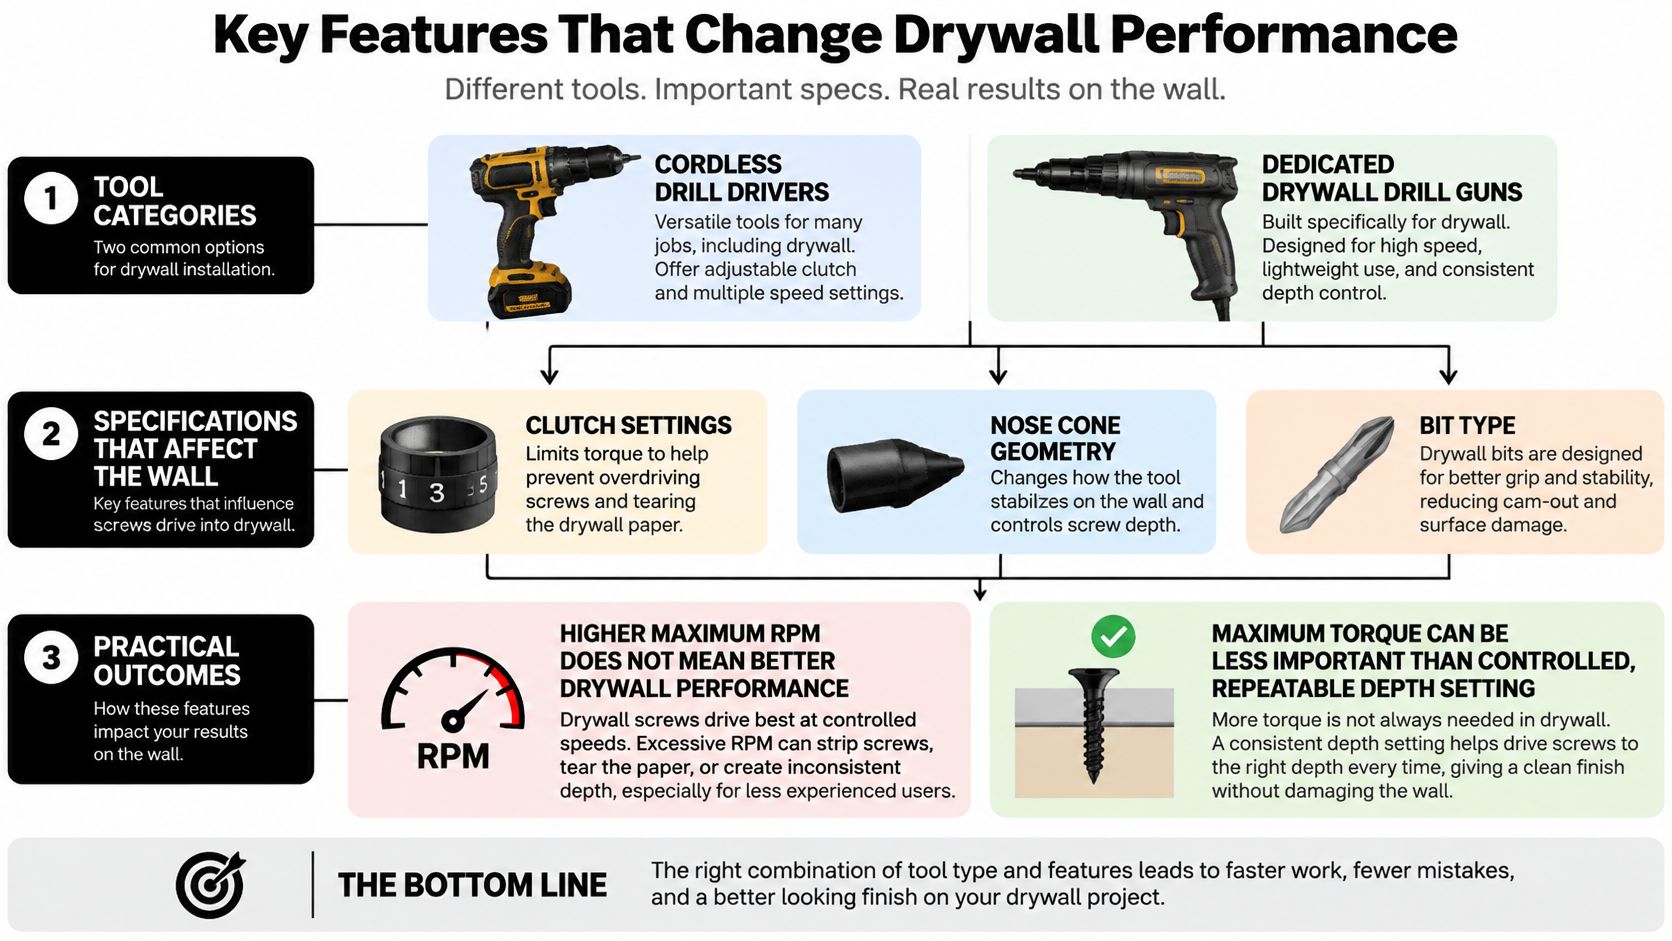
Maximum RPM isn't a quality-control feature. Speed becomes useful only after the fastener, bit, clutch, and locator work together consistently. A gun that drives quickly but leaves unpredictable recesses creates inspection and correction work.
A representative professional drywall screwdriver illustrates the category's priorities: 0–2,700 rpm under full load, 0–4,000 rpm at no load, and 12 Nm maximum hard torque, with a technical recess limit of approximately 0.8 mm (1/32 in) while preserving the paper, according to the professional screwdriver and gypsum-board technical guide. These are reference specifications, not minimum requirements for every purchase.
The relationship between tool features and fastening results matters more than a headline specification.
Match the screw before judging the motor
Framing determines which fastener belongs in the tool. The AWCI history and technical discussion of drywall fastening distinguishes coarse-thread Type W screws for wood, self-tapping Type S screws for light-gauge metal, and fine-thread drill-point screws for heavier steel.
That means buying the highest-torque gun isn't a substitute for selecting the right screw. The nose, bit, speed, and clutch need to suit the fastening system.
| Feature to inspect | What matters in practice |
|---|---|
| Depth-adjustment collar | Smooth adjustment and a setting that stays secure |
| Positive or silent clutch | Consistent engagement and release |
| Ratcheting mechanism | Predictable operation at the selected depth |
| Bit holder and spindle | Secure bit retention without obvious looseness |
| Trigger and speed control | Controllable starting and repeatable operation |
Motor labels don't settle the purchase
A brushless / sin escobillas motor is worth considering alongside battery compatibility, tool balance, and replacement-part availability. Don't assign it an unsupported runtime advantage or let the label outweigh poor nose condition.
Ergonomics deserve a hands-on check, especially with the battery installed. Hold the tool in the position you'll use, including overhead, and assess whether you can keep it square without fighting the balance.
A framing nailer / clavadora de marcos serves a different fastening operation. Terminology matters on a bilingual crew, but neither that tool nor a powerful general driver replaces a drywall screwdriver's particular control system.
Calibrating and Using a Drywall Drill Gun
Set up against the assembly you're fastening, not against whatever scrap happens to be nearest. Use the same board, screw, and framing material so the test represents the work.
National Gypsum's drywall installation guidance specifies minimum screw penetration of 5/8 in into wood framing and 3/8 in into steel framing, with screws kept at least 3/8 in from panel edges and ends. Select fastener length accordingly, subject to the project's assembly requirements.
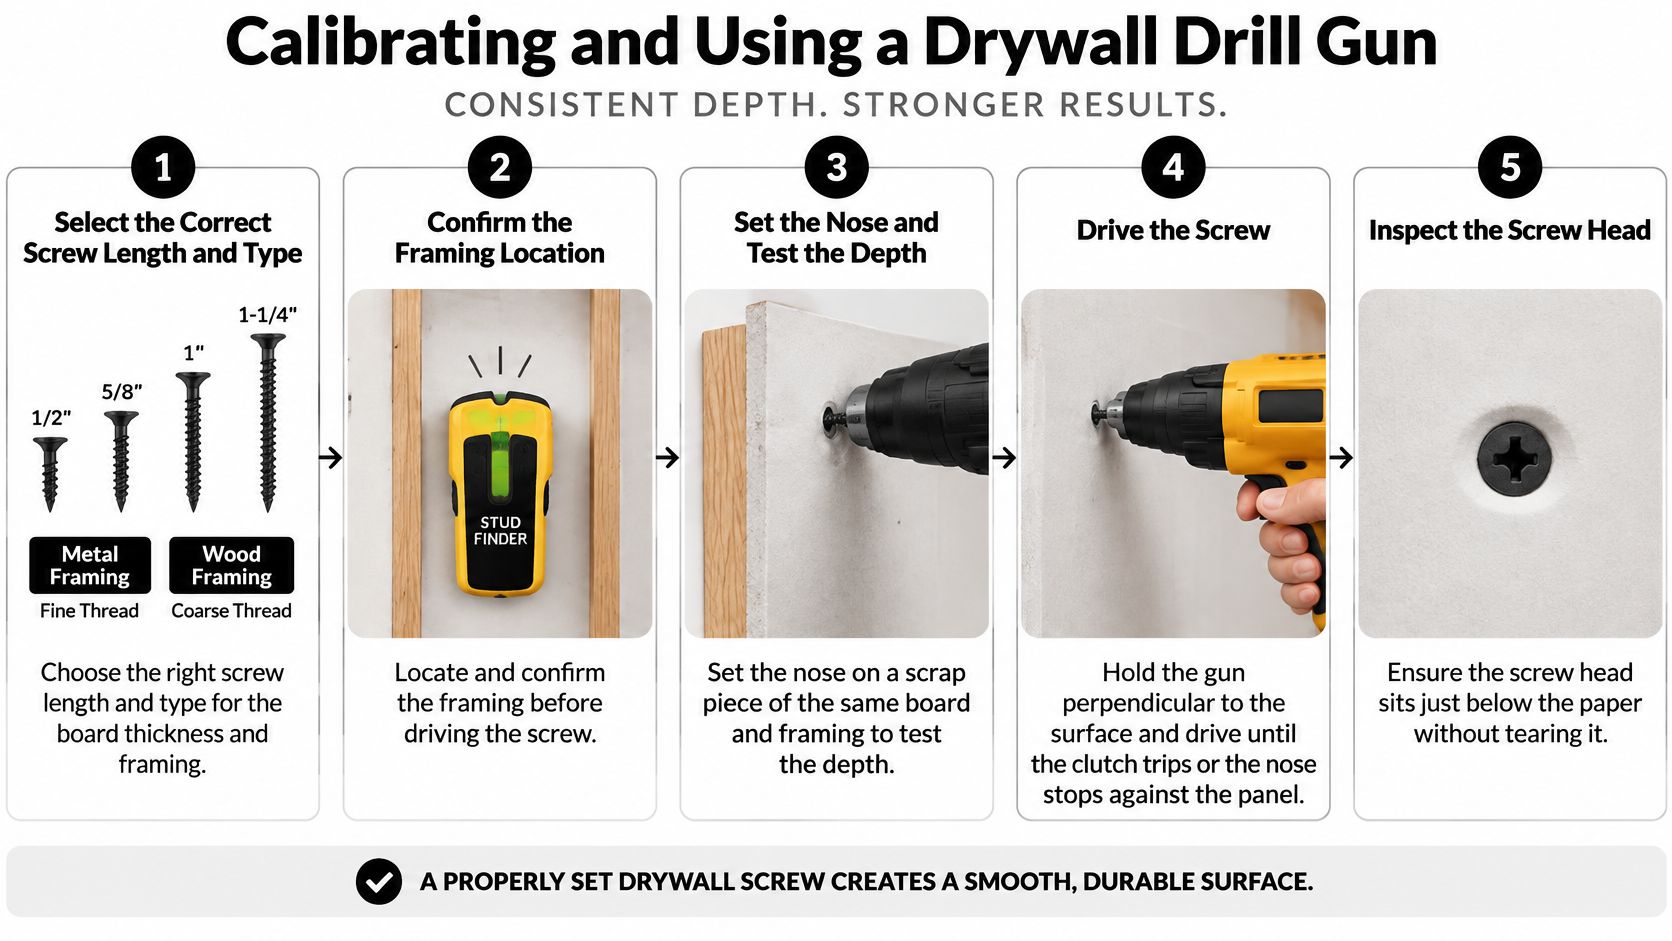
Use this sequence before committing to a wall or ceiling.
Establish the setting on scrap
- Select the fastener: Match screw type and length to the board and substrate.
- Confirm the framing: Don't use the screw as a substitute for locating the intended fastening member.
- Adjust the nose: Test on the matching scrap assembly and change the locator setting gradually.
- Check technique: Hold the gun perpendicular and maintain steady axial pressure.
- Inspect the result: Look for a shallow recess, intact paper, and a fastening point that hasn't stripped.
Drive field fasteners before perimeter fasteners, following the specified installation pattern. Run a short calibration test at the start of each wall or ceiling, particularly with an unfamiliar gun or a changed setup.
Stop forcing the last part of the drive
Excess pressure isn't an adjustment method. Maintain the engagement the tool requires, but don't keep leaning into it after the locator has contacted the surface and the mechanism has released.
A spinning screw isn't a successful fastening just because its head sits below the surface. It needs inspection and correction under the applicable installation guidance.
Stop-and-check signal: If successive screws behave differently, investigate the setup before changing your hand pressure to compensate.
Common causes to check include a worn bit, an unsuitable screw, a disturbed locator setting, and changing framing resistance. Don't keep moving across the panel while hoping the next fastening will behave better.
For safety, disconnect power before changing bits or servicing the nose, use appropriate eye protection, and verify the fastening location before driving. Follow the tool manufacturer's instructions for operation and maintenance.
Choosing a Drywall Drill Gun for Real Work
Buy for the work that fills your schedule, not the most demanding task you might do someday. Daily hanging, mobile repairs, and ceiling work create different priorities for power supply, balance, and setup time.
For larger jobs, separate material planning from tool selection. A resource such as Exayard drywall estimating software can be considered during estimating, while your fastening requirements and installation workload determine the gun you need.
Who This Is For
| Workload or assembly | Practical starting choice | Buying priority |
|---|---|---|
| Professional daily room hanging | Dedicated drywall screw gun | Consistent operation and dependable power supply |
| Repeated ceiling work | Well-balanced dedicated gun | Overhead comfort with the installed battery |
| Occasional DIY panel work | Drill with drywall nose attachment | Simple setup and broader usefulness |
| Property-management punch lists | Existing compatible drill platform | Availability and easy transport |
| Wood-framed remodeling | Gun or drill-stop setup suited to specified screws | Correct fastener pairing |
| Metal-framed installation | Dedicated gun matched to steel and screw type | Reliable engagement and suitable fasteners |
Cordless convenience versus system cost
Cordless suits remodelers moving between rooms and occupied properties. Its drawback is that the purchase may require batteries and a charger, not just the advertised tool.
A bare tool / herramienta sola can make financial sense when you already own compatible packs. A lighter platform may suit overhead repairs, while a larger shared platform may be more practical when the same batteries support other demanding tools.
Corded equipment deserves consideration for sustained work where power access is manageable. Pneumatic setups may also warrant comparison for production, but hoses, compressor requirements, and the suitability of the actual fastening equipment belong in the decision.
Don't compare runtime claims without job conditions. A useful field comparison records fasteners installed from a fully charged pack along with board type, screw size, framing, and battery condition, consistent with the workload considerations discussed in cordless power-tool market research.
Who Should Avoid This
A dedicated gun is harder to justify if you mostly drill holes, install fixtures, or complete small mixed repairs. Those buyers should prioritize a versatile drill rather than purchase specialization they rarely use.
Sacramento and Central Valley crews should plan battery rotation during hot summer work, keep spare packs shaded, and follow manufacturer temperature limits. For urgent replacement purchases, confirm Northern California delivery timing and Elk Grove pickup availability before scheduling around them.
Use the drywall installation tools guide to check the rest of the equipment list before spending the whole budget on the driver.
Maintenance and Open-Box Inspection
An open-box gun should pass the same functional test you'd expect from equipment already on your truck. Cosmetic scuffs matter less than a damaged locator, loose bit holder, or clutch that releases inconsistently.
Disconnect the power source before cleaning or inspecting working components. Clear accumulated gypsum from the nose and bit-holder area using the manufacturer's approved method, then inspect for damage rather than turning the collar and calling it ready.
Pre-wall inspection checklist
- Nose and depth stop: Check for cracks, smooth movement, and a secure adjustment.
- Clutch operation: Drive a repeatable test pattern and watch for unexplained seating changes.
- Bit condition: Replace worn or damaged tips instead of compensating with pressure.
- Battery and charger: Inspect housings, contacts, and cords; don't use damaged components.
- Assembly compatibility: Confirm the screws and framing match the intended setup.
Durability is best judged through the components that control fastening. A clean housing doesn't establish service condition, and a scratched housing doesn't establish mechanical failure.
Before buying used equipment, ask whether replacement nose components and bit holders remain available. Also distinguish a retailer's return policy from any manufacturer warranty, whose applicability should be verified for the particular item.
Open-box value without skipping inspection
Value Tools Co's open-box buying guide is a useful starting point for evaluating its tested and inspected open-box and bare tools, offered at savings up to 55% off typical retail pricing, with a 30-Day Peace of Mind Guarantee, returns by mail or in-store, and free return shipping on defective items.
That protection doesn't replace checking an unfamiliar unit before production use. Test the actual tool with the fasteners and assembly you'll use, and keep the purchase documentation until you're satisfied with its operation.
A bargain stops being useful when the crew has to correct every other fastening.
Keep maintenance tied to performance rather than appearance. Clean, inspect, test, and investigate a changing result before the tool creates work across an entire wall.
Final Drywall Drill Gun Buying Recommendation
Choose a dedicated drywall drill gun for repeated panel hanging. Choose a standard drill with an adjusted drywall stop when occasional repairs don't justify another specialized tool, and keep the impact driver focused on general fastening.
Before purchasing, verify platform compatibility, nose condition, clutch operation, included accessories, and the total battery-system cost. In California, the building-code fastening and inspection provisions reinforce the need to follow project documentation for structural, seismic, and rated assemblies rather than assume a generic fastening pattern.
Frequently Asked Questions
Can I use a regular drill for drywall?
Yes. A drill with a properly adjusted drywall depth stop is practical for occasional repairs.
Is an impact driver the same as a drywall screw gun? No. An impact driver doesn't provide a drywall gun's mechanical depth control on its own.
Should I buy an open-box drywall screw gun?
Consider one if its nose, clutch, bit holder, and power system pass inspection and its return protection suits the purchase.
Visit Value Tools Co to compare tested and inspected open-box or bare tools against your drywall workload and existing battery platform. Check current inventory, included accessories, and the guarantee before buying, and confirm delivery or Elk Grove pickup arrangements if your next job depends on the tool.


