

For most shops, the right random orbital sander for woodworking is a variable-speed, 5-inch model with a flat pad, strong hook-and-loop grip, and a dust port that seals properly to your vacuum hose. You're probably staring at a glued panel, a set of cabinet doors, or a tabletop that looks smooth until stain shows every swirl. Buy the sander as part of a system, meaning pad, disc, extraction, and grit progression, and you'll get a clean finish without re-sanding the whole job.
What a Random Orbital Sander Actually Does
You clamp down a tabletop, run your palm across it, and feel a ridge at every glue line. A sheet sander will polish those ridges. A belt sander will level them, and it'll gouge the panel if you hesitate for a second. A random orbital sander sits between those extremes, which is why it earns bench space on cabinet jobs.
Two Motions Working at Once
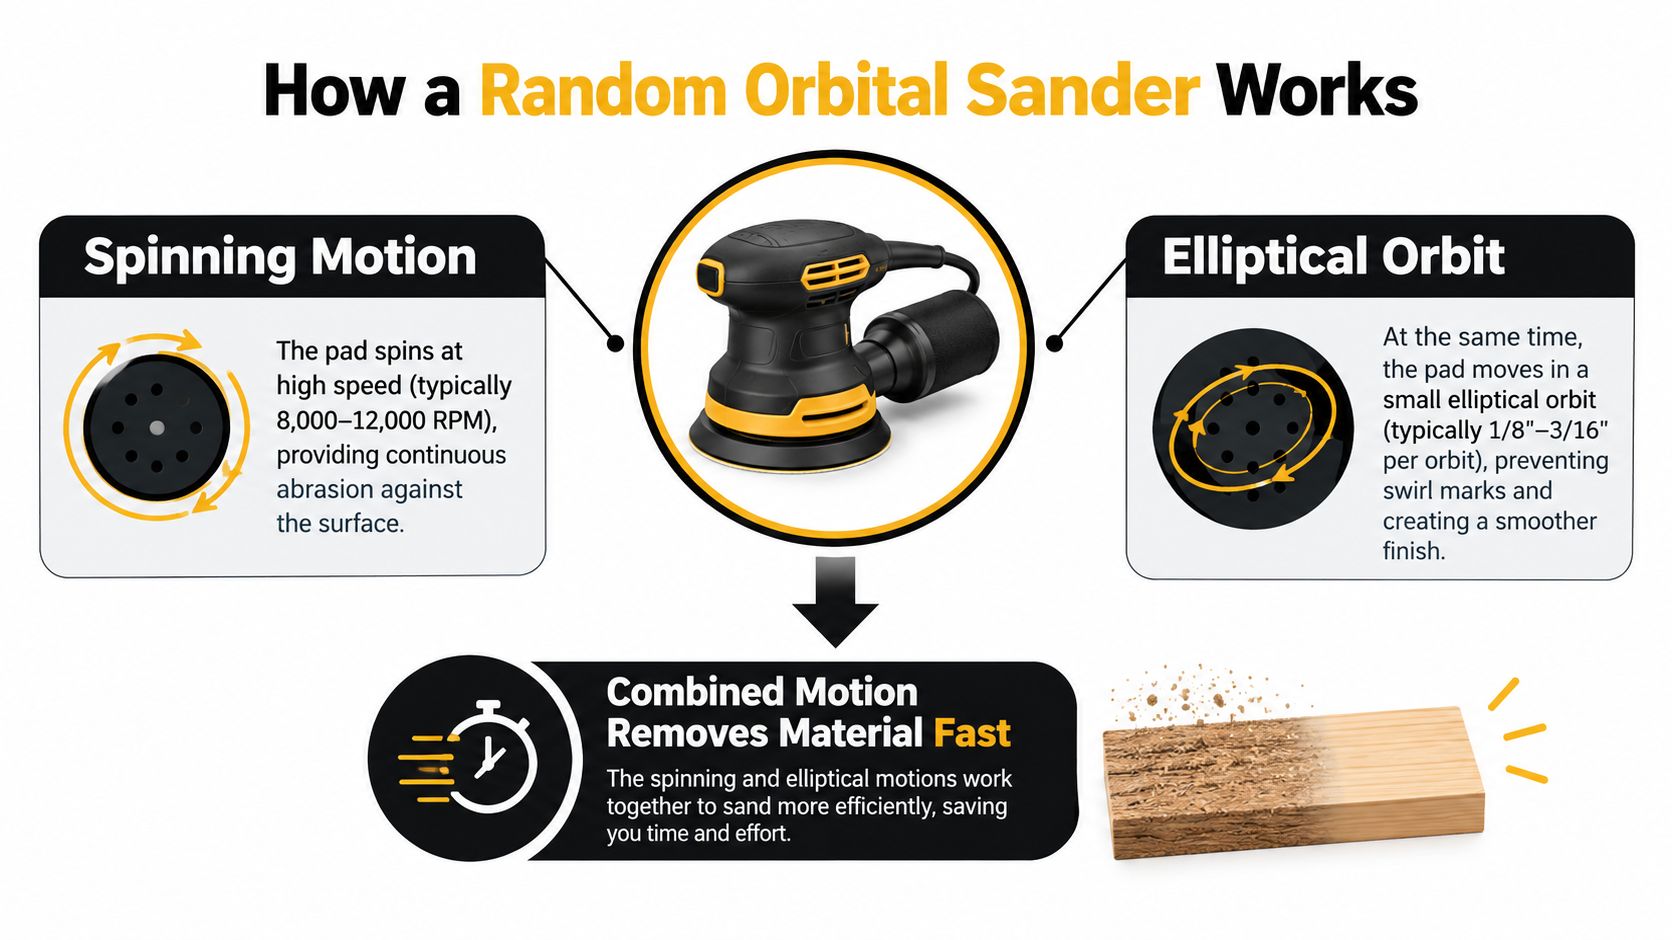
The pad spins while also moving in a small elliptical orbit, so the abrasive doesn't repeatedly follow one fixed path. That combined action reduces visible swirl marks and cross-grain scratches compared with fixed-pattern sanders. It's practical for flattening glued panels, smoothing hardwood, preparing painted surfaces, and making final finish passes.
The diagram below shows why the scratch pattern stays scattered instead of lined up.
OPM, Pressure, and Why Technique Still Matters
Speed is listed in OPM, or oscillations per minute, not RPM, because the pad is orbiting as well as rotating. Higher OPM generally removes material faster. Lower OPM gives you better control during finishing and reduces heat and sanding marks.
Don't lean on the tool to make it cut faster. Excess pressure slows the pad, weakens the random action, and leaves uneven scratches. Keep the pad flat, move in slow overlapping passes, and let a fresh disc do the work.
If the sander feels like it's skating, stalling, or fighting your hand, check pressure and disc condition before you blame the motor.
That one-tool versatility is real, but it has limits. This isn't a stock-removal machine for hogging down a twisted slab, and it won't rescue a surface if you skip grits or sand with a loaded disc. Used within its range, it's the finish sander most woodworkers reach for first.
Key Features That Matter on a Woodworking Job
Ignore the longest spec sheet. On a real job, four things decide whether a sander finishes clean or wastes your afternoon, orbit size, speed control, pad condition, and dust-port fit. Motor bragging comes last.
Orbit Size Sets the Job
Orbit diameter is the trade-off nobody explains well at the sales counter. A 3/8-inch orbit provides more aggressive and faster cutting, a 3/16-inch orbit offers moderate removal, and a 3/32-inch orbit is better suited to fine finish sanding, as outlined in woodworking guidance on avoiding swirl marks in finish sanding. If you only buy one tool for mixed work, the middle range is the safest compromise.
| Feature | Faster Cutting | Better Finish | Best Use Case |
|---|---|---|---|
| Large orbit | Yes | No | Leveling panels, removing old finish |
| Small orbit | No | Yes | Veneer, final passes, between coats |
| Higher OPM | Yes | Sometimes | Bare hardwood, flat stock |
| Lower OPM | No | Yes | Edges, paint prep, delicate faces |
| Vacuum extraction | Helps disc cut clean | Yes | Indoor work, stain prep |
Table. Random Orbital Sander Feature Trade-Offs for Woodworking
Variable Speed and Pad Quality
Variable-speed control isn't a cosmetic extra. One documented model offers selectable speeds of 7,000, 9,500, and 11,000 OPM, so you can back off for veneer, painted surfaces, and heat-sensitive work, then speed up for bare hardwood. A single-speed bargain tool can't make that adjustment.
Check these items in hand before you pay:
- Pad flatness: A warped or torn backing pad prints swirls no matter which grit you choose.
- Hook-and-loop grip: Discs that creep or fly off waste abrasives and scratch work.
- Dust-port fit: Bring your hose adapter dimension, because a loose port leaks where it matters.
- Grip and balance: A low, comfortable grip reduces tipping on edges and fatigue on doors.
For paint prep specifically, expert advice from Neasden Hardware is a useful companion on surface preparation before coating. Match that prep discipline to the sander, and finish problems drop before primer ever opens.
Choosing Grits and Running a Sanding Progression
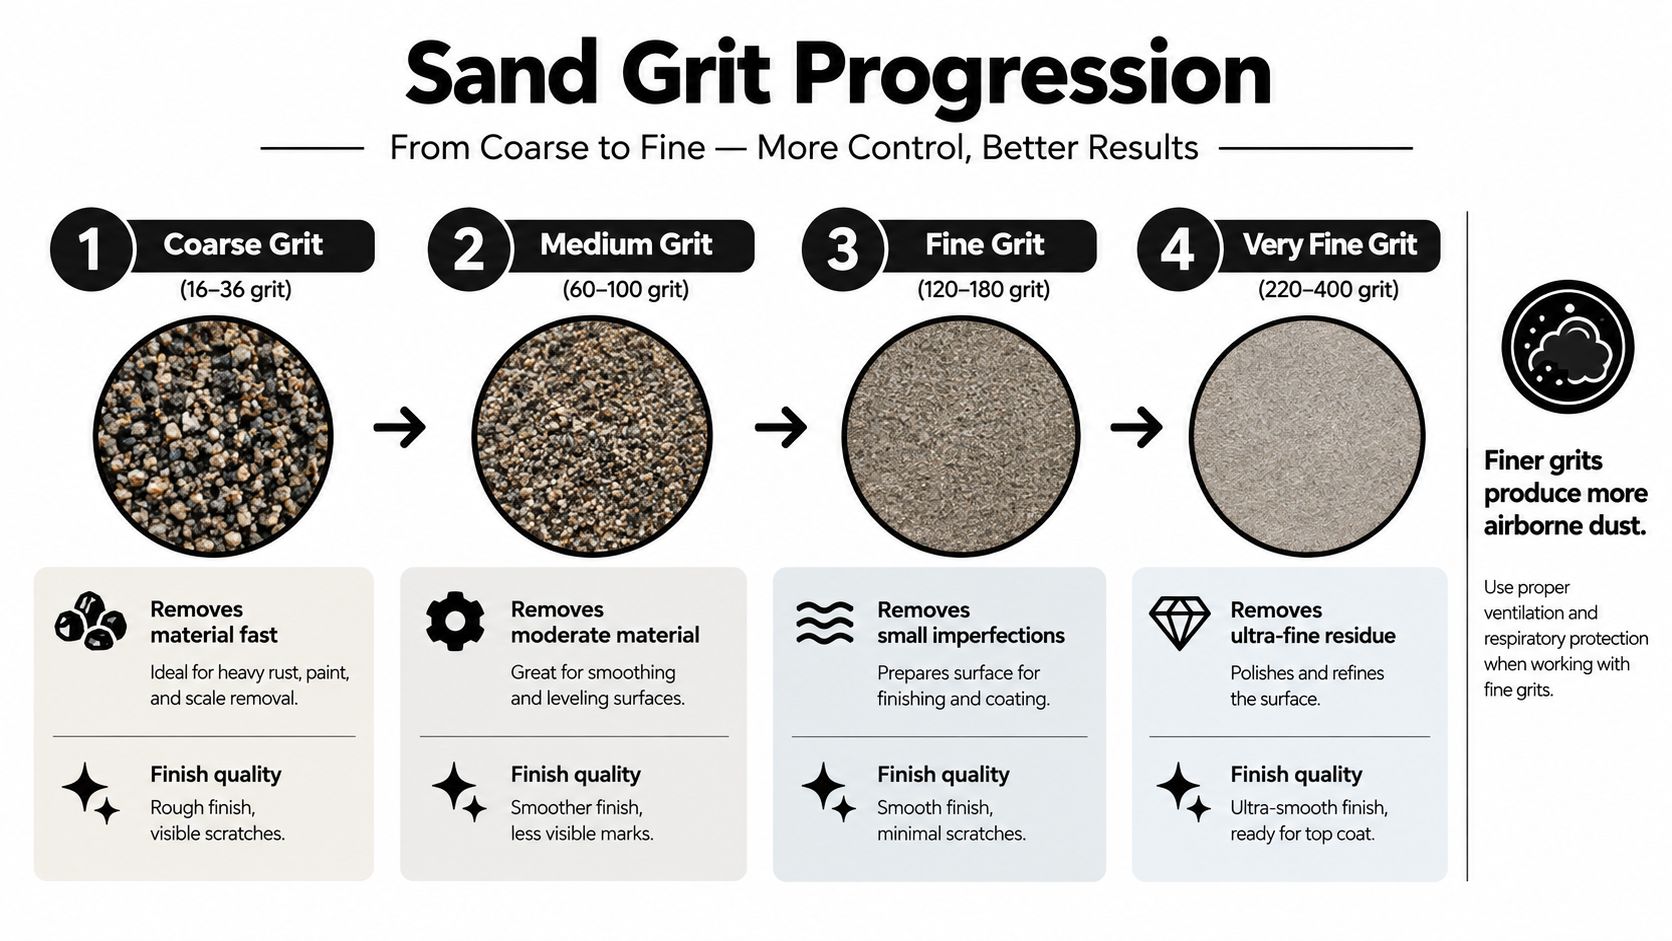
Start coarse only when the surface needs leveling. If the board is already flat and clean, starting too coarse just creates deep scratches you now have to remove. The progression below covers most furniture and cabinet work.
The chart maps removal against finish quality so you can pick a starting point without guessing.
A Progression That Doesn't Waste Time
- Leveling and defects: Begin around P80 when you must flatten glue lines or remove damage.
- Scratch removal: Move to P120, and don't advance until the previous pattern is gone.
- Finish preparation: Continue through P150 or P180, then P220 only when your finish schedule calls for it.
- Final check: Vacuum or wipe between grits, then hand-sand with the grain before finishing.
Controlled testing supports that sequence because coarser grits removed material faster but produced rougher surfaces, while finer grits improved smoothness at the cost of slower cutting. The same work found increasing rotational speed reduced scratch severity, although grit size had the stronger effect. In plain terms, don't jump from P80 to P220 and expect speed to hide the gap.
Cabinet refinishing follows the same logic, and the I PAINT STUFF cabinet sanding guide is worth reading if your project is painted doors rather than bare wood. Disc choice details, including hole patterns and backing types, are covered in this guide to random orbital sander sandpaper selection.
The short demonstration below shows controlled passes and disc changes in practice.
Here's the counterintuitive part. In a 2019 full-factorial study, P240 abrasive produced approximately 48% higher dust concentration than P40 abrasive under the tested conditions, and softwoods generated higher concentrations than hardwoods. Finer doesn't automatically mean cleaner, so keep extraction connected through the final pass and avoid over-sanding.
Matching the Sander to Common Woodworking Projects
Match the tool to the surface in front of you, not to the project you hope to build someday. A configuration that's perfect for a tabletop can destroy a veneered door in one careless pass.
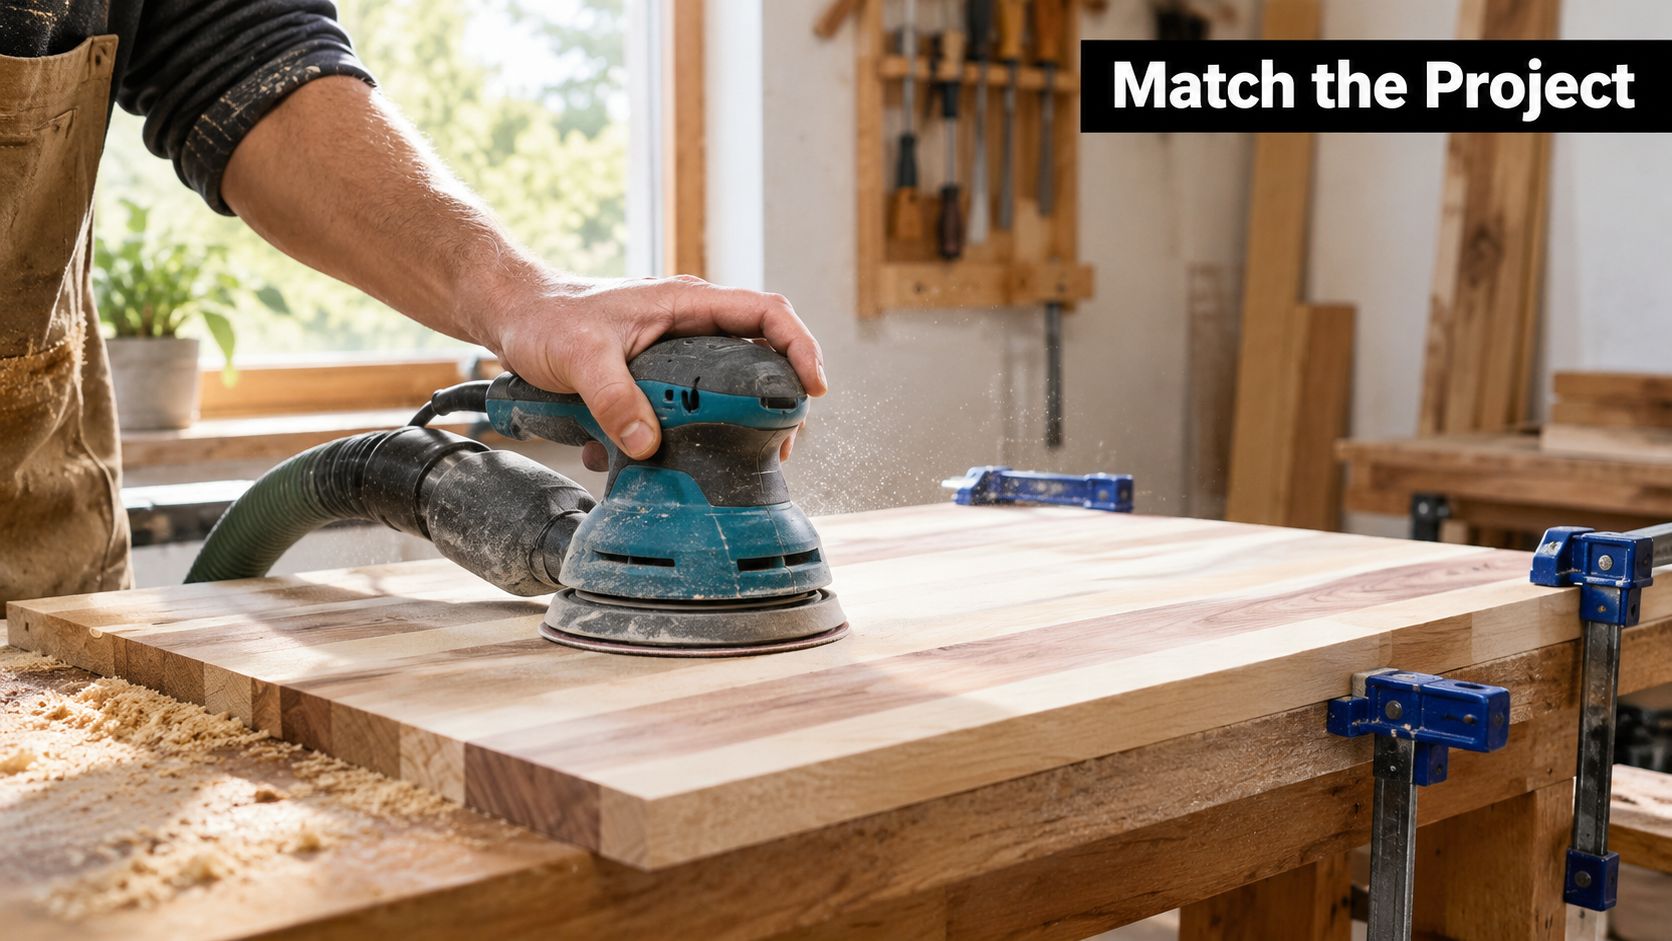
The photo shows the basic flat-panel setup most projects start from, pad flat, hose clear, and both hands guiding rather than pressing.
Project-by-Project Fit
Tabletops and glued panels reward a moderate or larger orbit and a full grit progression. You need enough cut to level joints, then enough refinement to keep stain from highlighting scratches. Work the whole surface evenly so you don't dish soft grain between harder bands.
Cabinet doors and drawer fronts need control around profiles and edges. Slow the OPM, keep the pad supported, and hand-sand inside corners the round pad can't reach. Dust extraction matters here because loose dust settling on a door shows up under paint.
Veneer and plywood faces are where aggressive tools cause expensive mistakes. Use a smaller orbit, lower speed, light pressure, and the finest starting grit that still corrects the surface. Once you cut through a face veneer, there's no sanding trick that puts it back.
Practical rule: If the workpiece is already at final thickness, choose control over cut rate every time.
Refinishing furniture and sanding between coats calls for restraint. You're scuffing and leveling a coating, not reshaping wood, so heat and loaded discs become the main risks. Change discs early, because a clogged abrasive drags debris across a finish you'd otherwise save.
How to Inspect an Open-Box or Used Sander Before You Buy
An open-box sander can be a smart buy or somebody else's return for a reason. Run this inspection in the aisle or at pickup, and you'll know which one you're holding within a few minutes. Judge the pad and extraction first, not the brand badge.
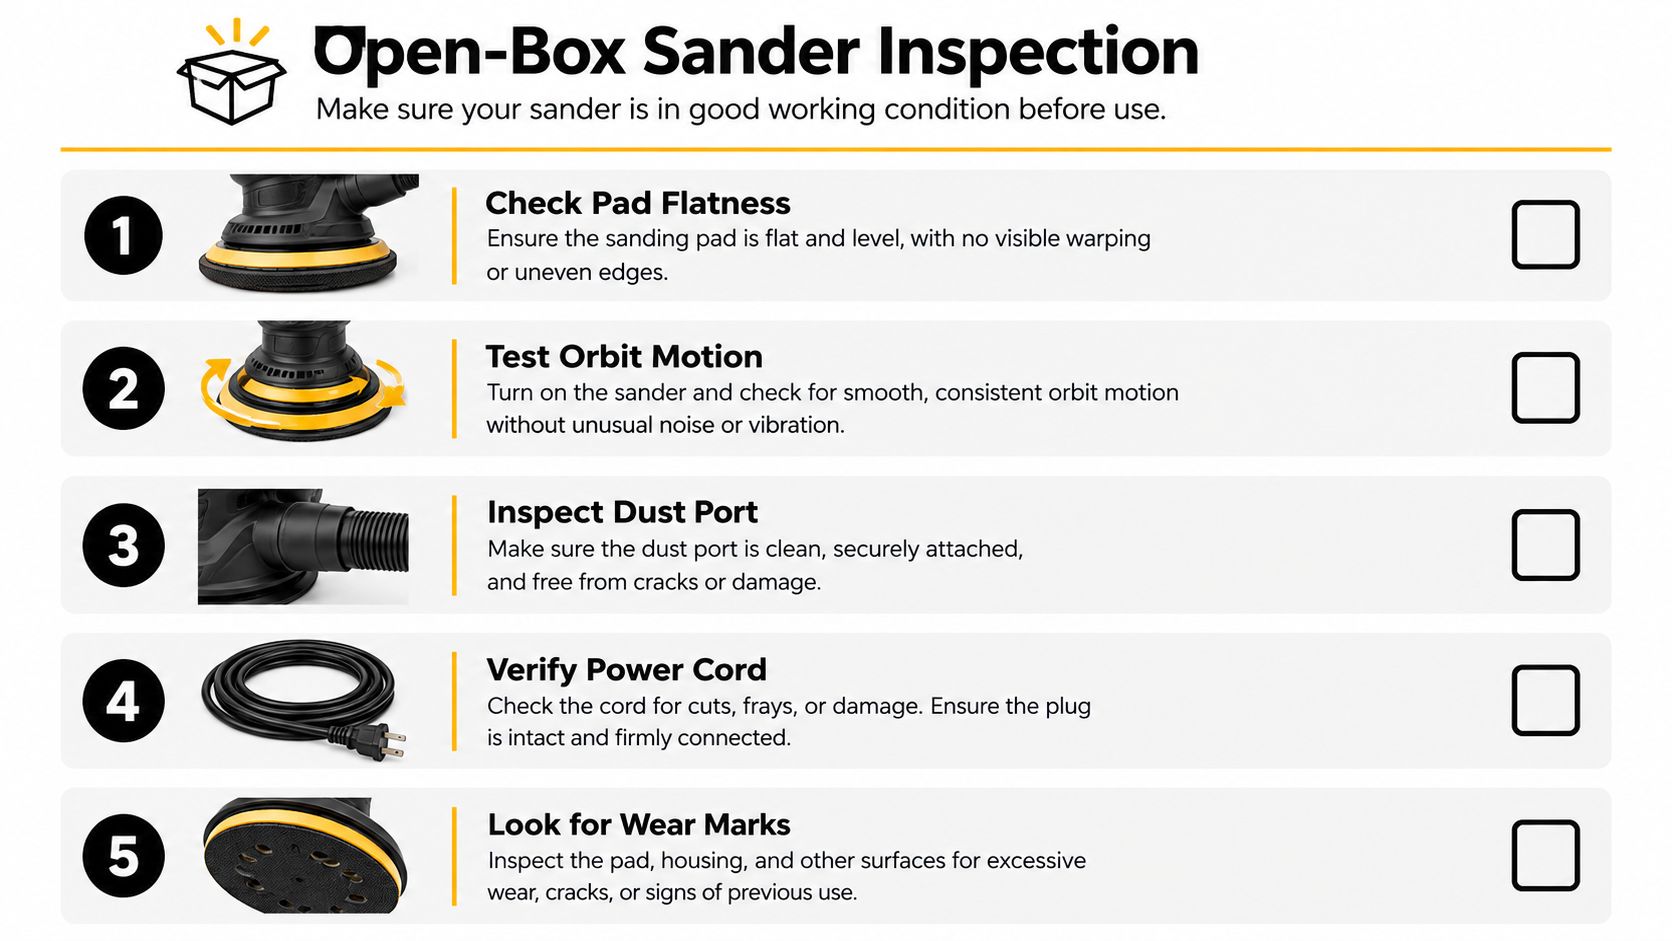
Use the checklist visual as your walk-around order so you don't skip the dust port.
The Five-Minute Inspection
- Spin and orbit test: Run it on scrap. The pad should spin freely, orbit smoothly, and stop without grinding or harsh vibration.
- Pad and hook-and-loop: Press a disc on and pull it off several times. Weak grip, melted hooks, or a cupped pad mean replacement cost.
- Dust path: Inspect ports, seals, canister threads, and the hose adapter for cracks. Leaks here undermine the whole system.
- Switch and speed dial: Every setting should change OPM cleanly, with no dead spots or flicker.
- Cord or battery fit: Check cord jackets for cuts. On a cordless bare tool, or herramienta sola, confirm your existing batteries seat tightly.
If the motor is brushless, or sin escobillas, don't assume that label guarantees condition. Bearings, pads, and seals still wear, and those parts decide finish quality. Cosmetic scuffs don't matter. A wobbling pad does.
Understand the category before you judge the price by reading what an open-box item actually means for tool buyers. Tested and inspected should mean the tool was powered, run under its normal functions, and checked for the wear points above, not wiped down and reboxed.
Dust Extraction and Shop Safety
Dust collection isn't a tidy-shop luxury. It's a performance and health control, and it changes how well the disc cuts. On a random orbital sander, extraction works as part of the same system as the pad and the grit progression: a sealed path keeps fines out of the air, and a hooked-up vac keeps the abrasive from loading so the disc keeps cutting. Treat a small dust canister as a backup for quick field work, not as your main indoor setup.
What the Testing Shows
A CDC and NIOSH control report from September 1996 found a modified system with additional exhaust and a slotted pad reduced dust emissions by approximately 90% compared with the conventional aspirator-controlled sander. OSHA identifies sanders as major dust-producing machines and recommends an aspirator with a perforated pad for random orbital sanders. The principle holds: capture at the pad beats chasing dust after it's airborne.
Separate occupational-hygiene testing reported particle concentrations approximately 320 to 4,640 times higher with conventional systems than with a self-generated-vacuum system, while removal stayed around 1.60 to 1.88 g/min with vacuum sanding. Extraction protects your lungs without giving up productive cutting. It also limits abrasive loading, so discs stay exposed and last longer.
Build the Setup Correctly
- Match the holes: The disc pattern must align with the pad, or suction can't reach the surface.
- Seal the connection: Use the correct adapter and check for leaks at the port. A cracked seal on a used sander kills the whole system.
- Protect yourself anyway: Wear a fitted respirator and hearing protection on long sessions, since extraction doesn't replace either one.
Exposure limits for nuisance dust are far below what a closed garage reaches in an afternoon, which is why local exhaust matters. In a Central Valley garage during 100°F+ summer heat, doors stay closed and dust hangs in the air longer, so an extractor pulling at the pad is worth more than a box fan in the window. Setup details and hose options are covered in this overview of random orbital sander dust collection methods.
Buying Through Value Tools Co and Who This Path Suits
Buying open-box makes sense when the discount buys you a better class of tool, not when it buys you unknown wear. Value Tools Co focuses on tested and inspected open-box and lightly used tools, with up to 55% savings on Open-Box or Bare Tools. That's the factual proposition. Your job is to inspect the wear points covered above.
Who This Is For
DIY woodworkers, remodelers, and small Sacramento and Central Valley shops stretching a budget fit this path well. You can step into a pro-grade DeWalt, Makita, or Milwaukee platform, especially with a herramienta sola if you already own batteries, and still keep money aside for quality discs and a proper extractor hose. Fast 1-day Northern California delivery and same-day Elk Grove warehouse pickup also help when a cabinet job can't wait for a national warehouse.
Summertime heat is a real factor for cordless buyers here. Batteries stored in a hot truck or garage cool slowly and may refuse a charge until they come down in temperature, so keep packs shaded and rotate them on long sanding days. A sin escobillas motor helps efficiency, but it doesn't repeal battery heat limits.
Who Should Avoid This
High-volume production shops that depend on same-day manufacturer warranty service should buy new through their normal dealer channel. If downtime costs more than the savings, the math flips. The same applies if you need a pneumatic production sander, a tool class this path doesn't address.
Pros
- Lower entry cost: Savings can fund extraction and better abrasives.
- Tested function: Power, speed control, and pad action checked before sale.
- Return window: The 30-Day Peace of Mind Guarantee allows 30-day returns by mail or in-store, with free return shipping on defective items.
Cons
- Cosmetic marks: Open-box tools may show handling wear.
- Stock varies: The exact model you want may not always be available.
- Accessory gaps: Confirm the dust adapter and pad are included before ordering.
For most budget-conscious buyers, the return window removes the main risk. Inspect on arrival, test on scrap, and decide within that window.
Final Recommendation and Quick Buyer FAQs
Buy for your most common surface. If that's mixed furniture and cabinet work, choose a variable-speed 5-inch random orbital sander for woodworking with a moderate orbit, a flat pad, and a vacuum port that fits your hose. Spend the savings from an open-box purchase on discs and extraction, because those parts govern the finish you'll see.
Quick Buyer FAQs
How do I avoid swirl marks? Use light pressure, slow overlapping passes, clean discs, connected extraction, and a full grit progression without large jumps. Replace a damaged pad, and hand-sand with the grain before finishing.
Which orbit size should I choose? Pick a larger orbit for leveling and removal, a smaller orbit for veneer, edges, and final finish passes. If you can only own one, choose the moderate middle and manage aggressiveness with grit and speed.
Do I still need a respirator with a vacuum connected? Yes. Extraction reduces airborne dust and keeps the disc cutting, but it doesn't capture everything at the surface. Keep the respirator on, especially with fine grits and softwoods.
Is open-box worth it for a first sander? Usually, yes, provided the pad, hook-and-loop, seals, and speed control pass inspection and you have a real return window. Those checks tell you more than the box condition ever will.
If you're ready to put a tested random orbital sander to work without paying full retail, browse the current open-box and bare-tool selection at Value Tools Co and check pad condition, dust adapters, and battery compatibility before you order. Sacramento-area buyers can use fast Northern California delivery or same-day Elk Grove pickup, then test the tool on scrap under the 30-Day Peace of Mind Guarantee.


