

A standard miter saw can cut aluminum only when fitted with a carbide-tipped non-ferrous blade of the correct diameter and tooth count, and the saw's manual must explicitly permit non-ferrous use. For most clean trim and extrusion work, choose a high-tooth-count blade, secure every piece, and control both blade speed and feed rate.
You may be standing at the saw with a length of aluminum trim, T-slot extrusion, or window profile marked and ready to cut. The blade already installed is probably intended for wood, the offcut is too short to hold comfortably, and the manual's material list is somewhere in the truck. That setup is where clean work turns into chipped anodizing, a pinched blade, or a piece that jumps off the table.
Aluminum is practical on a miter saw because it's softer than steel and benefits from the saw's repeatable angle and crosscut control. It's also gummy, heat-conductive, and unforgiving of poor workholding. Treat the operation as controlled hot work, not as ordinary woodworking, and the results become predictable.
Why a Miter Saw Can Cut Aluminum When Set Up Right
The first rule is simple: the saw must be rated for aluminum or other non-ferrous metals, and the manual must explicitly allow that use. A standard woodworking blade isn't an acceptable substitute. Safety guidance specifically calls for a blade recommended for non-ferrous cutting when aluminum is being cut, while ferrous metal requires a different tool and procedure. See the university miter saw safety guidance for that material distinction.
Aluminum profile work became a natural fit for miter saw workflows because trim, extrusion, and window components need square, repeatable cuts. Industry commentary links the development of specialized stationary miter saws with the growth of aluminum window construction, with early specialized machines appearing in the 1950s and 1960s as window production expanded. That history doesn't make every modern miter saw suitable, but it explains why aluminum remains one of the most practical non-wood materials for this saw class.
The four decisions that control the cut
A reliable cut depends on four connected choices:
- Blade type: Use a carbide-tipped blade made for non-ferrous metal.
- Tooth count: Match the teeth to the profile and desired finish.
- Workholding: Clamp the stock against the fence and support long sections.
- Feed rate: Let each tooth shear a small chip instead of forcing the blade.
Thickness matters more than the word “aluminum.” Thin-wall tube, angle, trim, and extrusion can cut cleanly with the right setup. Thick plate or heavy structural sections may heat the blade, overload a compact saw, and justify a dedicated metal-cutting machine instead.
Practical rule: If the manual doesn't clearly permit aluminum, stop there. A compatible blade can't override the saw's design limits.
The saw's diameter, arbor, guard, maximum RPM, and approved applications all matter. Confirm those details before installing a blade, then build the station around firm support and controlled movement rather than trying to compensate for a marginal setup with speed or muscle.
Choosing the Right Miter Saw and Non-Ferrous Blade
Start with the blade, because the saw can't rescue the wrong tooth geometry. For aluminum trim, extrusion, and thin sheet, a carbide-tipped non-ferrous blade with a high tooth count produces a cleaner edge than a standard wood blade. Blade guidance commonly places the useful range around 80 to 120 teeth, with more teeth favoring a smoother finish and fewer teeth moving through thicker material more quickly, as explained in this non-ferrous blade selection guide.
The blade diameter must match the saw. A 10-inch blade and a 12-inch blade also need different RPM expectations, kerf clearances, and profile capacity. Practical guides often identify 80 teeth as a strong choice for a 10-inch aluminum blade and 96 teeth for a 12-inch blade, but the saw manual and blade manufacturer remain the final authority.
| Saw size | Blade tooth count | Kerf | Best aluminum profiles | Corded vs. cordless fit |
|---|---|---|---|---|
| 10-inch | About 80 teeth | Match the saw and thin-wall stock | Trim, angle, light extrusion | Cordless is convenient for mobile work, corded sustains repeated cuts |
| 12-inch | About 96 teeth | Match guard clearance and profile thickness | Larger extrusion and broader profiles | Corded is preferable for demanding production work |
| Either size | Up to about 120 teeth for finish work | Avoid a kerf that overwhelms thin material | Clean architectural and finish profiles | Choose based on duty cycle and available power |
A triple-chip grind tooth pattern can be useful on heavier aluminum stock because it balances chip removal with edge quality. A negative or slightly negative hook angle also helps control grabbing in soft metal. Don't assume that a blade marketed as “fine finish” is suitable. The label must specifically identify aluminum or non-ferrous metal use.
Cordless saws on 18V and 36V platforms can handle common trim and angle cuts when the battery is healthy and the saw manual approves the application. Corded machines are the steadier choice for repeated cuts in heavier stock because they maintain consistent power without battery depletion. For RPM and heat control, one technical guide recommends approximately 3,000 to 4,500 RPM for a 10-inch blade and 2,500 to 4,000 RPM for a 12-inch blade, while variable-speed saws may be run at roughly 70% to 80% of maximum. Check the aluminum extrusion speed guidance against your exact saw and blade.
For another blade-specific reference, Value Tools Co's guide to a circular saw blade for aluminum is useful when comparing non-ferrous tooth designs and applications.
Setting Up the Workpiece Before the Cut
A clean aluminum cut starts before the motor runs. Mark the cut line with a fine-tip marker and a steel rule or speed square. Pencil lines disappear on bright stock, while chalk smears across anodized surfaces and makes an accurate witness mark difficult to follow.
Set the miter angle using the saw's positive detents where they fit the job, then lock the table firmly. Perform a dry plunge with the motor off to confirm that the blade path clears the fence, insert, and support. This catches an angle or clearance problem before the teeth meet the material.
Clamp the profile, not just the long end
Place the aluminum flat against the fence and base. Use quick-grip clamps or a non-marring fixture to prevent the extrusion from rotating, lifting, or sliding as the blade exits. Every workpiece should be clamped before cutting, including pieces that appear too small to move.
Short offcuts deserve special attention. If the cutoff can wedge between the blade and fence, it can become a projectile or pull the usable piece out of alignment. Support the offcut without trapping it, and never hold it by hand near the blade.
A sacrificial zero-clearance insert helps narrow tube and thin-wall extrusion stay supported instead of dropping into the throat plate. Use a sacrificial block when the profile is easily marred or too narrow for the standard table opening. The support should stabilize the piece without interfering with the blade guard or the cut path.
Support long stock at the same height
Long aluminum sections sag when they extend beyond the saw table. Roller stands or a level auxiliary table keep the profile aligned and reduce the chance that the material pinches the blade at the back of the cut. Support both the retained piece and the offcut, but make sure the waste can fall or move away without binding.
Clean chips from the bed before every pass. A small ridge under the extrusion changes its angle and can leave a stepped cut even when the saw is locked correctly. The miter saw safety manual also emphasizes secure workholding, full blade speed before contact, and waiting for a complete stop before raising the head.
Cutting Technique for Clean Aluminum Edges
The cut itself should feel controlled, not fast. Start the motor and let the blade reach full speed before it touches the aluminum. Starting against the stock can make the teeth grab the profile before the blade has developed stable cutting speed.
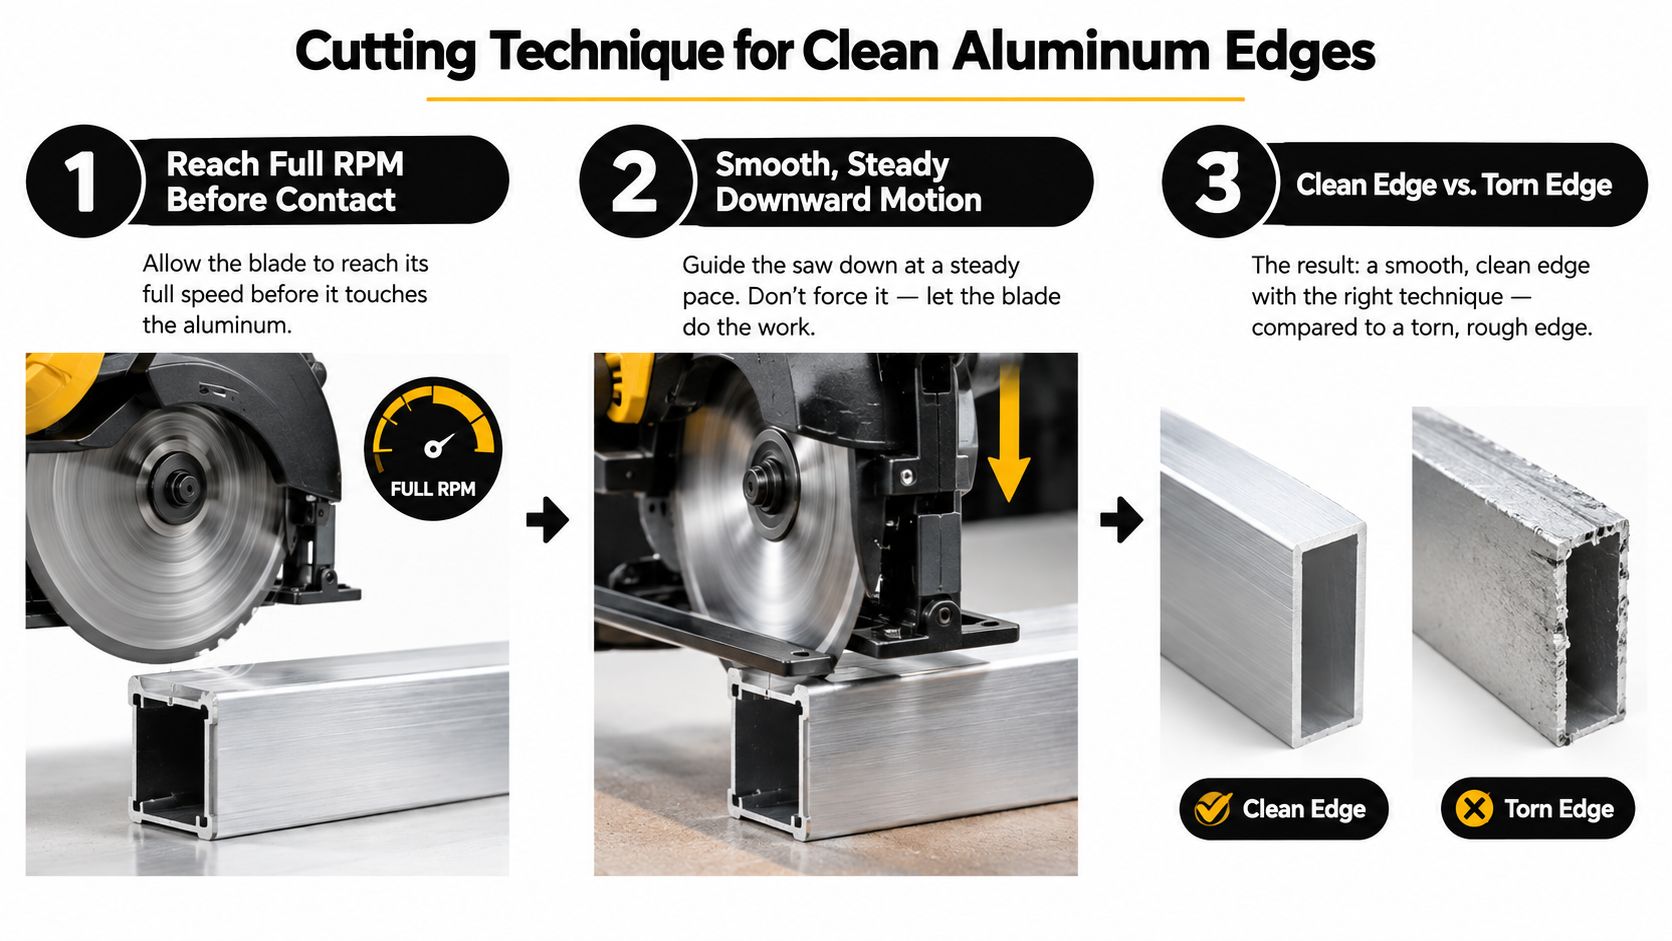
Lower the head slowly and steadily. Let the carbide teeth shear small chips instead of ripping through the material. If the cutting tone rises sharply, the feed is probably too aggressive. If the blade stalls or smears material, back off and reassess the blade, RPM, profile support, and lubrication.
Keep the extrusion tight against the fence and table for the entire pass. A small shift in the middle of a miter cut creates a step, a burr, or a hooked edge that can prevent two profiles from seating together. Don't pump the head through the material with several aggressive plunges. A single controlled pass is usually easier on the blade and the workpiece.
Finish the pass before raising the head
Complete the cut so the blade exits the material cleanly. Once the cut is through, hold the saw head down and wait for the blade to stop completely before lifting it. Removing the offcut while the blade is coasting can pull the material back across the teeth.
Long extrusions sometimes need a brief pause at the end of the pass so chips can clear. Don't dwell in one location, though. Holding the blade in the kerf builds heat and encourages aluminum to smear onto the teeth and gullets.
Deburr the edge immediately with a file or deburring tool. Freshly cut aluminum is sharp, and a burr can prevent a frame, connector, or trim joint from seating correctly.
Mistakes That Ruin Aluminum Cuts and Blades
The most expensive shortcut is installing a wood blade because it's already on the saw. Wood blades have tooth geometry and gullets intended for wood fibers, not gummy aluminum chips. The result can be grabbing, hot chips, aluminum buildup, a damaged finish, and a blade that loses its edge quickly.
Forcing the cut creates a second set of problems. Excessive feed pressure can make the blade bind, increase melting, and push the profile away from the fence. Thick extrusion needs patience, and when the section exceeds what the saw and blade can handle comfortably, changing tools is better than leaning harder on the motor.
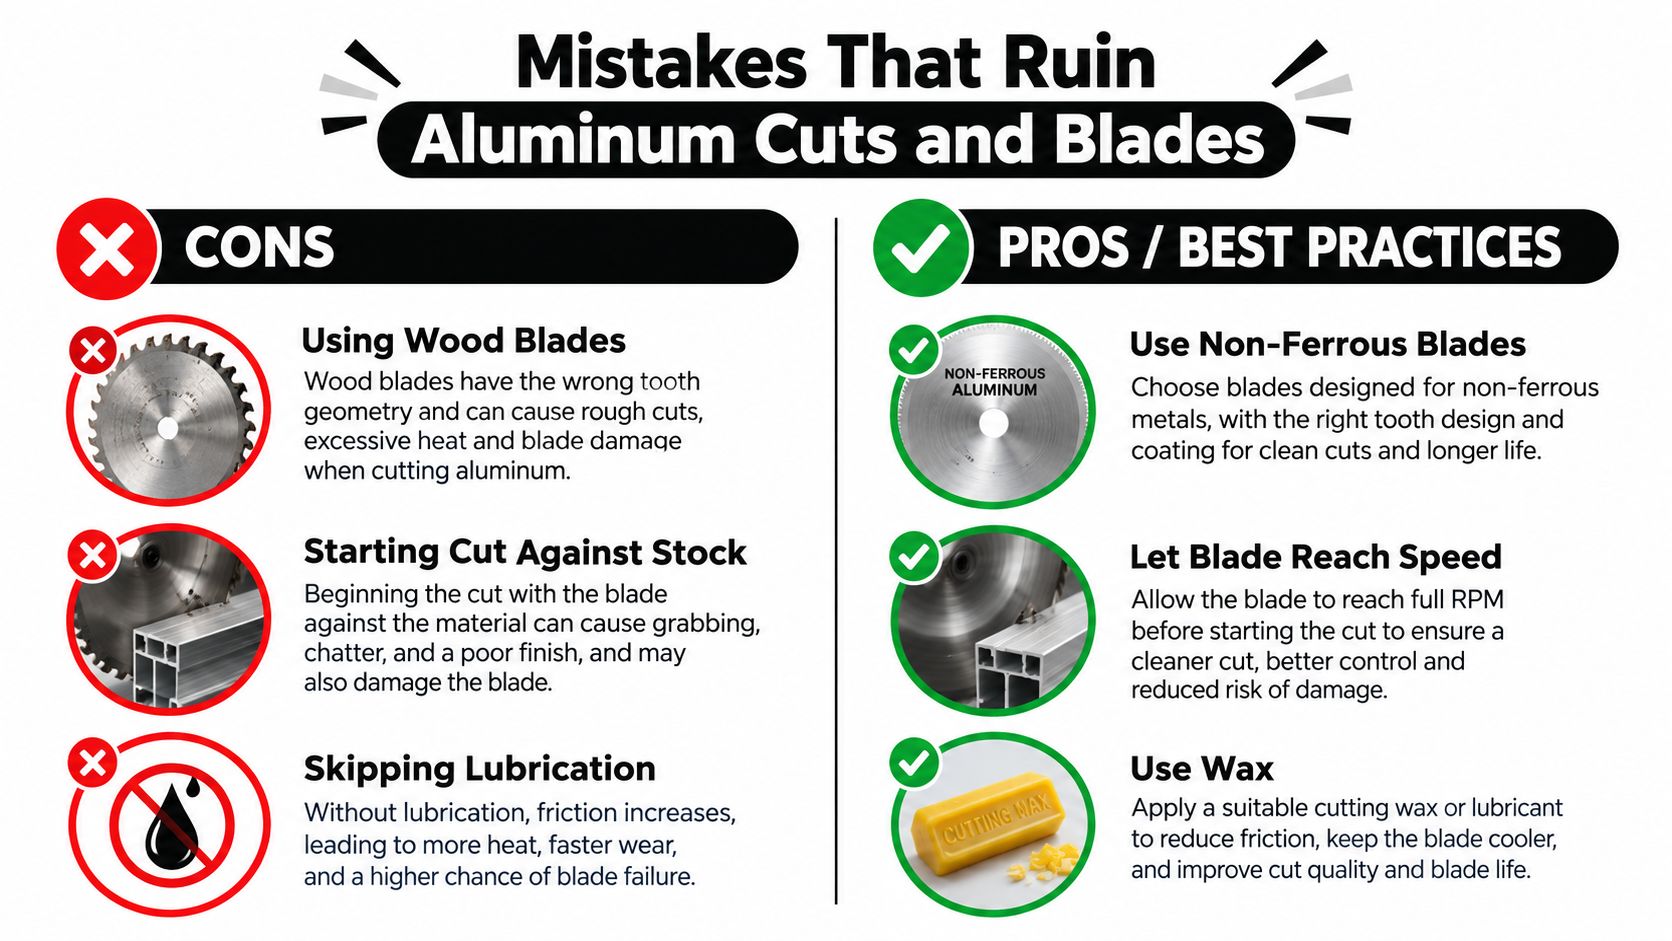
Skipping clamps because the stock looks flat is another bad trade. The profile may stay still during entry and then move as the blade exits, which is exactly when a loose cutoff can snag or wedge. A nicked tooth is cheaper than an injured hand, but neither should happen when a clamp would have prevented the movement.
Watch speed, battery condition, and buildup
A depleted cordless battery can reduce cutting performance and encourage the operator to push harder. That combination produces gummy chips, heat, and poor finish. Use a charged battery, respect the blade's maximum RPM, and stop if the saw no longer maintains a stable cutting sound.
Blade buildup also changes the cut. Aluminum fines and lubricant residue can collect in the gullets, reducing chip clearance. Clean the blade with the manufacturer-approved method rather than scraping the teeth with bare metal.
You can extend a blade's useful life with proper maintenance, but sharpening isn't a remedy for the wrong blade or poor setup. The saw blade sharpening guide is more relevant after you've confirmed that the blade is designed for the material and hasn't been damaged by binding.
A blade that's hot, loaded with aluminum, or cutting crooked is giving you a warning. Stop before the warning becomes a broken tooth.
Never cut aluminum without checking the manual's approved materials. Using the saw outside its stated application can create safety problems, damage the arbor or guard, and complicate warranty support.
Safety, Cooling, and Finishing on the Jobsite
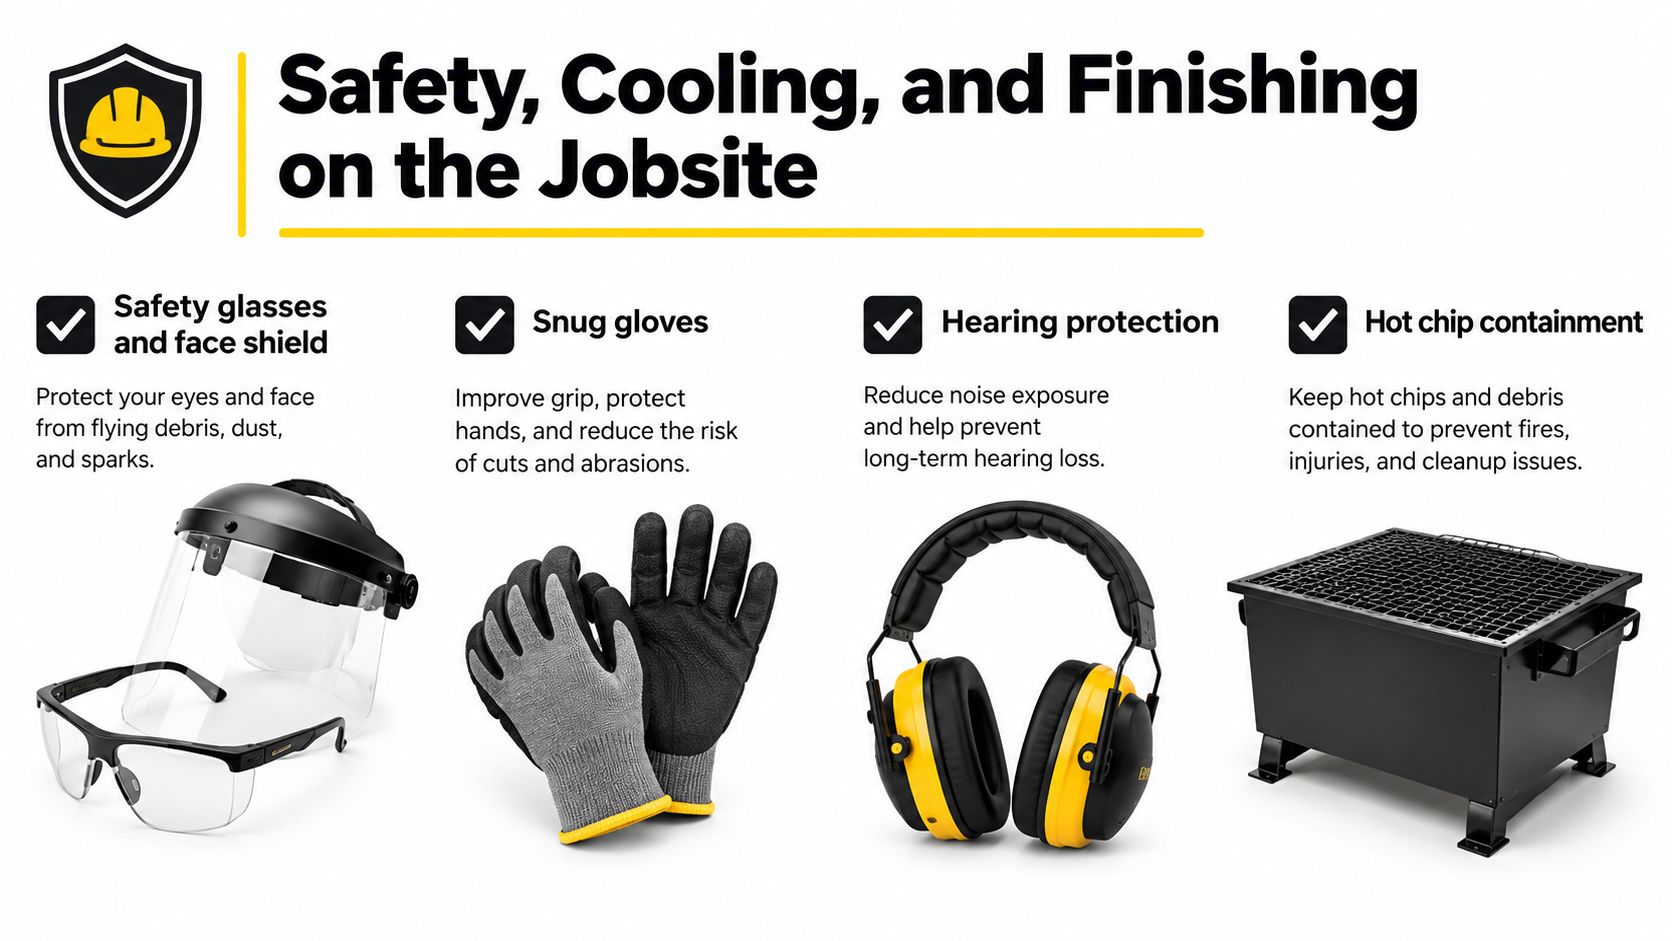
Aluminum cutting changes the work area. Sparks and hot chips can ignite sawdust, packaging, or other combustible debris, so clear the station before cutting and keep a Class ABC fire extinguisher within reach. The area should function like a controlled hot-work zone even when the material is non-ferrous.
Wear safety glasses and a face shield, snug gloves, and hearing protection. Aluminum chips are sharp and can leave the blade at speed. Gloves must fit closely enough that they can't catch on the work or controls, and they're not a substitute for clamping.
Control heat during repeated cuts
For long production runs, use stick wax, blade lubricant, or a light cutting fluid approved for the blade and material. Lubrication reduces friction and helps limit aluminum buildup, but it doesn't compensate for an incorrect tooth pattern, excessive feed, or an unsupported profile. Apply it carefully so it doesn't contaminate surfaces or create a slip hazard on the table.
The saw should be brought to full speed before contact, and the operator should let the blade stop fully before lifting the head. Those habits reduce binding and kickback risk, especially when the cut is nearly complete.
After every cut, deburr the edge with a file or deburring tool. Then brush chips from the table and blade area with a brass or nylon brush, never with bare hands. Wipe the blade with a solvent-soaked rag suitable for its coating and manufacturer instructions, removing resin and aluminum fines before storing it dry.
The power tool safety guidance is a useful companion for building a consistent PPE, inspection, and cleanup routine. A short end-of-cut inspection also catches loose clamps, damaged teeth, and chips under the fence before they affect the next piece.
Building a Miter Saw Setup That Pays for Itself
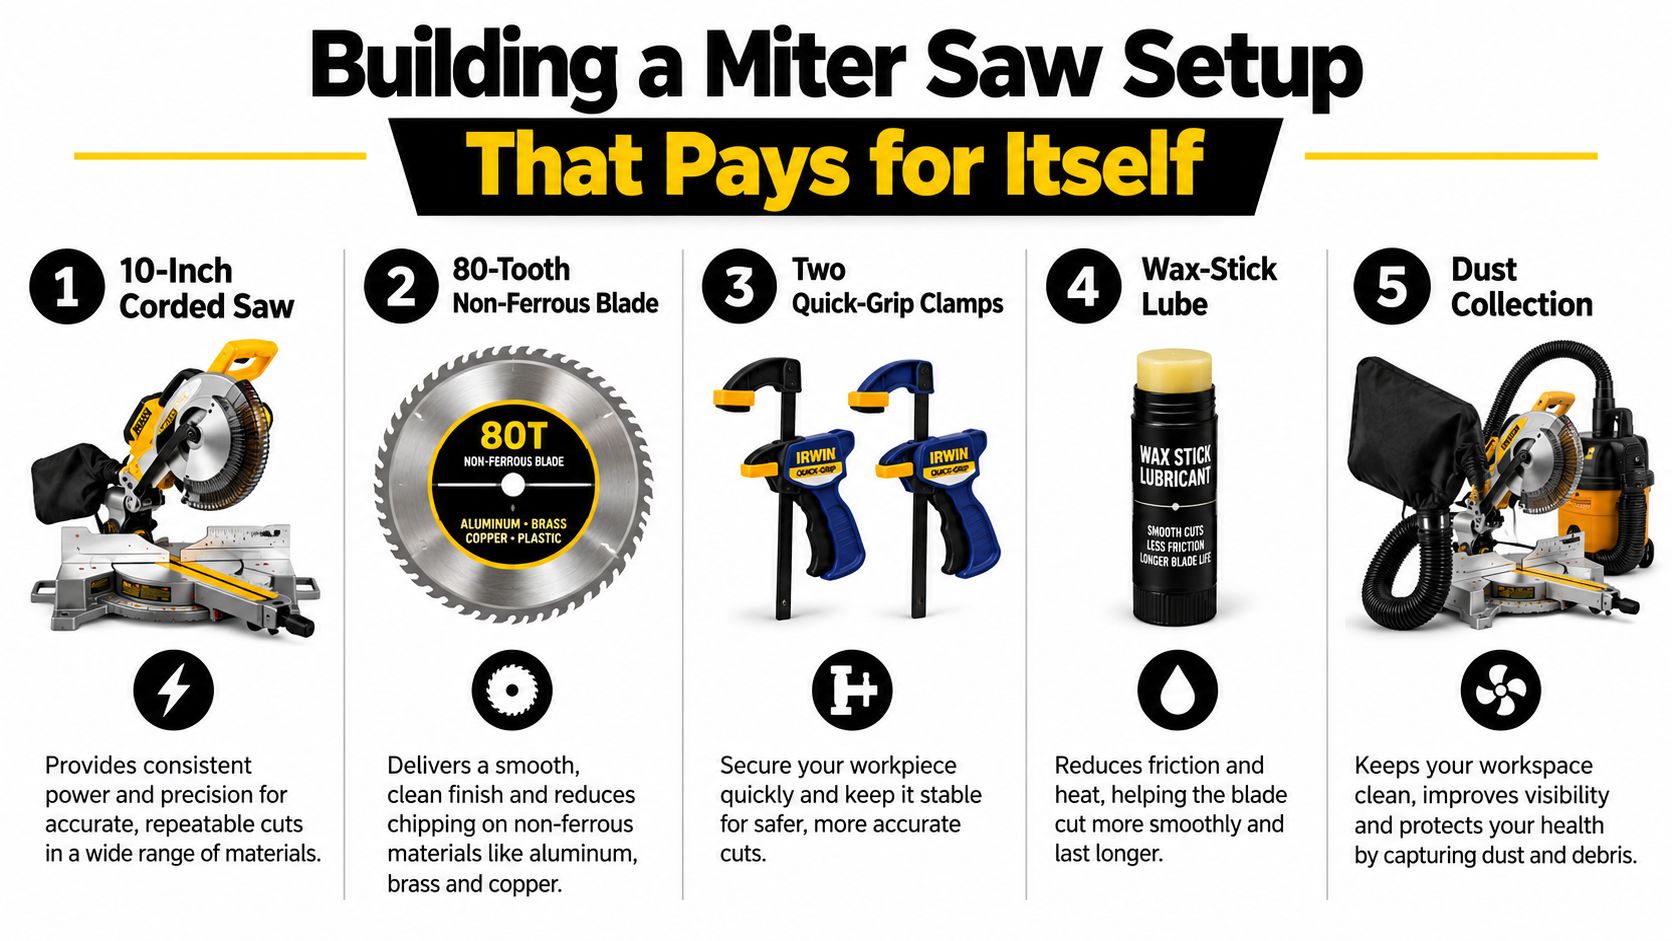
A practical aluminum station starts with a 10-inch corded miter saw whose manual approves non-ferrous cutting, an 80-tooth non-ferrous blade, two quick-grip clamps, a wax stick, and a labeled cutoff bin. Add roller support for long extrusion and a sacrificial insert for narrow profiles. Before cutting, check the manual, blade condition, fence alignment, clamp clearance, and the material's fit within the saw's rated capacity.
Each item controls a different source of waste. The correct blade limits damaged stock and premature tooth wear. Clamps stop shifted miters from creating rework. Wax helps manage heat during repeated cuts, while a cutoff bin keeps hot scrap and sharp offcuts away from the operator's feet and the next workpiece.
Choose equipment around the work
A corded saw suits a shop or crew making repeated cuts near reliable power. A cordless saw is easier to move between rooms or rooftops. Plan battery swaps around the cut list so a low pack never forces a harder feed on the last few profiles, especially during hot Sacramento and Central Valley summers when 100°F-plus conditions can affect cooling and handling. In either setup, the approved material list and blade RPM limits come first.
Open-box and bare-tool purchases can lower equipment cost when you already own a compatible battery platform. In Elk Grove, Value Tools Co sells tested and inspected tools, including open-box and bare-tool options, with savings of up to 55% off typical retail pricing. Most items have a 2-day return window. Check the Value Tools Co return policy for current terms, availability, delivery timing, and defective-item procedures before ordering.
A tuned station can cost less than a dedicated cold saw once labor, cleanup, and rework are counted, but only when the material fits the saw's approved capacity. The return comes from square cuts, fewer damaged profiles, and a clean handoff to the installer or next trade.
For aluminum work, Value Tools Co can help you compare tested and inspected miter saws, bare tools, stands, and non-ferrous blades without buying more machine than the job requires. Review current options before building a controlled aluminum-cutting station.


