

You're halfway through feathering a dried drywall patch on a stair riser when the sanding head reaches the inside corner. A random-orbit sander can't sit there, and hand sanding leaves a visible edge. An oscillating multi-tool sanding attachment fits the corner, blends the repair, and handles window trim, cabinet edges, door jambs, and other access-constrained work well. It isn't a replacement for a random-orbit sander on broad panels, tabletops, floors, or production finishing.
The practical rule is simple. Use the oscillating tool when access matters more than coverage, keep the pad moving with light pressure, match OPM and grit to the material, and control the dust at the source.
How an Oscillating Multi Tool Actually Sands
The pad doesn't spin like a random-orbit sander. It moves rapidly from side to side through a short angular arc, making the abrasive scrape across the surface without the broad sweeping motion of a rotating disc. Common oscillating tools operate between about 10,000 and 22,000 oscillations per minute, with published oscillation angles commonly ranging from approximately 1.4° to 3.6°. A narrower angle generally favors control, while a wider angle removes material more aggressively and can transmit more vibration. These operating ranges and trade-offs are outlined in this oscillating multi-tool guide.
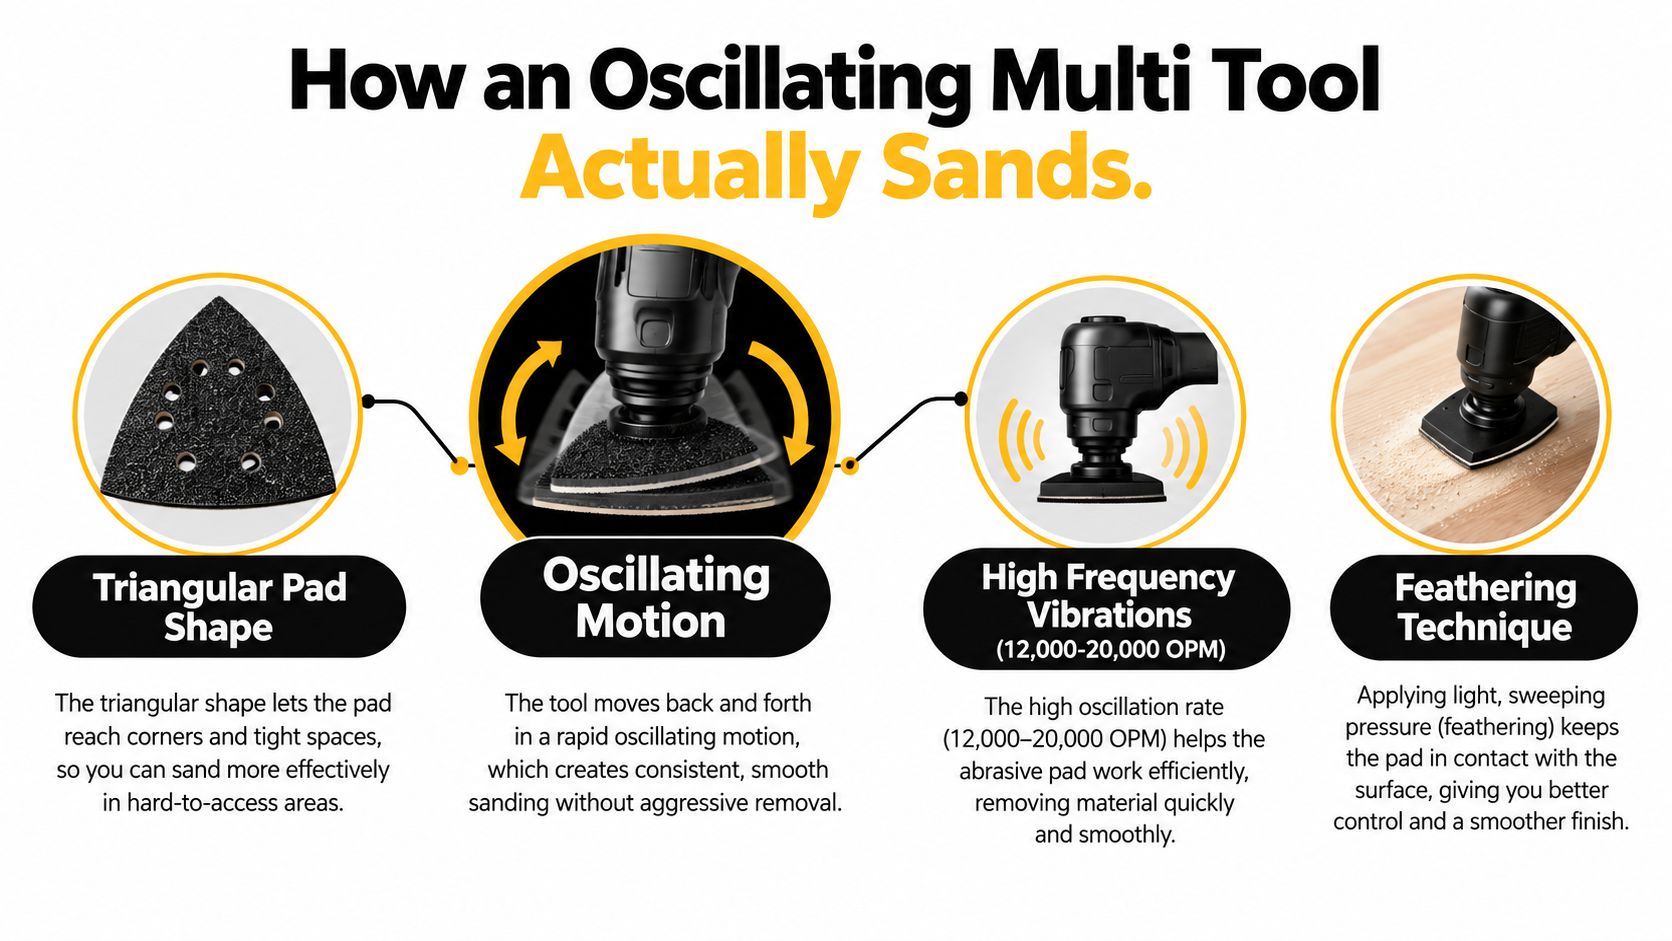
The triangular pad is the reason this tool earns its place on a remodel. Its point reaches inside corners, along stair nosings, around window sills, and beside installed trim where a larger sanding disc can't lie flat. The same point is also the hazard. If you park it at a corner or push down hard, contact pressure concentrates at the tip and can dish soft wood, round an edge, or burn through a thin coating.
FEIN developed the underlying oscillating mechanism in 1967 for a plaster-cast saw that could cut close to a patient's skin without using a continuously rotating blade, as documented by Woodworker's Journal's history of FEIN multi-tools. FEIN later introduced the Delta Sander in 1986, then combined oscillation with interchangeable accessories during the mid-1990s. Its 2007 QuickIN system used a lever for faster accessory changes. That lineage explains the tool's character: controlled, low-excursion movement for localized work, not bulk stock removal.
Control starts with the pad
Keep the pad flat whenever the surface allows it. Use the pointed tip only when the corner requires it, then return to the broader portion of the abrasive for blending. Move through short, overlapping passes instead of scrubbing one spot.
Practical rule: The tool's small arc gives you access. Your hand pressure determines whether that access produces a clean repair or a gouge.
For adjacent flooring or finished surfaces, protect the work area before sanding. The same attention to edge conditions that helps when picking the right outdoor rug applies here too. Protect what you aren't trying to abrade.
Choosing Sanding Pads and Abrasives for the Job
Most oscillating sanding failures start at the accessory, not the motor. A poorly fitted pad, a loaded abrasive sheet, or a hole pattern that doesn't match the extraction path will make the tool feel weak and leave inconsistent marks. Check that the sanding pad seats fully, the hook-and-loop face is clean, and the abrasive reaches the working edge without lifting.
A triangular pad is the general-purpose choice for corners and trim. A rectangular or segmented pad gives better contact along a narrow profile, while a finger-style accessory reaches recesses that are too tight for a full triangular face. Perforated pads are preferable when the abrasive and vacuum system share compatible extraction holes. For a tight profile where extraction isn't practical, a non-perforated sheet may fit better, but you'll need stronger local dust control.
Hook-and-loop systems make grit changes quick and allow you to replace only the worn sheet. Clamp-style systems can hold standard abrasive material, but trimming and tensioning take more time. FEIN's QuickIN lever is an example of a rapid-change approach that avoids a slower tool-based fastening process. Before purchasing replacement parts, confirm the mounting pattern and compatibility with your tool. A useful reference for matching cutting, scraping, and sanding accessories is Value Tools Co's guide to multi-tool blade types.
Match the abrasive to the work
Use P80 to P120 when you need to level a defect, remove an old coating, or reduce a raised repair. Move to P180 to P240 for surface refinement rather than trying to make one coarse sheet do every stage. Coarser abrasives cut faster but leave deeper scratches, and the small oscillating pad isn't efficient at erasing a deep scratch pattern with a much finer sheet.
| Pad or Accessory | Best For | Typical Grit Range |
|---|---|---|
| Triangular perforated pad | Corners, trim, window sills, cabinet edges | P80 to P240 |
| Triangular non-perforated pad | Tight profiles and localized hand-cut sheets | P80 to P240 |
| Rectangular or segmented pad | Narrow edges, profiles, and installed surfaces | P120 to P240 |
| Finger sanding accessory | Recesses, grooves, and restricted details | P80 to P180 |
| Hook-and-loop abrasive sheet | Fast grit changes and repeat repairs | P80 to P240 |
The correct accessory reduces wasted abrasive, but it won't compensate for excess pressure. If the paper loads, replace it. Pressing harder only increases heat and friction.
Building a Repeatable Sanding Workflow
A reliable workflow starts before the tool touches the surface. Identify whether you're removing material or refining a surface, choose the pad that keeps the tool flat, and set a moderate speed that suits the substrate. For leveling defects or stripping old coating, start around P80 to P120. For final refinement, progress through P180 to P240, allowing each stage to erase the previous scratch pattern, as described in the controlled MDF sanding research from Case Western Reserve University's ETD repository.
Use overlapping passes and keep the pad moving. On a stair riser or door jamb, work from the repair into the surrounding finish so the transition becomes gradual. Don't swing the tool like a rotary sander. The oscillating pad already creates rapid abrasive contact, so short controlled movements are easier to monitor.
A field sequence that holds up
- Level only what needs leveling. Use P80 or P120 for a ridge, old coating, or uneven filler. If the surface is already close, start finer.
- Keep the pad flat. Light hand pressure is enough. Let the abrasive cut instead of forcing the motor against the work.
- Move past corners quickly. The triangular tip concentrates pressure and can create a dish or burn mark when you dwell.
- Vacuum between grits. Dust left on the surface can mask scratches and contaminate the next abrasive.
- Inspect under raking light. Shine light across the surface, not directly at it. Cross-grain marks and remaining coarse scratches show more clearly.
- Advance only when the previous pattern is gone. Jumping from P80 directly to P240 often leaves scratches that the fine sheet can't remove efficiently.
The highest speed setting belongs to controlled stock removal, not the finish pass. On a visible trim repair, a slower setting and lighter contact give you more time to react before the pad cuts through the surrounding coating.
Record the abrasive grade, speed setting, extraction setup, and pass count on repeat jobs. That simple note turns an improvised patch into a process you can reproduce on the next unit, stair, or window opening.
Sanding Different Materials Without Damage
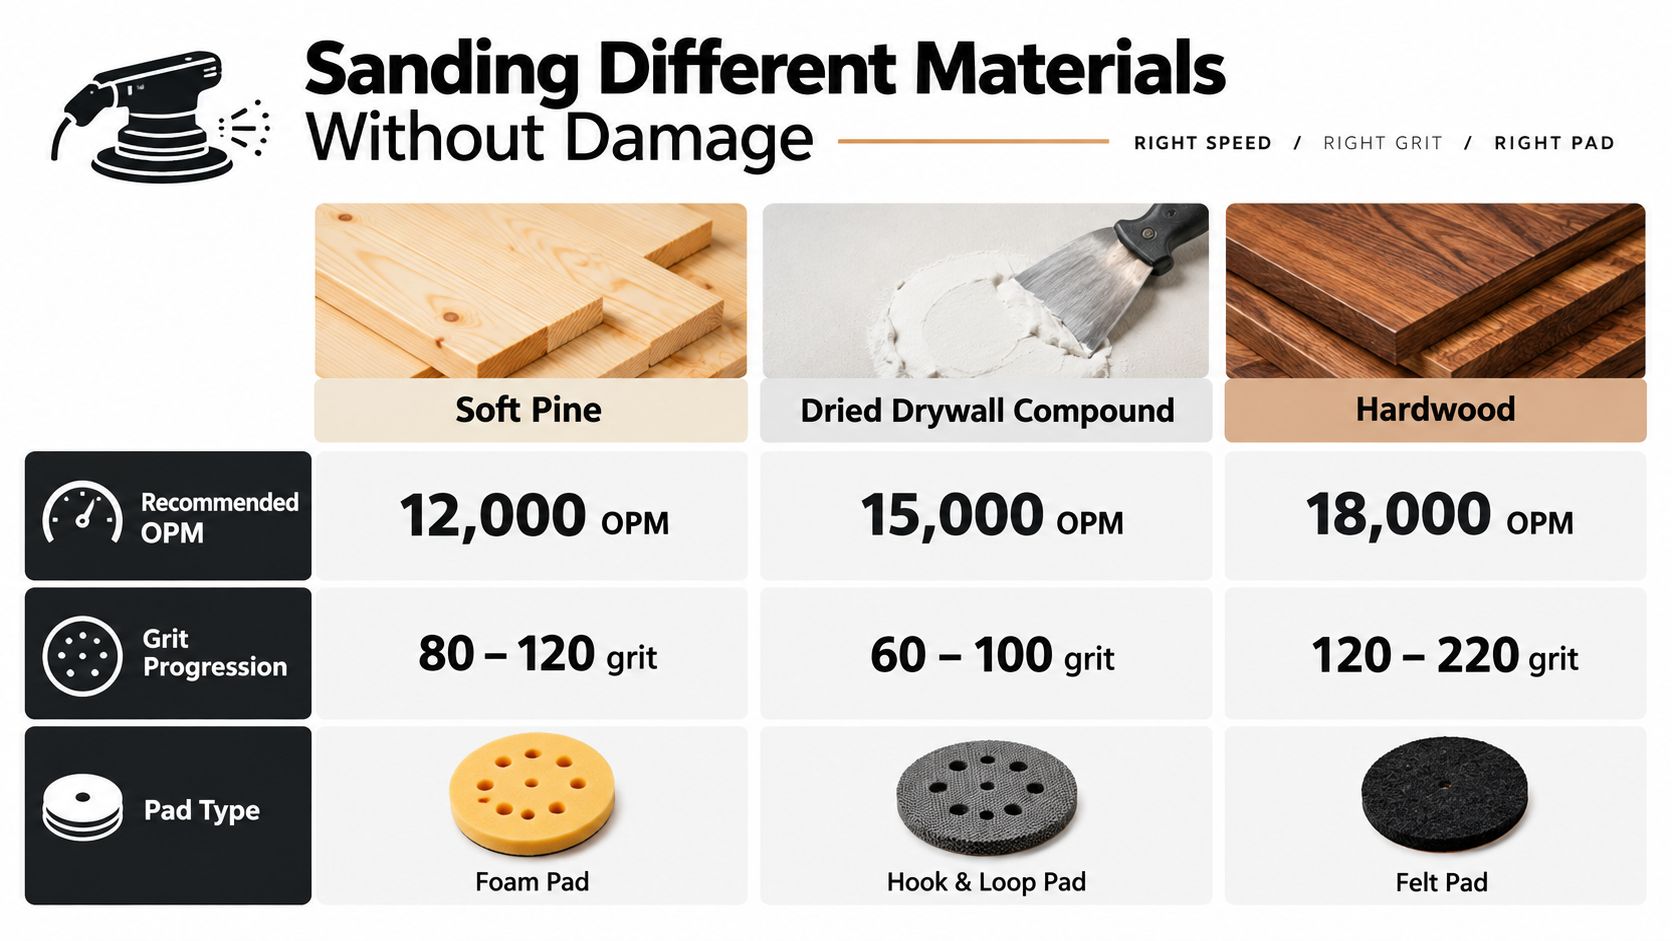
Soft pine and dried drywall compound punish heavy hands. Lower the OPM, keep the pad moving, and use feather-light contact near transitions. The supplied sanding guide presents 12,000 OPM and P80 to P120 for soft pine, 15,000 OPM and P60 to P100 for dried drywall compound, and 18,000 OPM and P120 to P220 for hardwood. Those settings are useful starting points, not permission to hold the trigger wide open on every surface.

| Material | Pressure | Speed approach | Pad choice |
|---|---|---|---|
| Soft pine | Feather-light | Reduce OPM to limit gouging | Flat triangular pad, fine control |
| Dried drywall compound | Very light | Use a manageable low-to-mid setting | Perforated pad where compatible |
| Hardwood | Light and steady | Higher OPM can support controlled removal | Flat pad with fresh abrasive |
| Veneer | Barely enough to maintain contact | Slow, frequent inspection | Fine grit and broad pad contact |
| Painted trim | Light, moving passes | Lower speed for feathering | Triangular or segmented pad |
| Metal | Moderate control, no forced pressure | Follow abrasive and tool limits | Metal-rated abrasive, no extraction |
Hardwood and stubborn paint tolerate more aggressive work, but they still load abrasives. A fresh sheet cuts cooler and more evenly than a clogged one. On veneer and end grain, use extra caution because the small pad can remove the surface faster than your eye catches it. A dedicated detail sander or hand block may be safer when the finish margin is thin.
Metal sanding requires a separate rule. The Power Tool Institute warns that a dust-extraction attachment must not be used while sanding metal because sparks and hot particles can enter the extraction system and create a smoking or ignition risk, as stated in its multi-tool safety guidance. Use a metal-appropriate abrasive, control sparks and hot debris, and follow the tool and accessory manufacturer's instructions.
On mixed-material repair work, never assume the vacuum is universal protection. Extraction is helpful for compatible wood, drywall, and painted surfaces, but it isn't the correct setup for metal sanding.
Dust Control as a Safety System
Oscillating multi-tool sanding can create fine airborne dust, especially when the abrasive stays in contact with a small area for repeated passes. Dust control begins with the pad. Use a perforated sanding pad matched to the abrasive, connect a properly rated vacuum where possible, and keep extraction running before contact and briefly after lifting the tool.
The exposure question changes with the material. NIOSH reports short-term total-dust concentrations during automotive body-filler sanding as high as 40 mg/m³, compared with its recommended 8-hour time-weighted average limit of 10 mg/m³ for total dust, in the NIOSH engineering-control evaluation. That measurement concerns autobody sanding, not every oscillating-tool setup, but it shows why “I'll clean it up later” is a poor control strategy.
Masonry, concrete, mortar, stone, and some engineered materials create an added silica concern. OSHA estimates that approximately 2.3 million U.S. workers are exposed to crystalline silica on the job, and its silica framework uses a respirable-crystalline-silica permissible exposure limit of 50 µg/m³ and an action level of 25 µg/m³, as summarized in the supplied occupational-safety guidance. Treat those figures as a reason to control dust at the workpiece, not as a substitute for a site-specific exposure assessment.

Jobsite controls that actually help
- Connect extraction early. Start the vacuum before the pad contacts the surface and let it run briefly after the pass.
- Keep holes open. Excessive downward pressure blocks airflow and loads the abrasive.
- Replace clogged paper. Increasing pressure raises friction, heat, and uneven removal.
- Vacuum the work area. Don't use compressed air to blow fine dust into the room.
- Isolate occupied spaces. Protect doorways, nearby cabinetry, and HVAC returns during interior renovation.
- Match protection to the substrate. Use suitable eye and respiratory protection for wood, MDF, coatings, drywall compound, and silica-containing materials.
A wood-dust field study found sanding had the highest median 8-hour time-weighted exposure at 3.2 mg/m³, with 40% of sampled sanders above 5 mg/m³ and 60% above 3 mg/m³, according to the published Annals of Work Exposures and Health study. Those results reinforce the practical point: extraction affects both worker exposure and sanding performance. For broader household cleanup context, you can also browse the Miami dust guide.
For compatible nonmetallic sanding, the right vacuum and pad combination can keep dust out of finished rooms and cabinet hardware. Guidance on matching extraction equipment to FEIN systems is available in Value Tools Co's information about FEIN dust extractors.
When to Reach for an Oscillating Sander and When to Skip It
The oscillating sander wins when the surface is small, installed, irregular, or boxed in by surrounding work. It loses when the job is broad, flat, and finish-sensitive. A random-orbit sander spreads contact over a larger disc and leaves a more consistent result on panels, doors, furniture, and cabinet faces. A dedicated detail sander offers similar corner access with a sanding-focused design, while a spindle sander belongs on curved edges and repeat profile work.
| Sanding task | Oscillating multi-tool | Better alternative |
|---|---|---|
| Inside cabinet corner | Excellent access | Detail sander if repeated |
| Stair riser repair | Strong for localized blending | Random-orbit for broad faces |
| Window trim and jambs | Good around installed work | Detail sander for regular production |
| Broad tabletop | Slow and uneven risk | Random-orbit sander |
| Full drywall seam | Poor coverage | Larger dedicated sander or hand system |
| Veneer repair | Usable with extreme care | Hand sanding or controlled detail sander |
| Heavy stock removal | Inefficient | Belt sander |
| Curved edge profiles | Limited by pad shape | Spindle sander |
Match the purchase to the crew
A remodeler, trim carpenter, flooring repair technician, or DIY homeowner handling patch work benefits from the oscillating tool's ability to cut, scrape, and sand without changing the basic platform. A bare tool, or herramienta sola, makes sense when the battery platform is already on the truck. Variable speed and low vibration matter more than the largest advertised OPM, particularly when one tool must move from drywall compound to hardwood trim.
A random-orbit sander is the better first dedicated sander for broad finish work. A detail sander makes sense for crews that spend much of the day on corners and profiles. A belt sander is for fast removal, not delicate blending. Brushless, or sin escobillas, motors can be attractive for users already invested in a cordless system, but motor type doesn't change the pad's limited coverage.
An impact driver, or atornillador de impacto, can share a battery ecosystem with the oscillating tool, but it doesn't make the sanding attachment faster or more suitable for large panels. Buy around the work, not around the number of tools in the kit.
For furniture preparation, sanding is still often the most predictable route when the existing coating or surface needs mechanical adhesion. A practical companion resource on painting furniture with smarter prep can help you decide whether the surface needs sanding at all.
Putting It Together and Picking Up the Right Tool
Keep this checklist in the tool case:
- Confirm pad fit. The mounting face should seat fully, and the abrasive should match the pad.
- Set OPM to the material. Start conservatively on pine, drywall compound, veneer, and painted trim.
- Choose the grit sequence. Use coarse paper only for removal, then progress through intermediate and fine grades.
- Run compatible extraction. Use perforated pads and a vacuum for nonmetallic work where the setup is approved.
- Keep the pad moving. Don't dwell at the triangular tip or force the tool with downward pressure.
- Inspect with raking light. Look for remaining coarse scratches, edge rounding, and swirl-like marks.
- Replace loaded paper. Fresh abrasive is cheaper than repairing a gouge or repainting a contaminated surface.
Who This Is For
This tool suits remodelers, trim carpenters, flooring-repair technicians, maintenance crews, and DIYers who regularly sand installed materials, corners, stair risers, cabinet edges, window trim, and small drywall repairs. It's particularly useful when the same job also requires cutting, scraping, or grout work and changing tools would slow the repair.
Who Should Avoid This
Production finish crews, large-paint contractors working across broad surfaces, and anyone whose main need is fast, uniform sanding across panels should buy a dedicated random-orbit, sheet, belt, or spindle sander instead. The oscillating tool's strength is access, not speed or finish consistency over a large area.
For buyers comparing a cordless oscillating multi-tool, Value Tools Co offers relevant options and sanding accessories, including the CRAFTSMAN CMA0220 sanding pad. Its cordless oscillating multi-tool guide is a useful starting point when matching a tool to an existing battery platform. In the Sacramento and Central Valley region, summer heat above 100°F can affect battery cooling, so keep packs out of direct sun and allow them to cool between demanding tasks.
Value Tools Co operates from an Elk Grove warehouse, with same-day local pickup available for suitable inventory. Its 30-Day Peace of Mind Guarantee covers tested and inspected tools, 30-day returns by mail or in-store, and free return shipping on defective items. Open-Box and Bare Tool options can offer savings of up to 55%, which is useful when you need a specialist access tool without paying for a full kit.
If your next repair involves corners, trim, drywall patches, or installed window work, compare the right oscillating tool, compatible sanding pad, and extraction setup at Value Tools Co. Sacramento-area buyers can check Elk Grove pickup options, while mail-order customers can use the 30-Day Peace of Mind Guarantee to buy with a clear return path.


