

You're halfway through refinishing a maple countertop, the 80-grit disc is gray with dust, and the surface still shows planer marks under the shop light. You tear it off, press on a fresh 120, and the sander immediately feels different. That change isn't in the motor. It's in the random orbital sander sandpaper, because the disc is doing the cutting while the tool controls its motion.
The practical rule is simple: choose the starting grit for the deepest defect, progress through grits without asking a fine disc to erase coarse scratches, and match the disc's diameter and hole pattern to the pad. Abrasive mineral matters too. Aluminum oxide handles everyday woodwork, zirconia alumina earns its keep on aggressive removal and metal, and silicon carbide belongs on hard finishes and composites. A dust-free setup, such as the guidance collected for find dust free orbital sanders, also makes a bigger difference than most multi-grit charts admit.
What Random Orbital Sander Sandpaper Does on the Job
A fresh 80-grit disc can level planer marks quickly, while a loaded disc of the same grit may only polish the high spots. The random orbital sander spins and orbits at once, sending the abrasive across the surface in overlapping directions. That motion reduces the straight grooves associated with sheet sanding and the directional pattern left by a belt sander, but it does not rescue a worn disc. Sandpaper condition still controls the result.
The disc does the cutting
An 80-grit disc removes stock, old finish, and uneven wood quickly. It also leaves a scratch pattern that must be removed before finishing. Move to a 120-grit disc after the major defects are gone. It refines the coarse scratches and produces a more even texture. Finer grades prepare bare wood for stain or finish and scuff cured coatings without removing material as aggressively.
Change discs before they appear completely dead. Abrasive can feel rough while resin and dust have already filled the cutting spaces. Once loaded, the disc rubs instead of cutting, creating heat and increasing the chance of pigtails or burn marks. Pressing harder usually makes that failure worse.
Practical rule: If the disc no longer removes material cleanly, replace it. Extra pressure transfers the problem to the workpiece.
Tool choice affects the scratch pattern and the speed of removal. A belt sander handles rapid, directional flattening. Sheet sanding gives direct control over a smaller abrasive face. A random orbital sander fits between them, covering broad surfaces quickly while remaining suitable for finish preparation when you keep the pad flat and moving. Use this belt sander versus random orbital sander comparison when deciding which tool should flatten and which should refine.
Dust control also affects disc life. A setup that clears dust from the work and disc, such as the guidance collected for find dust free orbital sanders, helps prevent premature loading.
Market estimates vary, but both reports indicate continuing demand for replacement discs. One estimate places the category at about USD 1,050.9 million in 2025, growing to USD 1,500 million by 2035 at a 3.6% CAGR. A broader estimate places it at USD 2.8 billion in 2025 and projects USD 4.6 billion by 2034 at a 5.6% CAGR. The figures use different methods, so treat them as market context rather than a precise measure. (Wise Guy Reports market estimates)
Anatomy of a Sanding Disc from Backing to Grain
A sanding disc isn't a generic sheet with a hole punched through it. It's a layered abrasive product, and each layer affects how it cuts, flexes, sheds dust, and survives pressure. Manufacturer guides describe the backing, abrasive mineral, and bond construction separately, which is why two discs with the same printed grit can behave differently. (3M random orbital sanding guide)
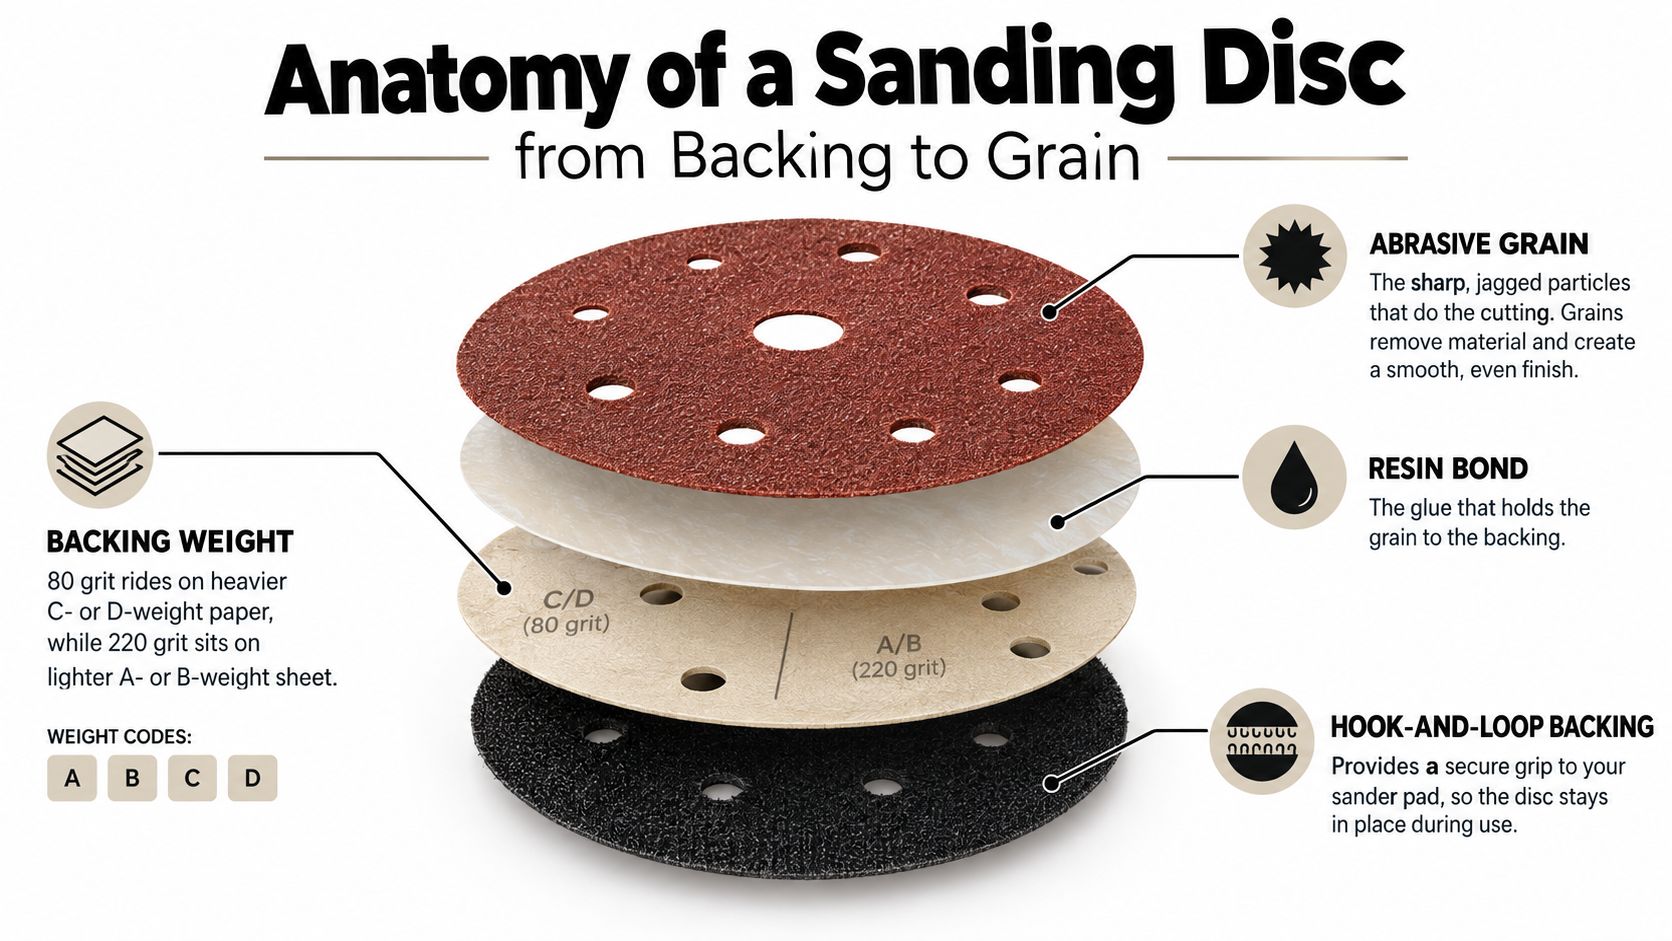
Four layers worth understanding
Backing paper supports the abrasive. Heavier backing generally tolerates more abuse and edge stress, while lighter backing flexes more easily for fine work. Backing weight codes vary by product, so treat them as construction information rather than assuming every manufacturer uses the same combination for every grit.
The hook-and-loop face is the attachment system. Loops on the disc engage hooks on the sanding pad, letting you change from coarse removal to fine finishing in seconds. The grip depends on both sides. A worn, glazed pad can release even a good disc, while a contaminated disc back may not seat evenly.
The make coat bonds the abrasive grain to the backing. The size coat holds and supports those grains under load. Think of the grains as cutting teeth and the resin layers as the structure that keeps those teeth in the correct position while the pad moves.
Mineral and coat pattern
The three common minerals are aluminum oxide, zirconia alumina, and silicon carbide. They don't cut or wear in the same way, so selecting by habit can cost more than selecting by price.
A closed-coat disc carries dense grain coverage and can produce a consistent finish. An open-coat disc leaves more space between grains, which helps reduce loading on softwoods, resinous lumber, and some painted surfaces. No coat pattern eliminates clogging when the material is gummy or the dust extraction is poor, but the construction can give you more working time.
Choosing the Right Grit Sequence for Each Task
Start with the grit that removes the worst defect without creating unnecessary work. Coarse grades around 60 to 100 remove material quickly, medium grades around 100 to 150 handle general smoothing, and fine grades around 150 to 320 prepare surfaces for finishing. (Home Depot sanding guidance)
A working grit ladder
For stripped hardwood floors or heavy millwork, begin at 60 or 80 if the surface has deep marks or uneven finish. Rough lumber and paint removal often call for 100 or 120, depending on how much material must come off. Bare wood that's already flat commonly moves through 150 or 180, while cabinet preparation and between-coat scuffing may finish at 220 or 320, according to the coating and finish schedule.
Don't move up because the surface feels smoother. Move up when the previous scratch pattern is gone. Run your fingertips across the workpiece, inspect it under raking light, and check edges where coarse scratches often hide. If you can still see lines from the previous disc, the next disc hasn't earned its place yet.
Scratch-removal rule: A finer grit should refine the surface, not be asked to rescue an incomplete pass from the grit before it.
| Task | Start Grit | End Grit | Typical Steps |
|---|---|---|---|
| Stripped hardwood or heavy millwork | 60–80 | 150–180 | 60 or 80, 100 or 120, 150, then 180 |
| Rough lumber and paint removal | 100–120 | 180–220 | 100, 120, 150 or 180, then 220 |
| Bare wood finish preparation | 150–180 | 220 | 150 or 180, then 220 |
| Cabinet preparation | 150 | 220 | 150, then 180 and 220 if scratches remain |
| Between-coat scuffing | 220 | 320 | 220 or 320 with light pressure and controlled speed |
A jump from coarse to fine often looks efficient on a chart but fails on the job. Deep scratches remain visible after stain or clear coat, and you have to return to an earlier grit. For a closer look at where a finer disc fits in the progression, see Value Tools Co's guide to 200-grit sandpaper.
Matching Abrasive Mineral to Wood, Metal, and Paint
The grit number tells you the relative size of the abrasive, but the mineral tells you how those edges behave. That distinction matters when a disc is clogging, dulling, or leaving a finish that doesn't match the label.
| Mineral | Cut Life | Best Materials | Typical Use |
|---|---|---|---|
| Aluminum oxide | Balanced and economical | Softwood, hardwood, paint, general trim | Everyday sanding and finish preparation |
| Zirconia alumina | Tough and durable under heavy load | Hardwood floors, bare metal, welds | Aggressive stock removal and high-volume work |
| Silicon carbide | Sharp cut with a brittle grain | Hard finishes, fiberglass, clear coat, composites | Fine finishing and controlled surface refinement |
Aluminum oxide for general work
Aluminum oxide is the practical workhorse. It's affordable, available in many hook-and-loop assortments, and suitable for hardwoods, softwoods, and paint-prep work. Its grain can fracture during use and expose new edges, which helps it remain useful across ordinary trim and furniture tasks.
Its limitation appears when the workpiece is hard or the removal rate is high. On bare metal, welds, or repeated heavy passes, a tougher mineral may deliver more usable cutting time even if the pack price is higher.
Zirconia for removal and metal
Zirconia alumina is the choice when the disc has to withstand more load. It fits floor sanding, hard stock removal, bare metal, and weld cleanup better than a basic aluminum oxide disc. The relevant comparison isn't only the price per disc. It's the amount of work completed before the abrasive becomes ineffective.
A zirconia disc can be excessive for light cabinet scuffing or a final paint-prep pass. On those jobs, its aggressive behavior can remove more material than you intended.
Silicon carbide for finishing
Silicon carbide has a sharp, brittle grain that works well on hard finishes, shellac or polyurethane between coats, fiberglass, and automotive clear coat. It's a poor default for raw wood because the sharper cutting action can be wasted on a material that aluminum oxide handles economically. Use it when the surface and finish demand a clean, controlled cut, not just because the number on the package is finer.
Hook-and-Loop Sizing and Hole Patterns That Fit
Most wasted discs come from two fit errors. The diameter doesn't match the pad, or the extraction holes don't line up. A 5-inch disc belongs on a 5-inch pad, and a 6-inch disc belongs on a 6-inch pad, regardless of whether the tool is a DeWalt, Makita, Milwaukee, Ryobi, or another brand.
Common random orbital sander discs use 5-inch or 6-inch diameters, with 3-inch discs used for detail work. Five-inch, 8-hole hook-and-loop assortments are commonly sold specifically for random orbit sanders. (POWERTEC 5-inch 8-hole assortment)
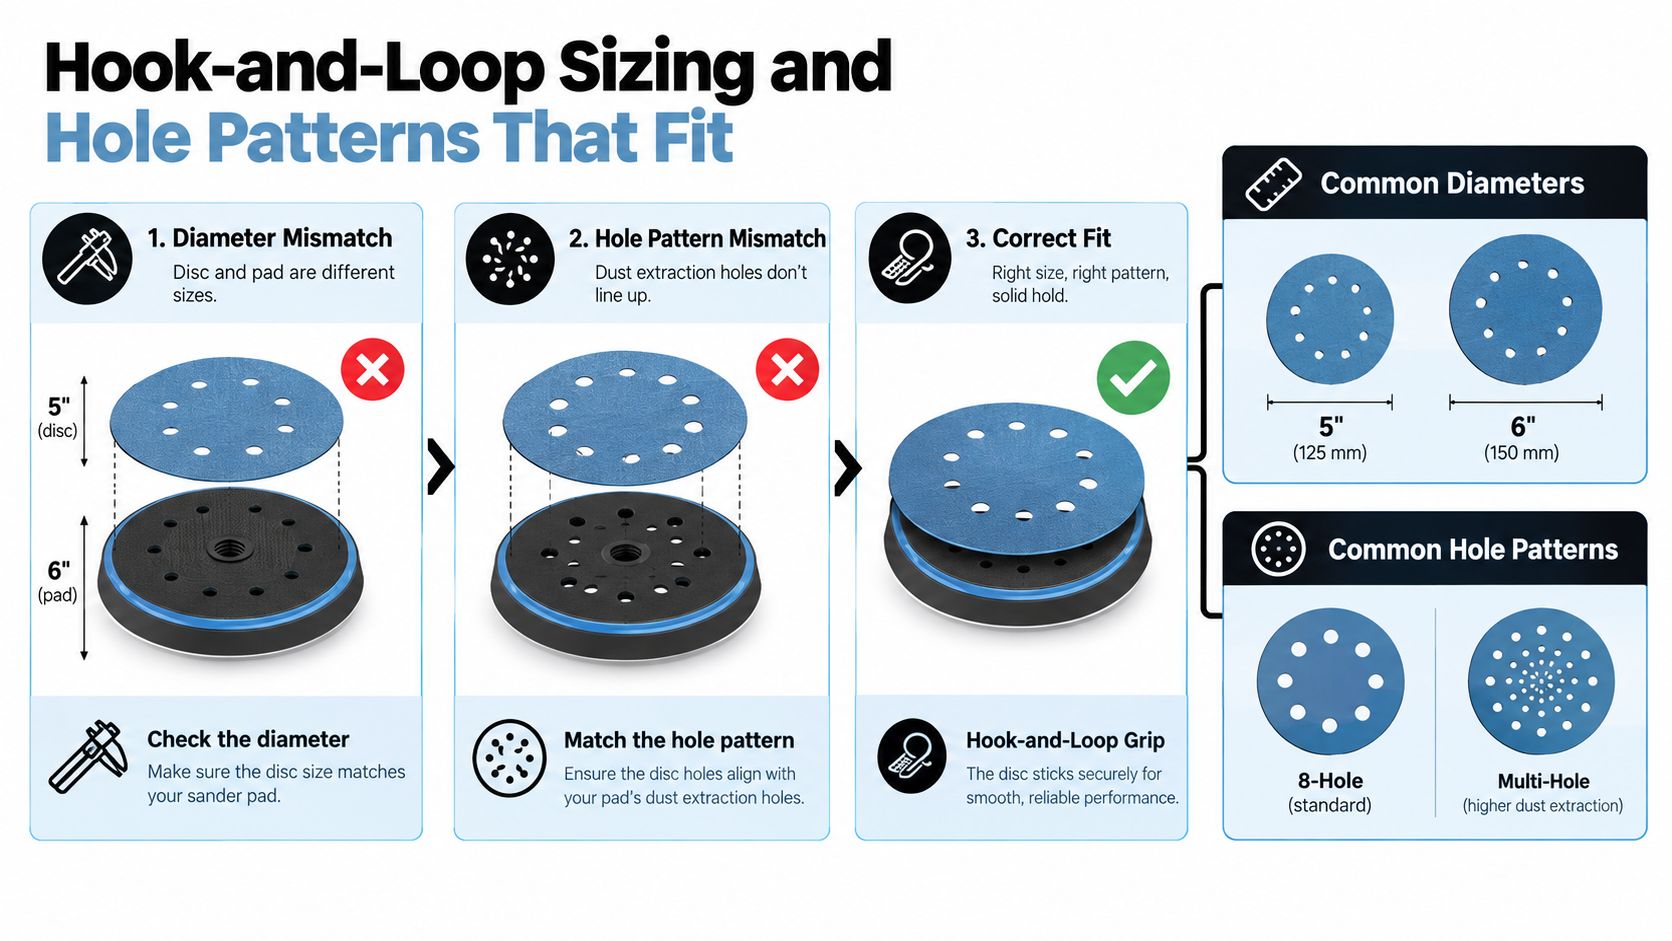
Check the pad before you peel
Hole counts can include 5-hole, 8-hole, and multi-hole universal layouts with many openings. The count only matters if the openings align with the pad's extraction ports. Misalignment traps dust beneath the disc, loads the abrasive, raises heat, and can shorten useful disc life.
Lay the disc flat on the pad before removing the liner. Rotate it until the holes match the pad openings, then press the center and work outward so the hook-and-loop connection seats evenly. Bosch explains that holes route dust through the pad and toward the extraction port, while multi-hole pads can accept more than one pattern. (Bosch GEX33-6N sanding pad information)
A worn pad creates a different failure. If the hooks are flattened or packed with dust, the disc may peel during a pass or slip enough to create uneven wear. Replace the pad when it no longer grips consistently. Don't compensate by pressing harder.
Why Your Starting Grit Matters More Than Your Pack Size
A cheap assorted pack isn't a sanding strategy. Starting at 80 because it's the first disc in the box can create unnecessary scratches, while starting too fine can polish the surface without removing the defect that brought you to the sander.
Use the deepest defect as your reference point, not the average appearance of the board. One rough planer mark or remaining strip of finish can determine the starting grit for the whole panel. Once that defect is gone, the next disc should remove the scratch pattern without forcing you to return to the beginning.
Three calls that save paper
A rough-sawn oak board with visible planer marks needs enough cut to flatten those marks. Start around 80 or 100, then inspect before moving upward. A pre-primed MDF door with light orange peel needs control rather than aggressive removal, so 150 or 180 is a sensible starting range.
A refinished tabletop with old finish that only needs the sheen broken doesn't need a stripping pass. Starting around 120 lets you create a consistent surface without cutting into the substrate.
The wrong starting grit wastes discs in two ways. Too coarse creates scratches that require several corrective passes, while too fine removes little and loads faster on old finish, paint, or filler. The right starting point lets each disc do its intended job, which usually reduces the number of changes needed across the whole project.
Field test: Make a small test area, inspect it under angled light, and judge the scratch pattern before committing the entire surface.
Starting grit also changes the operator's technique. A coarse disc needs steady movement and a flat pad, while a finer disc is more sensitive to pressure, dust, and lingering over one spot. Don't chase a smooth feel with a fine disc while defects remain. Smooth can mean polished, not prepared.
Troubleshooting Clogging, Swirls, and Burn Marks
Disc problems usually have a cause you can identify. Clogging points to the material, the abrasive, or extraction. Swirls often come from pressure, a contaminated disc, or a pad problem. Burn marks usually mean the disc stayed in one place too long or heat had nowhere to go.
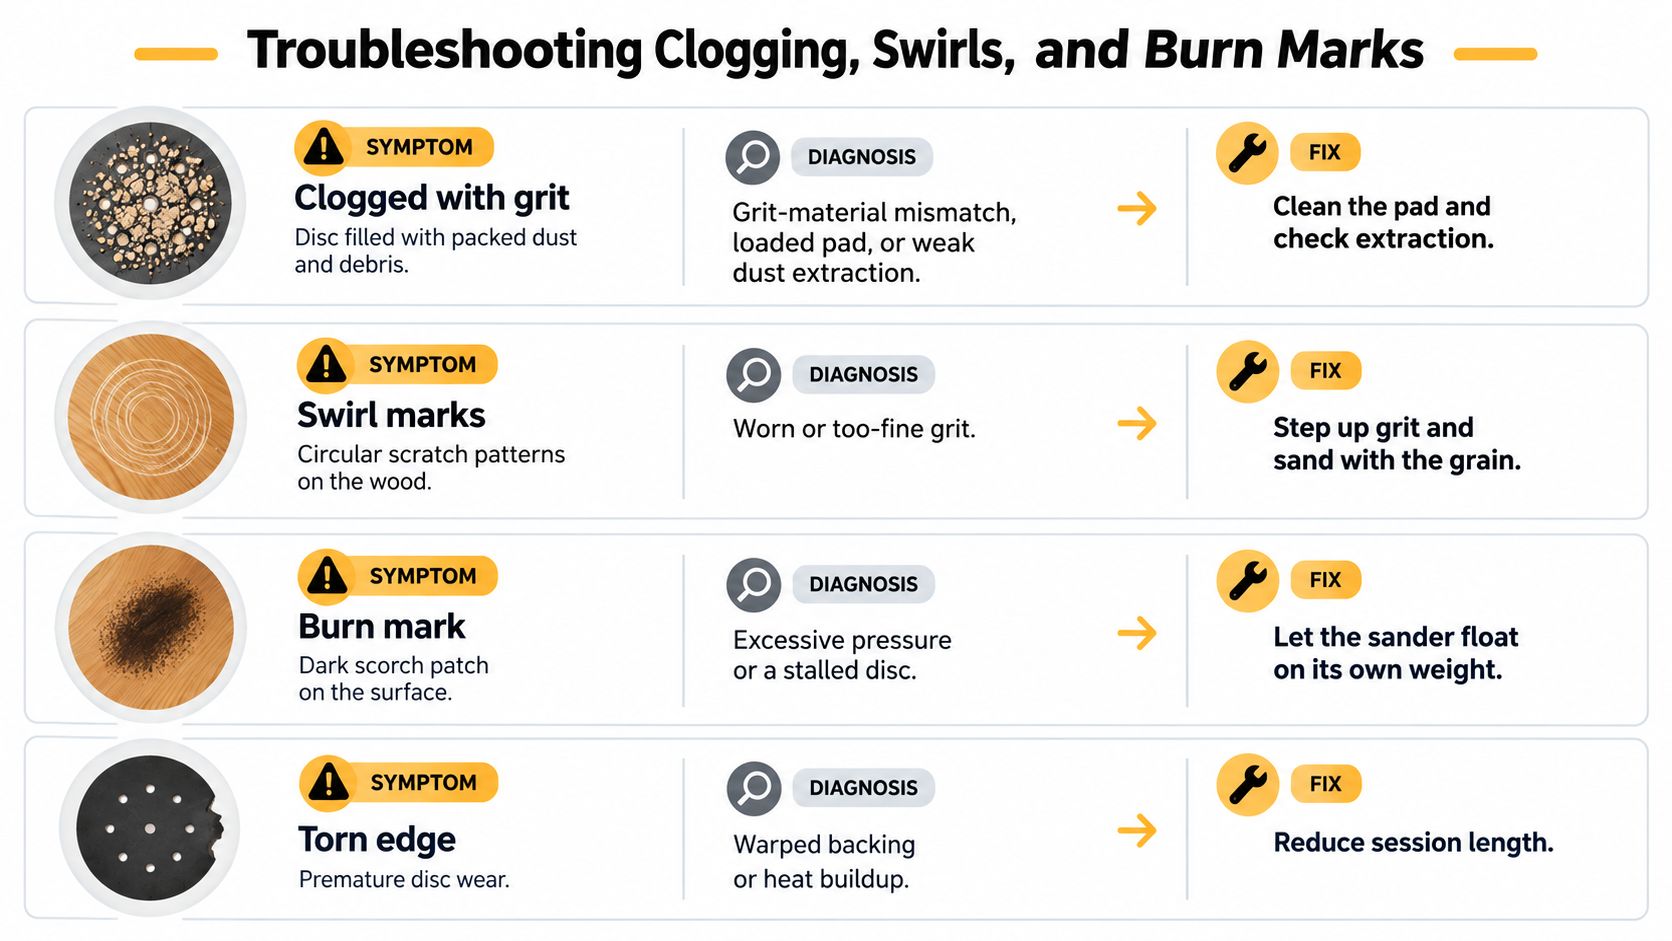
Diagnose the disc before blaming the sander
Clogging commonly appears on paint, primer, softwood resin, filler, and other materials that soften under heat. Try a fresh disc, step coarser if the current grade is rubbing, and tap or brush dust from the abrasive. Check that vacuum flow reaches the pad holes. A correctly aligned disc and a clean extraction path help the abrasive keep cutting.
Swirl marks can come from starting too fine, pushing down on the tool, or using a worn interface pad. Drop back to the last grit that produced a uniform scratch pattern, let the sander's weight provide contact, and replace an interface pad that has become soft, glazed, or uneven.
Burn marks mean the disc is dwelling or rubbing. Keep the tool moving, reduce speed on softwoods and heat-sensitive coatings, and clear dust before it becomes a hot abrasive slurry. If the disc is loaded, changing speed won't restore its sharpness.
Short disc life often means the mineral doesn't suit the material. Zirconia makes more sense for heavy removal and metal, while silicon carbide is better reserved for hard finishes and composites. Buying more of the wrong aluminum oxide disc only repeats the failure.
For dust management, connect the tool to an appropriately sized extractor and inspect the pad rather than relying on the dust bag alone. Value Tools Co's practical guide to dust attachment and vacuum setup is relevant when the disc is wearing unevenly or the surface is collecting dust under the pad.
Putting It Together and Stocking Smart
Make the selection in this order: surface and material, starting grit, abrasive mineral, then diameter and hole pattern. That sequence prevents the common mistake of buying a universal assortment first and trying to force it onto every job.
A furniture refinisher doesn't need the same stock as a metalworker. A trim carpenter working in Sacramento or the Central Valley may move from raw lumber to painted casing in the same day, so a useful shop supply includes both general-purpose grades and a more durable option for heavy removal.
| User Type | Recommended Grits | Abrasive Mineral | Diameter / Holes |
|---|---|---|---|
| Furniture refinisher | 80, 120, 150, 220 | Aluminum oxide | 5- or 6-inch, matched holes, commonly 8-hole |
| Trim carpenter | 80, 100, 120, 150, 180, 220 | Aluminum oxide plus ceramic-blend for heavy removal | 5- or 6-inch, matched pad pattern |
| Metalworker | 60, 80, 120, 220, 400 | Zirconia plus silicon carbide | Diameter and holes matched to the tool |
| Remodeling contractor | 60–120 for removal, 150–220 for prep | Mineral selected by surface | Keep separate assortments by pad size |
Keep discs flat in a sealed bin, away from humidity, and use older stock first. Bent backing paper won't seat evenly, and damp storage can compromise the attachment surface. Label bins by diameter, hole pattern, mineral, and grit so a new hire can find the correct disc without guessing.
For local professionals, Value Tools Co sells the RYOBI ONE+ 18V Cordless 5 in. Random Orbit Sander, a relevant option for portable sanding work. The Elk Grove retailer focuses on open-box and lightly used tools from brands such as DeWalt, Makita, Milwaukee, Ridgid, Ryobi, and Husky, with savings of up to 55% on Open-Box or Bare Tools. Its 30-Day Peace of Mind Guarantee covers tested and inspected tools, 30-day returns by mail or in-store, and free return shipping on defective items. Those details can matter when a contractor needs a working replacement without paying full retail, especially for jobs around Sacramento and the Central Valley.
The plain rule remains: match the disc to the surface, not to the cheapest multi-pack. If you're unsure, choose the least aggressive grit that will remove the deepest defect, use a mineral suited to the material, and confirm the pad fit before the disc touches the work.
Visit Value Tools Co to compare the RYOBI ONE+ 18V cordless random orbit sander and other budget-focused tools, then stock the correct discs by grit, mineral, diameter, and hole pattern. For local Sacramento-area work, contact the Elk Grove store about available options and choose equipment covered by the 30-Day Peace of Mind Guarantee.


