

For clean lumber and firewood, start with a 5 TPI coarse Sawzall wood cutting blade, and switch to a 6 TPI bi-metal blade whenever the wood may contain nails. Match the task in the table below before you buy, because tooth count and blade material decide whether the saw pulls itself through or fights you on every stroke.
You're halfway through a fence tear-out in Elk Grove, the battery is warm, and the blade that cut the first 2x6 cleanly now screams on a hidden nail and starts wandering. That's not a motor problem. It's a blade problem, and forcing it only adds heat, vibration, and a bent cut you'll have to clean up. Pick the right reciprocating saw wood blade for the stock in front of you, and the same saw feels controlled instead of violent.
TPI, Tooth Pattern and Length
A blade that cuts too slowly can tempt you to push harder. That extra pressure increases vibration and makes the cut harder to control. Match tooth count, pattern, and length to the material instead, so the saw can clear chips and track without being forced.
| Task | TPI | Blade length | Tooth design | Trade-off |
|---|---|---|---|---|
| Clean lumber, beams, firewood, rough framing | 5 TPI | 9-12 in | Coarse, large gullets | Fast cuts, rougher kerf |
| Pruning and green wood | 3-6 TPI | 6-9 in | Coarse, aggressive | Clears sap, more vibration |
| Nail-embedded framing and demolition | 6 TPI | 6-9 in | Cross-set, bi-metal | Tolerates intermittent metal, slower than coarse |
| Clean edges, thin sheet goods, trim | 8-10 TPI | 6-9 in | Fine, tight gullets | Cleaner edge, clogs in thick or resinous stock |
| Flush and confined cuts | 6-10 TPI | 6 in | Short blade, fine or medium teeth | Less flex and better control, shorter reach |
What TPI Actually Changes in Wood
TPI means teeth per inch. Fewer teeth leave larger spaces, called gullets, to carry chips out of the cut. A coarse blade takes a bigger bite and clears sawdust efficiently. A fine blade spreads the work across more teeth, which can help reduce grabbing and leave a cleaner edge on thin material.
That trade-off shows up quickly in the cut. Coarse teeth move through beams and branches fast, but leave a rougher kerf and can splinter the exit side. Fine teeth can give thin plywood a cleaner edge, but their tighter gullets pack with chips in thick, wet, or resinous wood. The cut slows, heat builds, and pressure on the saw rises.
For nail-free solid wood, the Festool SR 305/5/5 basic reciprocating saw blade listing describes a representative blade around 5 TPI, with a 5 mm tooth pitch, 1.25 mm thickness, 19 mm width, and 11-inch cutting length. It is intended for beams, branches, firewood, and hard- or softwood. That coarse profile removes large chips per stroke; it is not meant to leave a finish-ready edge.
Practical rule: If chips are not clearing, stop pushing. Choose a coarser blade, shorten the blade, or clear the kerf.
Dry dimensional lumber and green orchard prunings place different demands on the teeth. Wet fibers and sap call for aggressive gullets; dry lumber can tolerate a finer tooth when the edge matters. Thin plywood, paneling, and cabinet backs need enough teeth engaged to reduce hooking and splintering.
Tooth Set and Why Cross-Set Matters
On many wood blades, the teeth are set, meaning they angle slightly left and right in alternation. This makes the kerf wider than the blade body, reducing the chance that the body drags or binds. Cross-set teeth create a more pronounced path, useful for rough cuts in nail-embedded framing where clearance matters more than a clean edge.
- Coarse, large-gullet teeth: For beams, firewood, and rough framing where speed matters more than appearance.
- Cross-set bi-metal teeth: For demolition lumber where nails, staples, and pinching are likely.
- Fine, tight-gullet teeth: For thin sheet goods and cleaner edges where grabbing is a concern.
- Aggressive pruning teeth: For branches and green wood, where sap and wet fibers can clog a standard wood profile.
Use the tooth design that fits both the stock thickness and the finish target. A fine trim blade in thick material cuts slowly and builds heat; a coarse demolition blade in thin plywood cuts quickly but leaves more edge damage to fix.
Length, Flex, and Control
A 12-inch blade can reach through a beam, double top plate, or thick branch without repositioning. The extra reach also means more exposed blade can flex, wander, or catch if you twist to correct the cut. A 6-inch blade is easier to control in a wall cavity, under a cabinet toe-kick, or for a flush cut against subfloor, but it cannot reach as far.
Choose a length that lets the shoe stay planted and keeps several teeth engaged through the stroke. A blade extending far beyond the stock has more room to whip. One barely longer than the stock is thick can strike the far side on the return stroke and shock the teeth. For most 2x framing, 6- or 9-inch blades are practical; reserve 12-inch blades for thicker timber and branches where the added reach is useful and you can keep the cut straight.
In wall work, a shorter blade also limits how far the tip can travel behind the sheathing. For exposed outdoor stock and firewood, a longer coarse blade can reach through material without repositioning.
How to Read the Package
Check five details before choosing by brand or price: TPI or tooth pitch, length, thickness and width, material rating, and the stated application, such as clean wood, nail-embedded wood, pruning, or demolition. Thickness and width affect stiffness. If the package says only “wood” and gives no nail rating, choose it for clean wood rather than assuming it will tolerate metal.
California framing can contain many fasteners, including full round-head framing nails driven by a framing nailer, or clavadora de marcos. A clean-wood blade can lose its edge quickly when it hits those nails. Choose a blade rated for nail-embedded wood when fasteners may be in the cut.
Bi-Metal, Carbide and Steel Blades Compared
One question decides the material. Will this blade meet nails? If the answer is no, and you know it, high-carbon steel is cheap and sharp in clean, dry lumber. If the answer is maybe, buy for maybe. Demolition, pallet work, fence removal, and remodel framing are all maybe.
| Material | Best for | Strength | Limitation |
|---|---|---|---|
| High-carbon steel | Clean, dry lumber and softwood | Low cost, sharp edge | Dulls and breaks quickly on nails |
| Bi-metal | Nail-embedded framing and demolition | Flexible body with hard high-speed-steel teeth, up to 10 times the life in suitable use | Higher price than steel |
| Carbide-tipped | Heavy demolition, dense or nail-heavy stock | Holds its edge, resists tooth loss | Highest price, can chip if misused |
Bi-metal construction joins a flexible carbon-steel body to harder high-speed-steel teeth. The body bends instead of snapping, and the teeth resist wear and heat better than a plain steel edge. The Festool HSR 230/4,3 BI/5 universal blade listing gives a representative nail-embedded-wood blade with cross-set teeth, approximately 6 TPI, a 4.3 mm pitch, 1.25 mm thickness, and 19 mm width, and reports bi-metal blades can last up to 10 times longer than high-carbon-steel blades in suitable applications.
Treat "up to" as a best-case figure, not a promise on a nail-heavy tear-out. Your real life depends on nail frequency, stock thickness, pressure, blade length, and whether you clip masonry or a hardened screw. Judge by cost per cut, not package price. A cheap steel blade that dies on the second stud costs more than a bi-metal blade that finishes the wall.
Keep at least three teeth engaged in the stock. Fewer than that and a single tooth hooks, shock-loads, and snaps or tears out. That's why thin material needs finer TPI even in bi-metal.
Carbide-tipped blades sit above bi-metal for dense, abrasive, or nail-heavy demolition where tooth loss is the failure you keep seeing. They hold an edge in dirty, treated, or gritty stock and shrug off fasteners that would strip steel. You pay more, and carbide can chip if you twist the blade or slam it into concrete. I would buy carbide for repeated demolition and pallet work, bi-metal for general remodel framing, and steel only for known clean wood.
Wood species matters at the margins too. If you're salvaging stock for reuse and weighing appearance against hardness, choosing between maple and cherry is worth a look before you decide what's worth saving from a tear-out. For cuts that are mostly fasteners and pipe, step over to dedicated metal profiles instead, covered in our guide to metal Sawzall blades and when to use them.
How to Mount and Cut With a Sawzall Wood Blade
The sequence below is the same whether your saw is corded or a brushless, or sin escobillas, cordless model. Follow it in order and most blade failures disappear, because most failures start before the first stroke.
The infographic sums up the core routine at a glance.
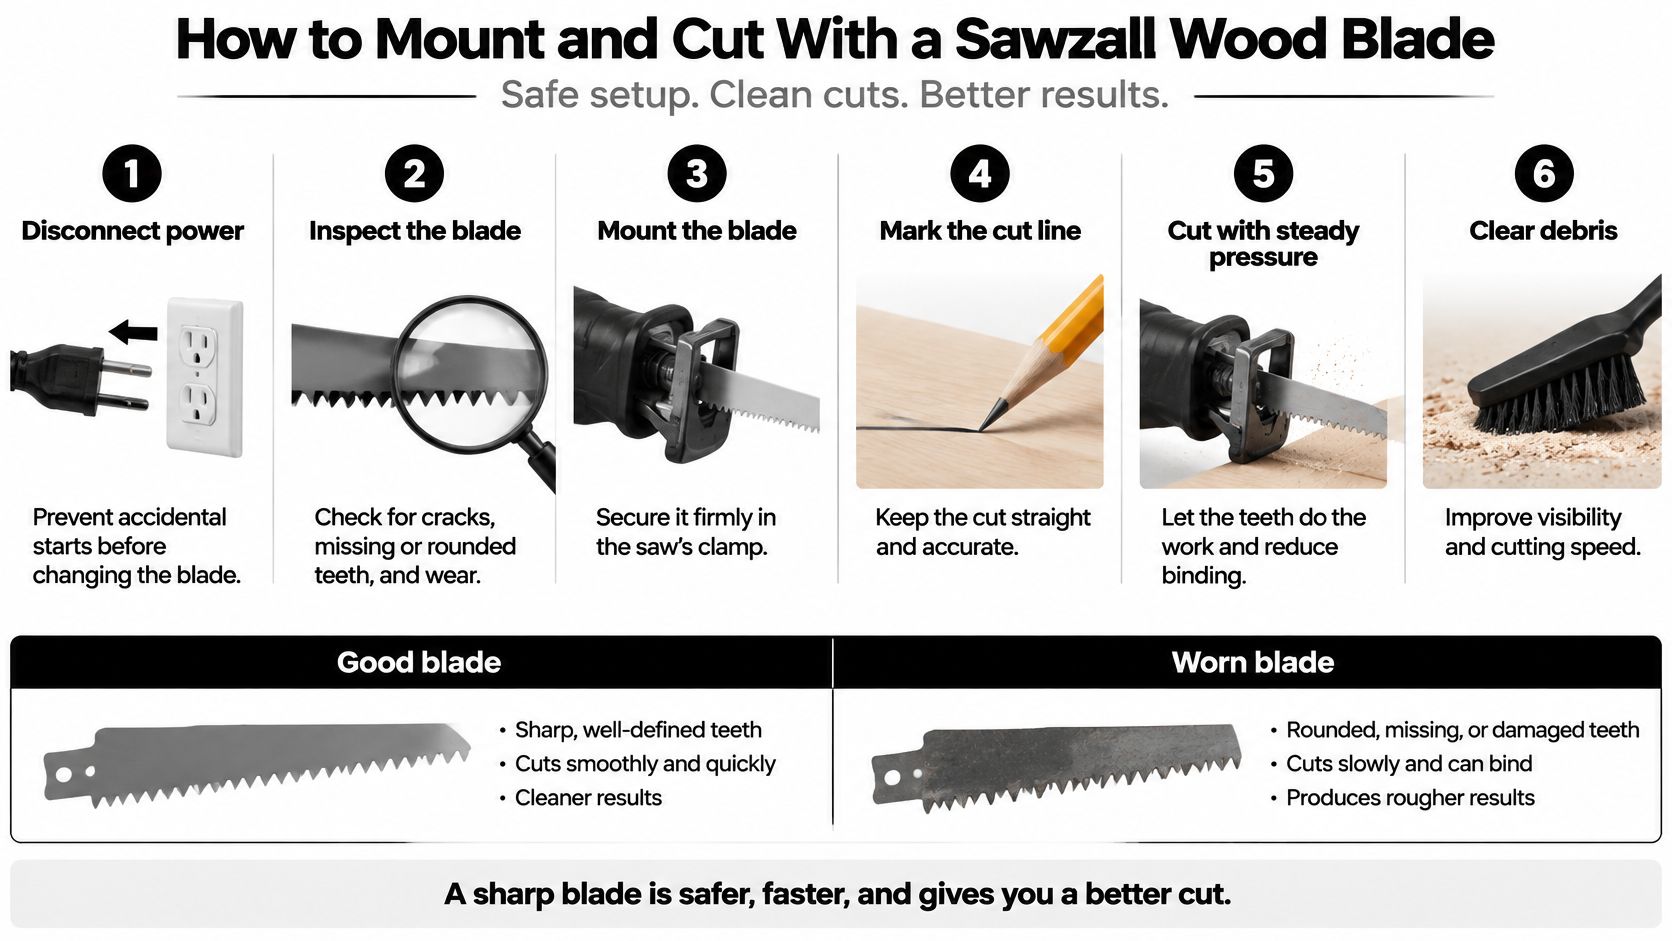
Mounting and Cutting Steps
- Disconnect power before you touch the clamp. Pull the battery or unplug the saw so an accidental trigger pull can't start the stroke while your fingers are on the blade.
- Inspect the blade in good light. Look for cracks at the shank, missing or rounded teeth, bent sections, and blue heat marks, because a damaged blade breaks under load instead of wearing out gracefully.
- Seat the blade with teeth pointing away from the handle. Push the tang fully into the clamp, let it lock, then tug it, because a half-seated blade ejects or bends on the first hard stroke.
- Confirm length against the stock before cutting. Several teeth should stay engaged through the stroke, and thin stock calls for a shorter blade, because excess exposed length flexes and catches.
- Clamp or brace the workpiece and plant the shoe. Stock that moves pinches the blade, and a floating shoe lets the saw chatter instead of cutting, so support both sides of the kerf where you can.
- Start slow, then let the teeth work at full intended speed. Feather the trigger to establish the kerf, then feed with steady, light pressure, because forcing a reciprocating blade bends it sideways and overheats the teeth.
- Check behind the surface before any blind or plunge cut. Look for wiring, gas, and water lines from the other side, an access panel, or a stud finder with utility detection, because the blade tip reaches places you can't see.
- Release the trigger before you reposition. Keep bystanders out of the cut line and wear eye protection, because a reciprocating blade throws chips and, when it fails, broken teeth.
- Let the blade and workpiece cool before handling. Friction heat is real after long cuts, and in Sacramento and Central Valley heat above 100°F the saw, battery, and blade all start hot and cool slowly.
A blade that needs your body weight to move is telling you something. Listen before it bends.
Check the shank before you buy, not at the truck. Universal-shank blades fit most reciprocating saws across brands. T-shank blades belong to jigsaws and specific tools, and a few proprietary clamps only accept matching tangs. If the blade rocks in the clamp or won't lock with a positive click, don't run it.
The video below shows the mounting and stroke control in motion, which is easier to copy than a written description of trigger feel.
On plunge cuts, rest the shoe edge on the surface, tip the blade in at a shallow angle, and start with a short, controlled stroke. Don't bury the full length until the kerf is established and tracking where you marked it. On flush cuts, a short blade and a light touch beat bending a long blade flat, which fatigues the shank and snaps it at the clamp.
Vibration, Wear and When to Replace the Blade
The most common failure isn't a snapped blade. It's a slow, wandering cut. The teeth round over, the blade stops biting, and the operator pushes harder. Pressure bends the blade off line, heat builds, and vibration climbs. The cut gets worse and the operator blames the saw.
That cycle has a health cost on repeat work. A German Institute for Occupational Safety and Health analysis reported in the IFA vibration exposure document for reciprocating saws found vibration during wood cutting ranged from approximately 1.9 to 10.2 m/s², influenced by the saw's stroke, the blade, and the material, and notes worn blades increase exposure. For a homeowner making three cuts a year, a dull blade is an annoyance. For a maintenance crew cutting all week, it's fatigue, lost control, and exposure you can prevent with a two-minute blade swap.
| Symptom | Likely cause | Fix |
|---|---|---|
| Blade wanders off the line | Dull or rounded teeth, excess pressure | Replace the blade, reduce pressure and let the blade cut |
| Saw stalls in clean lumber | Clogged gullets or too fine a TPI | Clear chips, switch to a coarser TPI |
| Excess vibration | Worn blade, blade too long for the cut | Replace the blade, shorten the blade |
| Rounded or missing teeth | Contact with nails or masonry | Replace with bi-metal, check for hidden fasteners before cutting |
| Blue or dark discoloration at the teeth | Heat from a dull blade or forceful cutting | Replace the blade, allow the blade to cool, cut with lighter pressure |
| Crack or bend near the shank | Fatigue or misuse | Remove from service immediately |
Reading the Signs Early
Run a thumbnail lightly across the teeth, with power disconnected. Sharp teeth catch. Rounded teeth skate. Sight down the blade for bends, and check the shank area for hairline cracks where flex concentrates. Blue or straw discoloration at the teeth means heat has already softened the edge on steel blades, and that blade won't come back.
- Rounded or missing teeth: Replace now, because the remaining teeth take double load and fail faster.
- Wandering in straight stock: Swap the blade before you blame your line or the shoe.
- Stalling in clean lumber: Check for packed gullets first, since a coarser TPI may fix it in one change.
- New vibration on a familiar saw: Treat the blade as the suspect until proven otherwise.
The contrarian point is worth stating plainly. The most aggressive-looking blade isn't always the cheapest to run. If it forces higher feed pressure, rattles your hands, and leaves edges you have to recut, its cost per finished cut is higher than a matched blade that pulls through calmly. Fresh, correct blades are a control and safety purchase, not a consumable you squeeze. If the saw itself is the question, our overview of the handheld reciprocating saw covers stroke, orbital action, and grip formats.
Evaluating Open-Box and Lightly Used Wood Blades
An open-box saw can be inspected and test-cut; a used blade has less predictable remaining life. Its teeth may look intact but cut poorly, so weigh the price against the likelihood of replacing it.
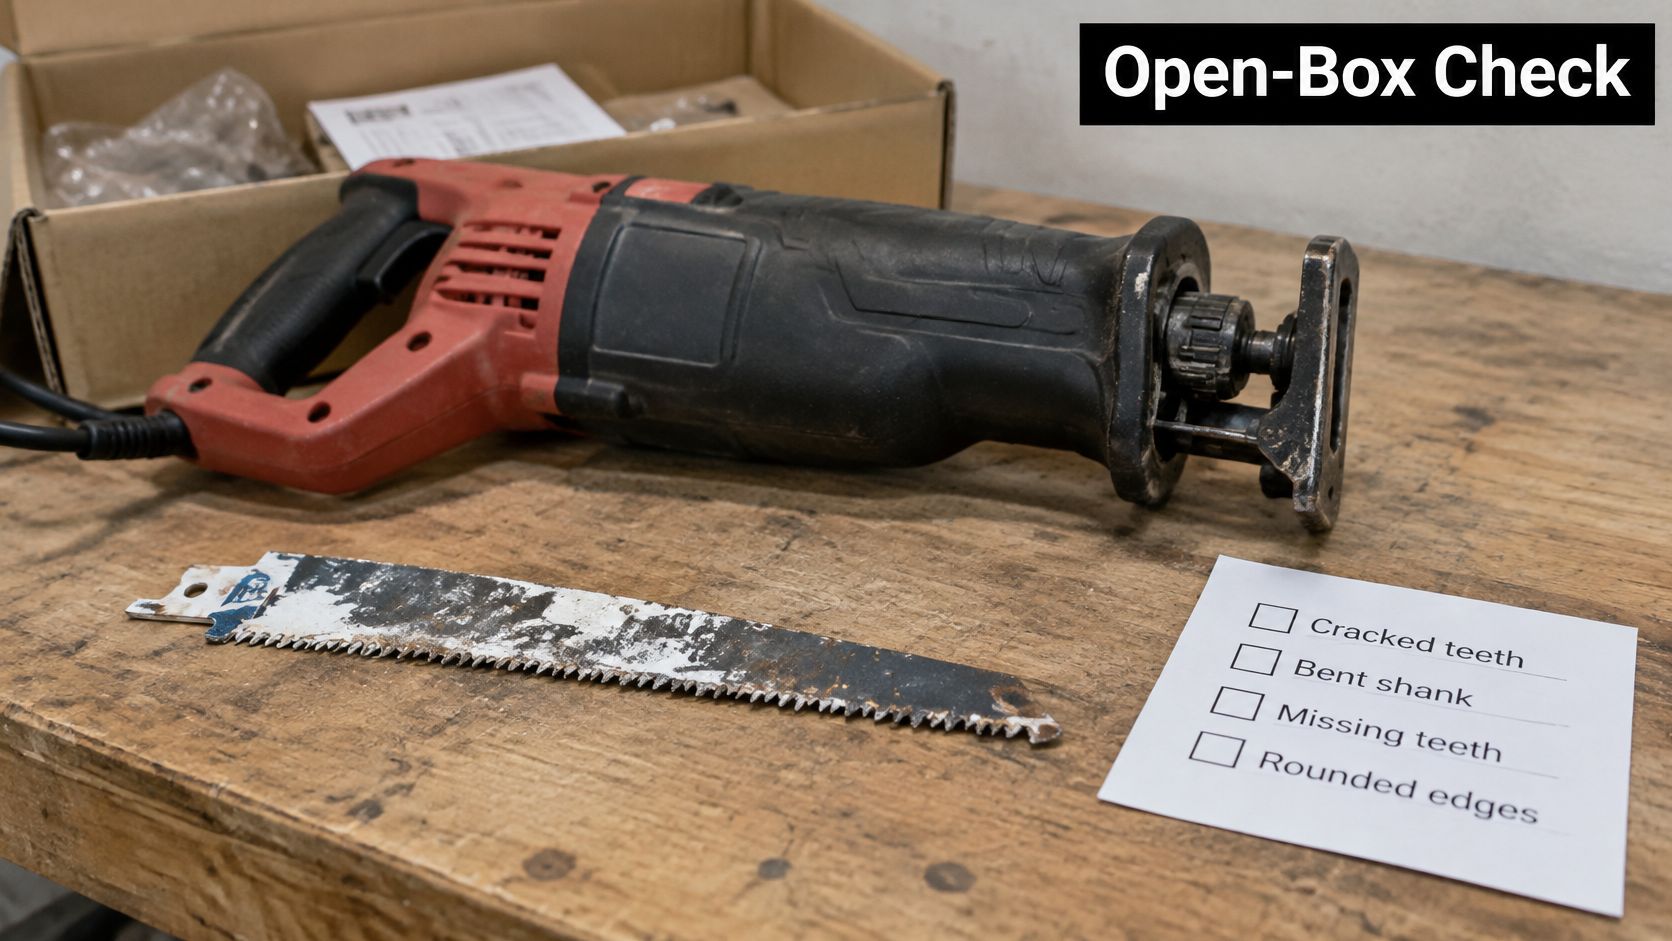
Inspection Checklist for Blades and Tools
- Every tooth: Check for rounded or missing sections and damaged set. Reject blades with visible heat discoloration at the edge.
- Straightness: Sight along the blade body for bends or twists that can make cuts wander.
- Shank condition: Look for cracks or wear that could prevent the tang from locking securely in the clamp.
- Printed rating: Check the packaging or blade marking for TPI and a wood or nail-embedded rating.
- Test cut: Cut scrap lumber and check whether the blade bites, tracks straight, and runs without unusual vibration.
On the saw, check the trigger, shoe adjustment, blade clamp, battery fit, and vibration during a short cut. OSHA's guidance for handheld reciprocating saws says covered saws with blades greater than one-fourth inch must have a constant-pressure control. Confirm that the stroke stops when you release the trigger, and keep the blade directed away from nearby people and traffic areas.
A bare tool, or herramienta sola, makes sense if you already own compatible batteries and chargers. If you need those accessories as well as a case and blades, add their cost before deciding whether the tool is a saving. In Central Valley summer heat, let an open-box cordless saw and battery cool between heavy cuts during inspection. Thermal slowdown on a 100°F afternoon does not, by itself, show that the tool or blade is defective.
Open-box buying can lower the purchase cost and make established brands more accessible. The trade-offs are cosmetic wear, missing accessories, and the need to check condition before use. Value Tools Co offers open-box and bare tools at savings of up to 55% off typical retail pricing, and its return window is concise, so confirm the return terms shown at checkout before you buy. For a clearer picture of what to expect, read what an open-box item means.
Who This Is For and Who Should Avoid This
Framers and remodelers cutting nail-embedded lumber should stock 6 TPI bi-metal blades in 6-inch and 9-inch lengths. That's the demolition and alteration workhorse. Property-maintenance crews and handymen clearing storm debris and cutting back damaged fencing do well with coarse 5 TPI blades plus a few bi-metal blades for surprises.
Orchard and vineyard crews pruning in the Central Valley should run 3-6 TPI aggressive pruning blades that clear green, sappy fibers without packing. DIY owners making occasional rough cuts, breaking down lumber, or bucking firewood get the most from a small assortment, coarse for clean wood and bi-metal for anything reclaimed.
Pros and Cons by Blade Type
- Coarse 5 TPI wood blade: Fast in clean stock and cheap to replace, but rough finish, more vibration, and no tolerance for nails.
- Bi-metal 6 TPI blade: Durable in mixed material and flexible enough to survive bending, but slower in clean wood and pricier per blade.
Who should avoid this category is just as clear. Finish carpenters who need clean joinery should reach for a fine-tooth blade, a jigsaw, or a hand saw, because a reciprocating saw isn't a precision tool. Anyone cutting thin metal, conduit, or pipe needs a metal-rated blade, not a wood profile. First-time buyers who need a complete kit should skip bare tools and buy the battery and charger bundle once.
Don't run blind cuts in walls until you can check for hidden utilities and control the saw with both hands and a planted shoe. If you can't verify what's behind the surface, open a small inspection hole first or hand the cut to someone trained to make it.
Where to Buy Next and Common Questions
Choose blade length and tooth pattern for the cut, then keep a spare on hand. For a basic assortment, pair a coarse 5 TPI blade for clean wood with a 6 TPI bi-metal blade for mixed material; add an 8–10 TPI blade for thin sheet goods. A blade that dulls or wanders can cost more in time and control than a cheaper blade saves.
Value Tools Co is an Elk Grove online and local retailer offering open-box, fully functional reciprocating saws and wood blades from major brands. The store offers free U.S. shipping on qualifying orders and 24/7 support. Check the item's condition and return terms at checkout before buying.
Frequently Asked Questions
Can a wood blade cut metal? A wood blade is a poor choice for metal and may dull or lose teeth. Use a metal-rated blade, or a bi-metal blade rated for the materials in the cut.
What TPI is best for plywood? Use 8–10 TPI for thin plywood and cabinet panels to reduce grabbing and splintering. For thicker sheets, 5–6 TPI clears chips more readily.
Can a Sawzall wood blade cut through nails? A standard wood blade can lose teeth quickly on nails. Use a bi-metal or carbide demolition blade, keep the shoe planted, and expect wear when cutting through hidden fasteners.
How long does a wood cutting blade last? Blade life depends on fasteners, stock thickness, and cutting pressure. Replace it when teeth are rounded or missing, the cut starts to wander, or the saw needs noticeably more pressure.
A fresh, correctly matched blade helps the saw cut without forcing it. Value Tools Co offers open-box and lightly used tools from major brands, plus wood blades. Check condition and return terms before ordering.


