

Your saw is sliding across the truck bed, the tape measure is buried under pliers, and the spare plywood looks like an easy fix. Build a wooden hand-tool tote if you need quick access and repairable storage, but size it around the longest tool, not the offcuts you happen to own. A loaded jobsite box also needs a dependable handle, secure hardware, and a separate plan for lithium batteries.
DIY Tool Box Wood Cut Lists and Fit
A portable tote is a practical starting point for hand tools that need quick access. Use nominal 1-by-10 and 1-by-5 boards for a template with an 18-inch bottom, two 12-inch ends, two 19 1/2-inch sides, and a 22-inch dowel handle. Treat those cuts as a starting layout, then check them against the tools you plan to carry.
Set the saw, hammer, pliers, square, and tape in their working arrangement before cutting. Leave room to grip each handle without moving another tool first. Measure the clear interior length, since outside dimensions do not show whether the saw will fit between the end panels.
DIY wooden toolbox sizes and cut lists
These are starting templates, not interchangeable cut lists. The tote uses fixed dimensions; size the chest and rolling box around the tools and hardware they must hold.
| Template | Key cuts | Handle | Best for | Skip if |
|---|---|---|---|---|
| Portable tote | 18 in 1x10 bottom, two 12 in ends, two 19 1/2 in 1x5 sides | 22 in dowel, equal projection, one nail each end | Homeowner hand tools and a small saw | You need drawers, a lock, or weather sealing |
| Traditional chest | Length at or under about 600 mm; 12 mm ash base, sides, lid, and handle strips | Push handle on strips; shallow 2 mm grooves register head boards | Woodworkers carrying planes, chisels, and a longer saw | You want a one-evening nail-together tote |
| Rolling box | 3/4 in plywood carcass sized to the longest tool; allow mounting room for casters | Side lift handles; casters take the travel load | Crews moving a heavy divided kit between truck and site | You need a one-hand carry up stairs |
Choose a chest when sharp edges need separation and tools need a lid. A rolling box suits a heavy kit that is moved repeatedly, but wheels do little for stairs, gravel, or loading into a pickup. For fitted dividers and tool-specific compartments, Premier Builders on bespoke carpentry offers a useful example of planning beyond a generic rectangular container. For sheet-stock layouts, follow this guide to cutting plywood before cutting the panel.
Who This Is For
Elk Grove and Central Valley homeowners organizing hammers, pliers, and tape measures can use a tote for straightforward access. Small remodel crews may prefer a divided chest that can be repaired with ordinary shop materials.
- Advantages: Custom length, replaceable parts, and wooden panels that do not clang against loose steel tools.
- Compromises: Limited weather resistance, no drawer system in the tote, and less security than a lockable polymer chest.
Who Should Avoid This
Choose another type of box if you need lockable, weatherproof storage for a complete cordless kit. A wooden box is also a poor choice if lithium packs would remain inside it through Central Valley summer heat.
Stock Glue and Shop Tools to Gather
Buy straight, dry stock before buying extra power tools. Furniture-grade pine is easy to cut and reasonably forgiving; poplar gives a cleaner painted surface and firmer edges. Neither benefits from knots running through the handle area or twisted boards forced straight with screws.
Use straight ash or a comparable hardwood for a traditional chest. Cabinet birch plywood makes sense for a rolling carcass because broad panels stay more predictable than wide solid boards. Its disadvantages are exposed edges, extra weight, and the need for sound caster mounting blocks.
Toolbox stock and fasteners
| Template | Stock | Fasteners | Skip |
|---|---|---|---|
| Portable tote | Furniture-grade pine or poplar | Nails plus a thin exterior-glue film | MDF or pressure-treated lumber |
| Traditional chest | Straight 12 mm ash or similar hardwood | Nailed joints with shank-matched pilots, or #8 screws 1-1/4 to 1-1/2 in where thickness permits | A softwood-sized pilot in dense ash |
| Rolling box | 3/4 in cabinet birch plywood | #8 screws and glue after the carcass is square | An MDF carcass or treated offcuts |
Don't use the same screw length everywhere without checking the joint. A screw suitable for a thicker plywood corner can break through a thinner chest panel. Hold the proposed fastener against the actual joint before drilling.
Reject MDF on interior surfaces that hands and tools will rub daily. Its edges fray, damaged surfaces retain dust, and moisture makes repairs awkward. Pressure-treated offcuts also stay out of this project, particularly where they would contact steel tools.
Hand-tool minimums and optional power
Gather a combination square, tape, marking knife, sharp handsaw, block plane, countersink, hammer, drill bits, and clamps that span the box width. Add a drill for handle holes and pilots. The beginner woodworking tools guide is useful for separating tools you'll reuse from accessories bought for a single operation.
- Drill first: A brushless drill, or sin escobillas, handles boring and pilots with better control than an impact driver.
- Driver second: An impact driver, or atornillador de impacto, is optional. Finish delicate screws slowly rather than hammering them below the surface.
- Saw upgrade: A circular saw with a guide or a track-guided saw helps with plywood. A sharp handsaw is adequate for the tote.
- Battery compatibility: A bare tool, or herramienta sola, saves money only when you already own compatible batteries and a charger.
A framing nailer, or clavadora de marcos, is the wrong fastening tool. Structural framing nails and seismic wall-plate fastening schedules don't translate into suitable toolbox joinery.
Keep loose hardware sorted during the build. For packing finished tools or separating parts during a move, Moving Boxes UK, Packing Boxes & Supplies including Removal Boxes from Storage & Removal Boxes Ltd is a relevant packing resource, not a substitute for a load-bearing tool carrier.
Dust Control Before the First Cut
A small parts list doesn't make this a low-hazard project. OSHA's wood-dust guidance identifies allergic respiratory symptoms, asthma, chronic bronchitis, dermatitis, and cancer as potential consequences of exposure, and lists serious cutting and eye injuries among woodworking hazards.
Ripping boards, boring handle holes, and sanding inside a garage put fine particles close to your breathing zone. Capture dust at the source before relying on a mask.
Use this checklist to arrange the work area before switching on the saw.
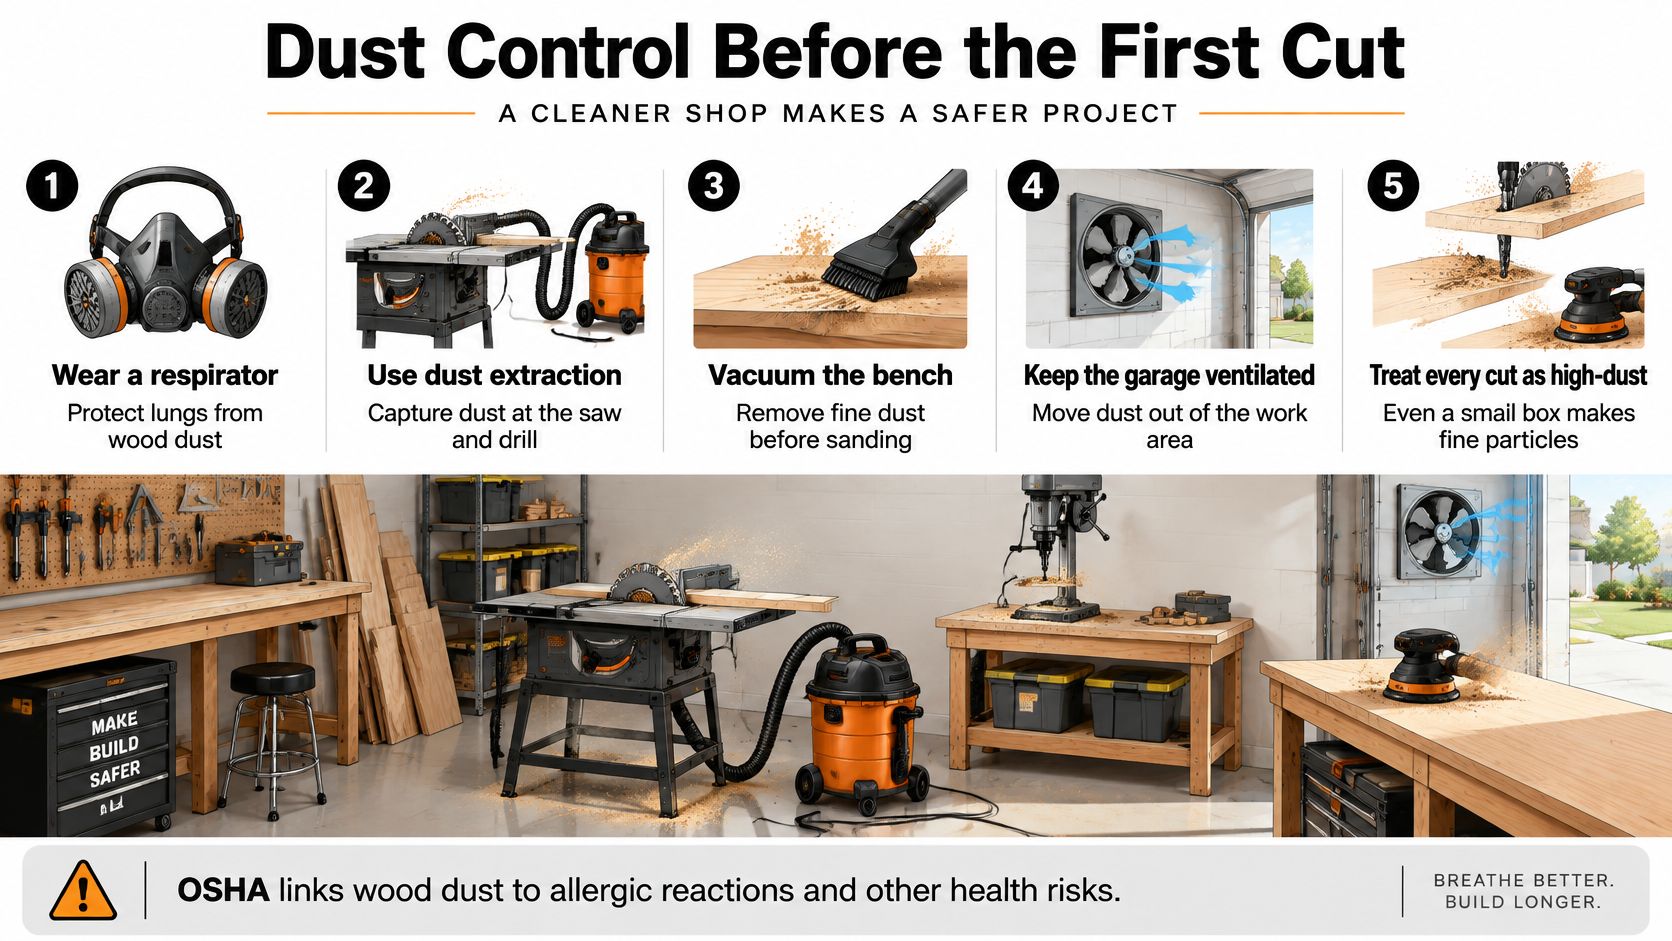
- Capture first: Cut outside when practical, and connect extraction close to the blade or sander.
- Use suitable filtration: A sealed shop vacuum with fine-dust filtration and a collection bag can serve short plywood-sanding work when connected to the tool. Visible escaping dust means the setup needs improvement.
- Protect yourself: Wear eye protection and a properly fitted N95 or P100 respirator during sanding and dusty boring operations.
- Clean without redistributing: Vacuum the bench and floor. Don't blow dust around with compressed air.
The shop vacuum dust-collection guide can help you check hose connections and filtration. An ordinary vacuum isn't a reason to spend an afternoon machining MDF in an enclosed garage.
How to Assemble the Wooden Toolbox
Build the tote on a flat bench, with the actual tools nearby for a final fit check. Mark matching parts so you don't reverse an end panel after boring its handle hole.
The assembly graphic shows the tote arrangement and the alternate chest and rolling-box layouts.
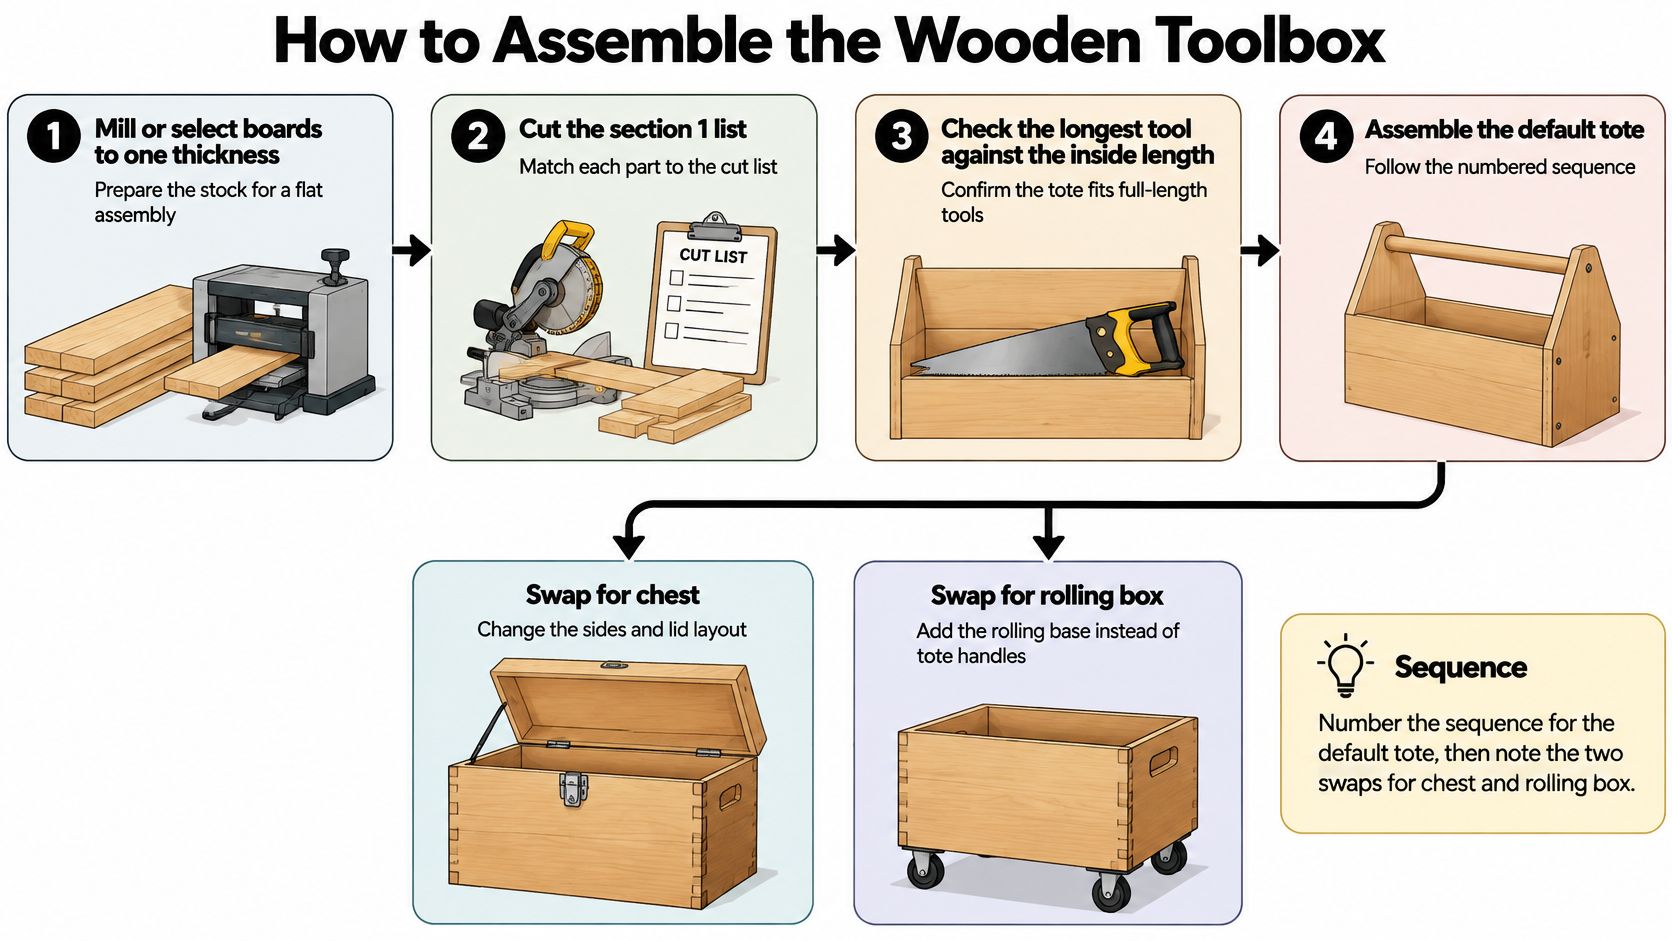
Default tote assembly sequence
- Select consistent stock and cut the parts. Plane or reject boards that prevent the bottom from sitting flat. Check the longest tool against the clear inside length before fastening anything, and stack matching ends to confirm they agree.
- Dry-fit and mark the fastener lines. Use the tote's end-to-bottom and side-panel fastening pattern, spreading fasteners across the receiving material rather than crowding a corner. Mark the receiving board's centerline on the outside face so nails and screws don't wander out through an edge.
- Drill for the chosen fastener. For #8 screws, the WoodBin pilot-hole guide lists approximately 5/64-inch pilots in softwood, 3/32-inch pilots in hardwood, and an 11/64-inch clearance hole, with practical guidance using 3/4-inch stock, screws about 1-1/4 to 1-1/2 inches long, spacing roughly 4–6 inches along long joints, and the first fastener at least 3/4 inch from an end. Drill the clearance hole through the outer board and the pilot into the receiving board; keep the drill perpendicular and stop the pilot slightly short of screw length.
- Glue, clamp, and fasten. Spread a thin, continuous film of exterior wood glue over mating surfaces. Clamp the box, compare its diagonals, and adjust until they match before the glue skins over. Drive heads flush or slightly countersunk, not deep enough to crush the surface.
- Fit the handle. Bore matching holes using a backer board to control breakout. Center the dowel so its projections match, then pin through each end panel into the dowel. Keep the retaining fastener clear of the grip area and check that no point emerges.
- Make the template-specific changes. For the chest, use shallow registration grooves for the head boards and fit the lid before installing its hardware. For the rolling box, fit a divider or removable tray, then mount casters to reinforced locations only after the carcass is square.
- Run the scrap acceptance check. Reproduce the entire drill-and-drive sequence using offcuts from the same stock. A passing joint has a seated head, tight mating faces, no breakout, and no visible crack. Although this is the final acceptance check listed, perform it before committing fasteners to the actual box.
Prevent joint failure before it starts
A clearance hole lets the screw pull the outer board against the receiving board. Without it, threads can grip both pieces and preserve a gap even though the head feels tight. More driver torque won't correct that joint.
For nails, match the pilot to the nail shank and alternate the hole direction slightly without steering toward an exposed edge. Don't force hardwood together with a hammer when a trial nail already shows splitting.
Practical rule: If the scrap joint splits, change the drilling or fastening setup before touching the finished parts.
Watch the build sequence with particular attention to workholding and part orientation.
Finish Choices Latches and Template Hardware
Judge the finish by what stays on the wood, not by how glossy the box looks. The coating should reduce staining and prevent uncured oil from transferring onto planes, chisels, and drill chucks. It won't make ordinary nailed joints waterproof.
Sand to 180 grit, soften hand-contact edges, and vacuum the surface thoroughly. Dewaxed shellac is a practical interior sealer; hardwax oil is another option when you apply it thinly and give it enough curing time. Waterborne polyurethane suits a rolling box exterior that will face repeated handling and abrasion.
The finish and hardware choices below should support daily use rather than appearance.
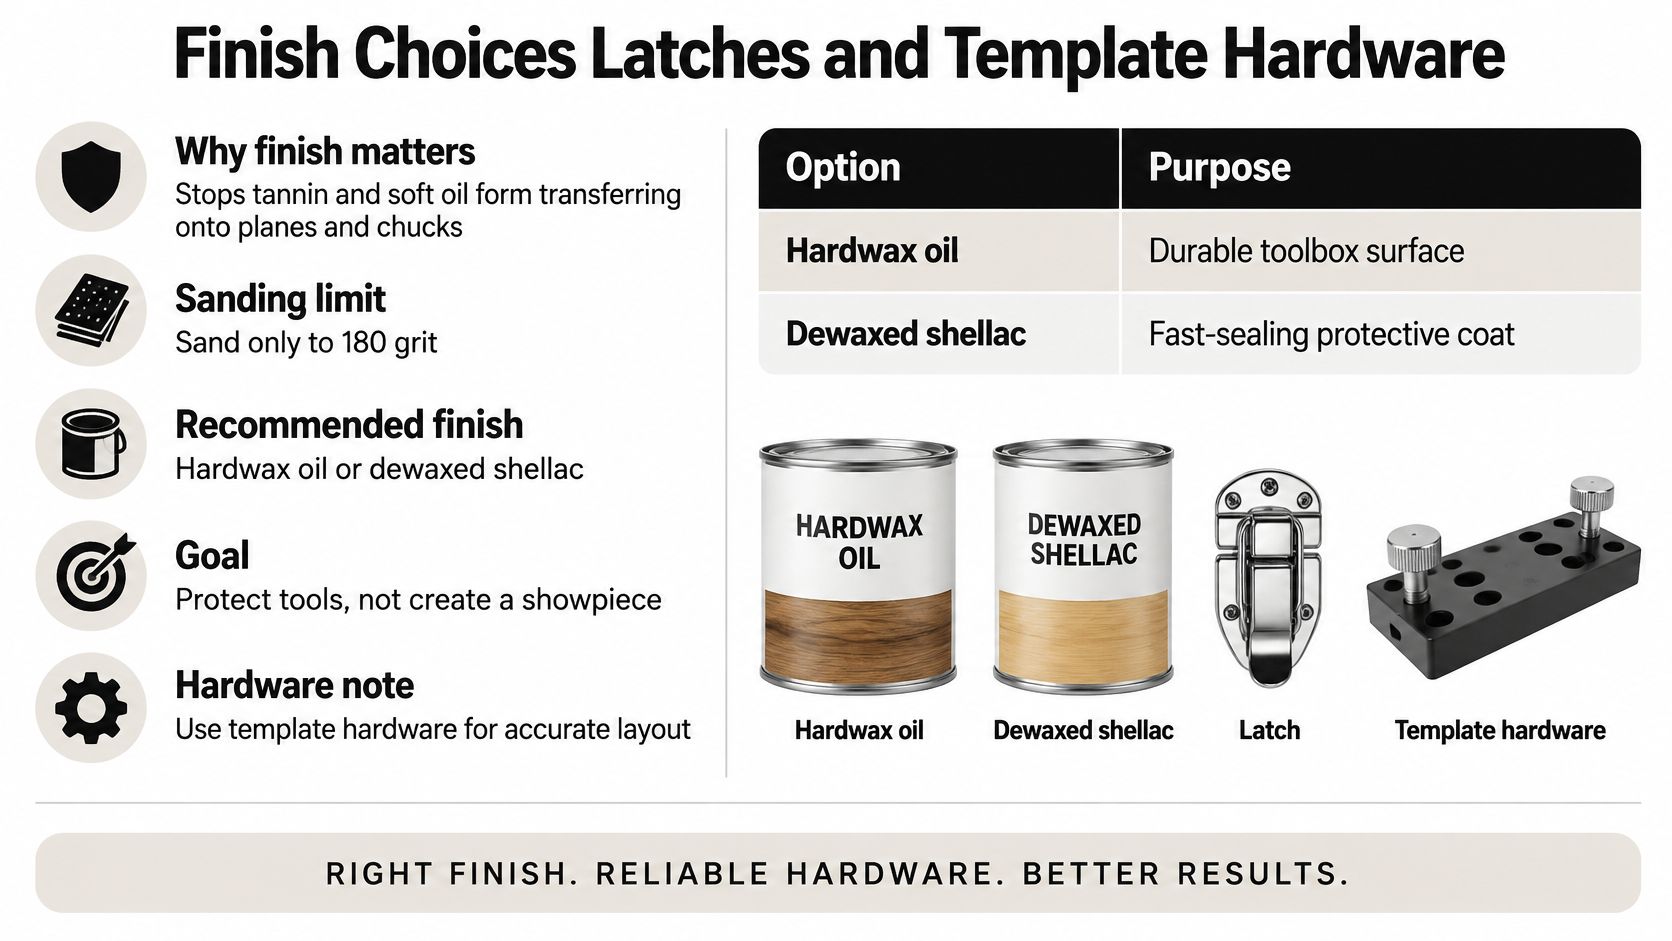
Match the hardware to the template
The Art Bloom Lab wooden-box guide describes a traditional chest using 12-millimeter ash, registration grooves about 2 millimeters deep, and a portable length of approximately 600 millimeters or less. That construction needs hardware positioned for its actual panel thickness, not screws chosen for a thicker plywood cabinet.
| Template | Hardware choice | Main limitation |
|---|---|---|
| Open tote | Through-dowel handle pinned through the end panels | No lid retention or security |
| Traditional chest | Supported push handle, lid stay, and positive-closing hasp | Thin panels require careful screw placement |
| Rolling box | Positive draw latches, lockable casters, reinforced mounting blocks | Wheel locks don't secure the box against theft |
Use a hardware template or a marked scrap guide to repeat hole locations accurately. A lid stay keeps the lid from levering against its hinges, while a positive catch prevents bouncing from releasing a loose hook.
Choose organization that earns its space
- Removable tray: Best for bits, pencils, and small fasteners. It keeps little parts visible but adds a lifting step before reaching larger tools.
- Open tote: Best for frequent hand-tool access. It carries easily but exposes the contents to dust and splash.
- Divided chest: Best for separating sharp edges and protecting organized hand tools. It takes longer to build and still isn't a weatherproof enclosure.
Leave the finish overnight at minimum before assessing it, then allow the full product-specified cure before loading tools. A cool garage can extend that wait considerably. A tacky oil surface is an unfinished job, not useful rust protection.
For a separate painted cabinet project, Painters North Shore's guide to choose topcoats for sprayed MDF provides relevant finishing context. It doesn't make MDF a suitable substitute for the working surfaces in this toolbox.
Wood suits hammers and layout tools. A removable, protected battery pocket can organize transport, but ventilation alone doesn't make it safe for unattended pack storage.
More storage volume isn't more value if the lid won't stay shut.
Choose a molded chest instead when locking and exposure protection matter more than custom compartments. That benchmark is more useful than spending on decorative hardware that doesn't improve retention.
Heat Limits and the Loaded Carry Test
A battery left in a closed truck or sun-heated box can get hotter than the outdoor air, especially during Sacramento and Central Valley summers. Charging and storage limits are printed in the manufacturer manual for each battery and charger. Follow those limits for your specific system, and remove drill, impact-driver, and framing-nailer batteries from the carrier after the shift.
Test with the real working load
OSHA's hand and power tool guidance covers safe tool selection and hazard control. Use this shop check to assess the box; it is not a certified load rating.
- Weigh the actual load, including fasteners and accessories.
- Place dense items low and close to the handle's load path.
- Carry the box 50 feet across a clear, level area.
- Inspect the handle, joints, and latch for movement or opening.
- Remove batteries and fragile tools. Secure ballast, then conduct a controlled six-inch drop onto plywood with feet clear.
Stop if anything loosens or cracks. A flexing handle attachment needs a stronger load path, not extra hardware added to hide the movement.
Splits Racks and Loose Handles
A split end panel is the first fault to inspect when a fastener suddenly stops tightening. Don't assume the screw needs more torque. Check whether the wood has opened along the grain or the fastener has missed the receiving board.
Wooden toolbox faults and fixes
| Symptom | Likely cause | Fix |
|---|---|---|
| End grain split | Fastener too close to the end, or no suitable pilot in hardwood | For a minor local defect, plug the hole and relocate the predrilled fastening |
| Box racks out of square | No clearance hole, overdriven screws, or clamps removed too soon | Resquare on the diagonal and reclamp before glue sets |
| Dowel pulls out | A nail driven into the end of the handle without a through-panel connection | Fit a through-dowel pinned or screwed through the panel face |
| Lid opens in the truck | Hook latch with no positive catch | Replace it with a positive draw latch |
| Oil on the tools | Interior finish remains soft | Empty the box and let the finish cure fully |
| Hot battery after lunch | Pack left in a closed box or truck outside its label limits | Remove it to shade and charge only within its printed range |
Decide whether to repair or replace
Split end: Plugging works for an abandoned hole in otherwise sound material, not for restoring a fractured handle support. If the split reaches the handle hole, travels through the joint, or reopens under load, cut a new end.
Racked carcass: Wet glue gives you a chance to recover the assembly by easing the fasteners and correcting the diagonals. Once cured out of square, the box may need disassembly; a diagonal brace is appropriate only when the underlying joints remain sound.
Loose dowel: A face-driven retaining screw is a short bench repair when the through-hole and surrounding wood are intact. An oval hole or crushed panel means replacing the damaged part rather than adding another screw alongside it.
Unreliable latch: Replacing a hook with a positive catch is usually a local hardware job. Check alignment with the box loaded, because a latch fitted to an empty, twisted lid may bind during use.
Soft finish: Waiting is the correction, although a heavily overapplied coating may require removal and refinishing. Don't cover it with a liner that traps the uncured surface against your tools.
Hot battery: Remove the pack from the storage arrangement rather than drilling ventilation holes and hoping. If it shows swelling, leakage, unusual odor, or damage, stop using it and follow the manufacturer's disposal guidance.
A box that fails the loaded carry test doesn't earn approval because you've hidden the flex under another bracket.
Pick the Box Then the Driver
Build the pine tote for hand tools, a short saw, and a straightforward evening assembly.
Choose the ash chest when planes and chisels need fitted storage behind a dependable lid.
Build the rolling birch box when the working load needs wheels rather than repeated lifting.
What fails a weekend wooden toolbox build?
Cutting lumber before checking the longest tool against the interior is the expensive mistake. The other common failure is driving finished joints before the scrap test produces a seated head without a crack.
A clean cut list won't rescue unsuitable stock or an untested fastening setup. Buy straight boards and prove the joint before spending time on finish.
What goes in the cart before the lumber run?
Exterior wood glue, a countersink, suitable drill bits, and clamps come first. Add a brushless drill as a bare tool, herramienta sola, if your existing battery platform supports it; choose an impact driver only when you also need its broader fastening capability.
For this project, a drill gives better value than a specialist nailer. It handles pilots, clearance holes, and the dowel openings, while a handsaw can complete the tote cuts.
Where should a Northern California buyer get the driver?
Choose a seller that identifies condition clearly, confirms battery compatibility, and provides a usable return route. Open-box savings matter only when the tool performs correctly and the missing battery or charger doesn't erase the price advantage.
Check pickup availability before leaving for the lumberyard. For delivery, verify that the advertised service covers your address and the tool is in stock.
Value Tools Co in Elk Grove offers tested and inspected open-box tools from DeWalt, Makita, Milwaukee, Ridgid, Ryobi, and Husky, with up to 55% savings on Open-Box or Bare Tools for equipping this build. Its 30-Day Peace of Mind Guarantee includes 30-day returns by mail or in-store and free return shipping on defective items, with same-day warehouse pickup and fast one-day Northern California delivery available. Pick up a compatible driver on the way to the lumberyard, then cut the tote this weekend.


