

A beading router bit cuts a rounded bead with a sharp shoulder beside it in a single pass, and its radius, bearing and cutting depth set the final shape. If you're choosing a cutter for cabinet trim or a furniture edge, match the profile to the stock before worrying about price.
The trouble usually starts when a small decorative detail gets treated like an ordinary edge-rounding job. A narrow strip won't support the router properly, a bearing follows an imperfect edge, or an extra-deep cut changes the shoulder instead of producing the bead you wanted. The right purchase includes a workable cutting sequence, not just the right radius.
What a Beading Router Bit Cuts and How It Differs
A beading router bit is a profiling cutter for producing a rounded decorative edge with a distinct shoulder beside the curve. That shoulder separates the bead visually from the surrounding surface, giving cabinet edges, trim and furniture parts a more defined line.
The package dimensions describe different parts of that result. Cutting radius determines the fullness of the curve, overall diameter determines cutter clearance, and cutting height tells you how much vertical cutting geometry is available. Shank size determines collet compatibility, while pilot-bearing diameter and flute count describe guidance and cutting construction.
The difference in scale is substantial: the Amana beading-bit specifications published by Coastal Tool include a 3/16-inch radius, 7/8-inch cutting diameter and 1/2-inch cutting height, alongside a larger example with a 3/8-inch radius, 1 1/4-inch diameter and 5/8-inch cutting height.
Read the profile, not just the diameter
The bearing establishes the lateral reference against the workpiece and helps determine the lower inset, or fillet. Cutting height changes the other shoulder, so adjusting the setup changes the bead's proportions without necessarily changing cutters.
Look at the shoulder beside the rounded section in this edge-routing example.
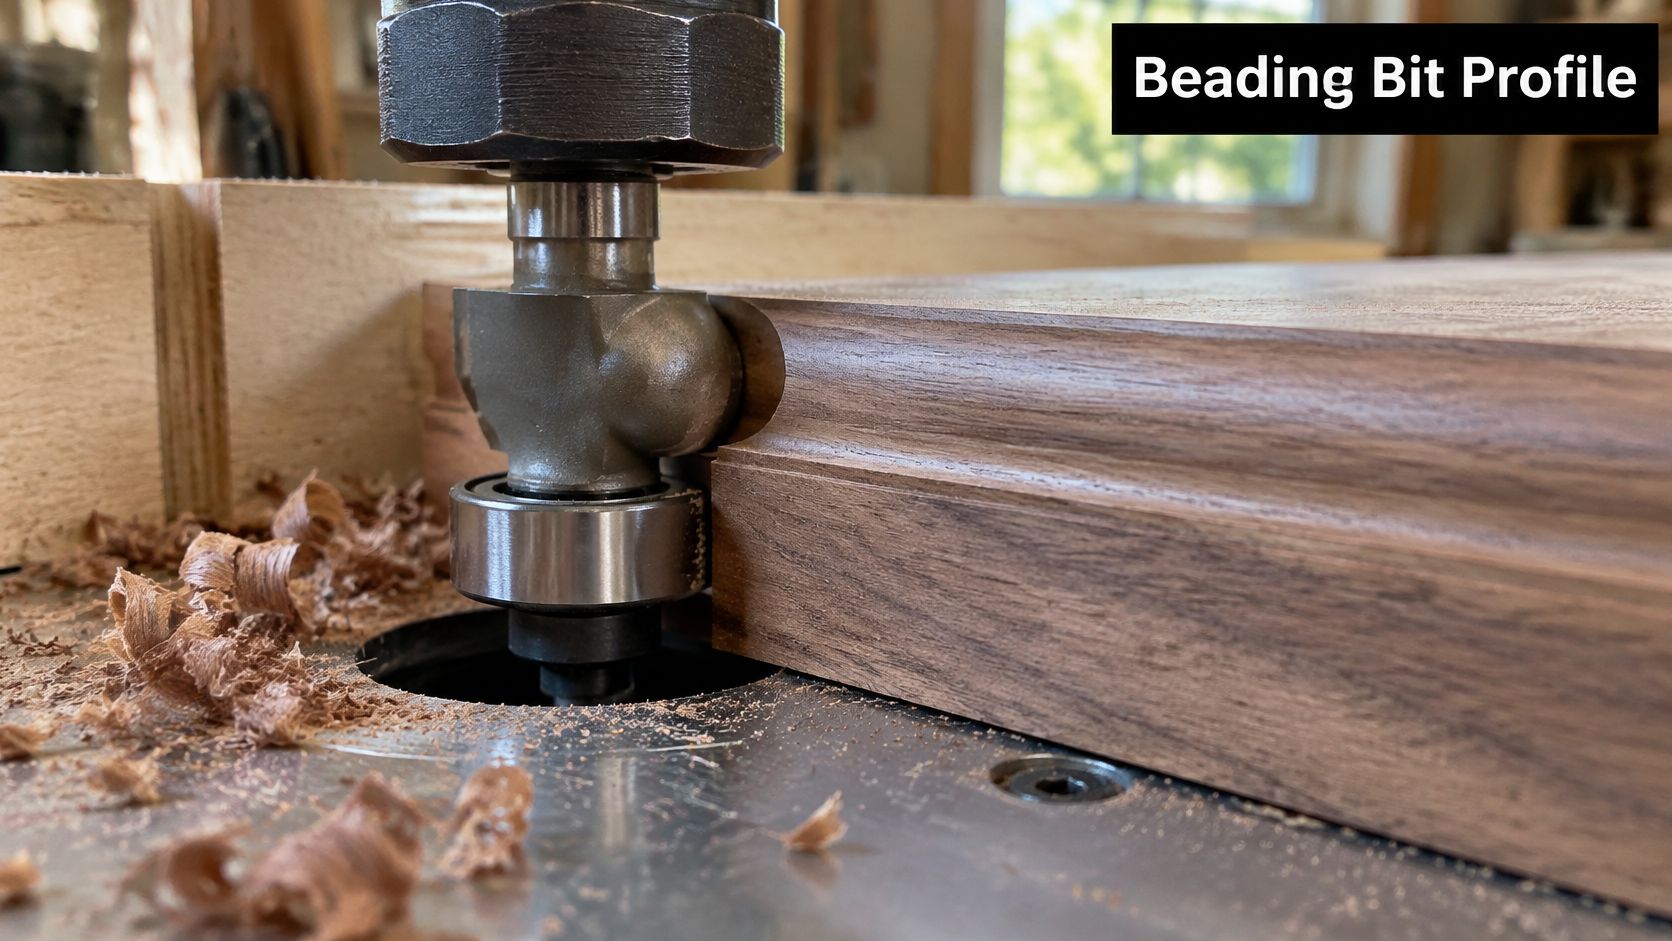
Many professional designs combine carbide edges with paired flutes for cutting hardwood, softwood, plywood and composition materials. Carbide offers wear resistance, but it doesn't make a dirty bearing, damaged edge or unstable workpiece acceptable.
A roundover removes the corner continuously. A bead retains a deliberate transition beside the curve.
Buying test: If the drawing needs a visible shoulder line, shop for a bead profile. If the requirement is simply a comfortable, softened corner, start with a roundover.
Who This Is For and Which Profile Fits Your Edge
Choose a beading bit when the finished edge needs definition, and a roundover when it needs a soft, continuous curve. The distinction matters on a cabinet face frame, where a shoulder creates a shadow line, and on a tabletop, where that same detail might be unnecessary.
The Popular Woodworking router reference distinguishes the bead's shoulder, or sharp arris, from the uninterrupted curve of a roundover. It also describes routing opposing sides to create a double-bead treatment.
Bead, roundover and combination bits compared
| Profile | Edge result | Bearing setup | Best for | Avoid when |
|---|---|---|---|---|
| Beading bit | Rounded bead with a sharp shoulder beside the curve | Specified bearing for the intended bead | Trim, cabinet edges, furniture lines | The project needs a soft, continuous edge |
| Roundover bit | Continuous softened corner without a shoulder | Standard bearing specified for the cutter | General edge softening throughout a shop | The project needs a visible shoulder line |
| Combination bit with paired bearings | Roundover or bead from one cutter | Smaller approved bearing for greater bead definition, followed by height recalibration | Shops needing several trim profiles without separate cutters | Setup time or measurement error is unacceptable |
| Double bead | Beads on opposing sides of an edge | Same approved bearing, with both sides routed | Decorative panel or rail edges | The stock cannot safely support both operations |
A dedicated beading bit makes sense when you'll repeat the same detail across doors, rails or lengths of molding. Its advantage is a recognizable profile from a repeatable setup; its disadvantage is that an inconsistent shoulder is easy to spot, especially where pieces meet.
A roundover bit is the more forgiving general-shop purchase. It suits shelves, utility furniture and exposed corners where comfort matters more than a decorative line, but it won't substitute for a specified bead.
A combination cutter can reduce accessory purchases, particularly for a small shop. The trade-off is setup discipline: changing bearings means checking the profile again, not assuming the old height setting remains correct.
A double bead gives a rail or panel edge more detail without requiring a completely different design language. Its cost is another operation and less room for error if the remaining flat edge must still support the bearing.
Who This Is For
- Cabinetmakers and trim carpenters: Use a bead to establish consistent details on face frames, suitable door edges and applied trim.
- Furniture builders: Match the profile to rails, panels and edging rather than choosing the biggest cutter that fits the router.
- DIY woodworkers: A dedicated bit can be good value for a defined trim project, provided the stock preparation is straightforward.
- Small production shops: An approved interchangeable-bearing cutter suits occasional profile changes when setup time is less expensive than maintaining separate cutters.
For a broader cabinetmaking kit, our cabinet-making router bit guide helps place an edge-profile cutter alongside the joinery tools the job needs.
Who Should Avoid This
Skip a beading bit if you only need to remove a sharp corner. Don't buy one expecting an ordinary bearing-guided edge cutter to produce decorative beads anywhere across a panel face.
Beginners should also avoid starting with loose, narrow molding strips. Practice on scrap of the same species and thickness, with enough width to support the intended operation.
Profile consistency matters more than decorative complexity. A modest bead with clean shoulders looks deliberate; a larger bead with wandering fillets looks like a setup error.
Beading Bit Sizes, Shanks and How to Choose One
Nominal size is the least useful number on the box. Radius, cutting height and shank determine what the cutter does.
| Bit | Radius | Diameter or profile | Shank |
|---|---|---|---|
| 7/8-inch bit | 1/8-inch | 3/8-inch profile | 1/4-inch |
| 1-inch bit | 1/8-inch | 1/2-inch profile | 1/4-inch |
| 1-1/8-inch bit | 1/4-inch | 5/8-inch profile | 1/4-inch |
| Professional bit A | 3/16-inch | 7/8-inch diameter, 1/2-inch cutting height | 1/4-inch or 1/2-inch typical; confirm before ordering |
| Professional bit B | 3/8-inch | 1-1/4-inch diameter, 5/8-inch cutting height | 1/2-inch typical at this diameter; confirm before ordering |
| Bosch PRO beading bit | 3.2 mm | 9.5 mm diameter, 10.2 mm working length | Metric shank; confirm size before ordering |
Lee Valley's beading-bit range lists the 7/8-inch, 1-inch and 1-1/8-inch cutters above, all on 1/4-inch shanks, with the profile dimensions shown. Bosch Professional's PRO Router Bit Beading listing specifies a 3.2 mm radius, 9.5 mm diameter and 10.2 mm working length for the metric entry. The two professional examples show how listings split overall diameter from cutting height rather than quoting a single “size.”
Profile dimension is not automatically cutting height. Don't substitute one label for another when comparing listings, and don't infer an unlisted shank from a product photograph.
Choose by the finished part
Larger cutters need more clearance and steadier handling, yet overall diameter alone doesn't tell you how full the bead will look. Read the radius and profile drawing together, then weigh that against the stock in front of you.
For light furniture edging or narrow cabinet trim, a restrained profile leaves useful material around the detail. A deep-looking bead on thin stock can leave an awkward shoulder or remove the flat surface the bearing needs. On narrow stock, decide how many passes the edge can support and check grain direction so the exit side of the cut lands on material that won't tear out.
Use this purchase order:
- Profile first: Match the curve and shoulder to a drawing or physical sample.
- Stock second: Check thickness, width, grain and the edge available for guidance.
- Shank and collet: Confirm an exact match rather than assuming your router accepts every common bit.
- Diameter and speed: Check the cutter's rating and your router's permitted capacity.
- Bearing arrangement: Identify the supplied bearing, approved alternatives and mounting hardware.
A shank that fits the collet proves only that it fits the collet. It doesn't prove the router can safely run the cutter.
Compare value beyond the purchase price
A carbide cutter is useful for repeated profiling, but durability also depends on clean sharp surfaces, sound bearings and avoiding impacts. Inspect an open-box cutter for chipped carbide and confirm that all required hardware is present.
The biggest bit is rarely the best buy. A larger diameter can demand more router capacity, a lower permitted speed and tighter feed control, and it leaves less margin for error on narrow stock. For a single trim run, I'd pick the profile that fits the part over the cutter that merely fits the router.
Router ergonomics matter too. A base you can keep flat and control comfortably is a better match than a more powerful router that feels awkward on the workpiece.
Our guide to HSS router bits gives additional context for comparing cutter materials. Keep material choice separate from profile compatibility.
Value Tools Co is an online tool shop based in Elk Grove, California, selling power tools from DeWalt, Husky, Milwaukee, Makita, Ridgid and Ryobi, with free U.S. shipping on qualifying orders and a concise 2-day return window.
Pick the profile, confirm the missing specifications before ordering, and reserve matching scrap for the setup cut. Don't make the finished component your compatibility test.
How to Set Up and Rout a Clean Bead
Start with straight, adequately wide stock and a stable reference edge. The cutter can reproduce an edge accurately, but it can't correct a hollow, bump or loose workpiece.
Use this setup sequence as a bench reference.
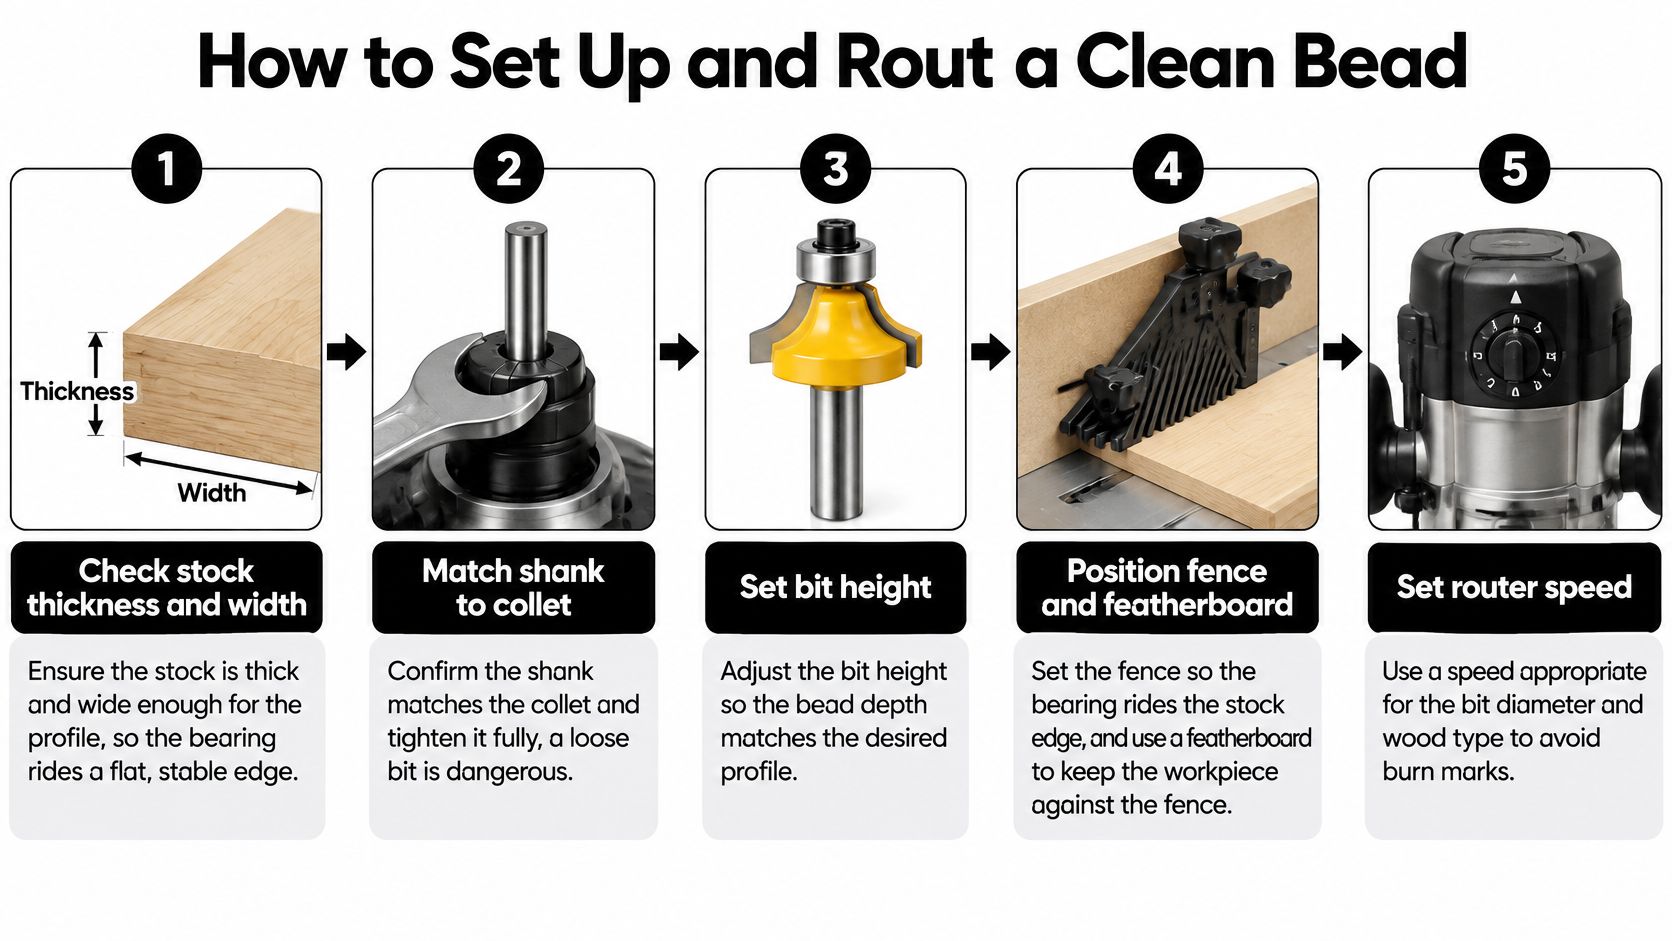
Secure the cutter and establish the reference
Disconnect power or remove the battery before installing the bit. Clean the collet and shank, insert the bit to the router manufacturer's specified engagement, and tighten the collet correctly; don't bottom the shank against the spindle and assume that makes it secure.
Fit only a bearing approved for the cutter. Rockler's router-bit guide explains how an approved smaller bearing can expose more cutting width and produce a more defined bead, while interchangeable-bearing designs can provide different edge treatments.
That change affects the setup, not just the accessory list. Check the mounting screw, confirm smooth bearing rotation, and establish the cutting height again.
Set the router on matching scrap and bring the cutter into position gradually. Compare the shoulder against a marked reference line or sample rather than judging only the rounded portion.
Make the test cut useful
- Support the work: Clamp handheld-routing stock securely, or use appropriate table support and featherboards without trapping the work against the cutter.
- Stage the cut: Where substantial material must come off, use controlled shallow cuts with suitable fence guidance before the final bearing-referenced pass.
- Check both ends: Inspect the entry and exit for dips caused by tilting the base or losing bearing contact.
- Keep the feed steady: Don't pause against the spinning cutter while studying the profile.
With a bearing-guided handheld setup, don't improvise partial cuts by letting the router float away from the edge. If staged removal needs another reference, use a suitable fence or revise the operation.
The demonstration below can help you relate router position to the workpiece; your cutter and router manuals still govern compatibility and operation.
Keep the setup consistent on the job
When buying a cordless router as a bare tool, check whether the listing includes the motor, base, battery and charger rather than assuming the term means a base alone. Use consistent crew terminology for the collet, guide bearing and cutting height so adjustments aren't misunderstood.
In Sacramento and Central Valley summers above 100°F, keep cordless routers and batteries shaded between runs and allow overheated equipment to cool. A brushless motor doesn't remove the need for thermal management.
A clean bead has a continuous curve, a crisp shoulder and no burned dwell marks. Sanding should refine that result, not reshape a faulty profile.
Cutting Half-Round Beads in Two Passes
A single-pass edge bead and a complete half-round molding aren't the same operation. Driving the cutter deeper won't necessarily turn one into the other.
The Popular Woodworking edge-and-surface guide describes a beading cutter as effectively a point-cut quarter-round tool: each pass produces a 90-degree arc, while a half-round bead requires two passes. The same guide warns against routing narrow profiles as loose strips and recommends shaping the edge of wider stock before cutting the strip free.
Keep the supporting stock until profiling is finished
Prepare the stock to the thickness required by the intended profile while leaving enough width for secure handling. There isn't a universal safe width: it must accommodate the router base or the table's guarding, hold-downs and push devices without putting your hands near the cutter.
Sketch the stock cross-section before cutting. Mark the finished bead, the cutter's first position, the reference face, the bearing contact and the orientation required for the opposing pass.
A practical sequence is:
- Establish the first curve: Rout the supported edge while keeping the marked reference face consistent.
- Reorient deliberately: Follow the cutter's intended geometry and confirm that the new orientation still provides stable support and guidance.
- Match the meeting line: Test the opposing cut on scrap and inspect the crest for a ridge or flat.
- Separate the molding afterward: Rip the completed profile free using a suitable guarded saw setup, keeping hands clear of the narrow offcut.
A mismatched crest usually calls for a setup correction, not aggressive sanding. If you sand away the ridge without checking symmetry, you can flatten the bead and lose the profile you bought the cutter to make.
Keep the board wide while the router needs support. Make the molding narrow only after the shaping operation is complete.
Match the workflow to the application
Furniture edges often need only the edge treatment shown on the drawing. Adding an opposing cut can change the design rather than improve it.
Cabinet trim may be better made as applied molding from wider prepared stock. That lets you machine repeatable lengths before fitting them to the cabinet.
Multi-bead reeds and surface decoration need guidance that an edge bearing alone can't provide across an uninterrupted face. Choose a cutter and fence, template or other guiding arrangement intended for that operation.
The cheapest cutter isn't the best value if it requires an unstable setup. Nor does a larger radius save time when it demands more stock removal, additional preparation or a router table you don't have.
Safety Checks Before Every Beading Pass
Feed against cutter rotation. For handheld routing around an exterior perimeter, the Festool OF 1400 manual specifies counterclockwise travel and recommends starting across end grain to reduce corner tear-out.
That direction rule describes moving the handheld router around the work, not feeding stock across a router table. Confirm the correct feed direction for the actual setup.
Keep these checks visible beside the router.
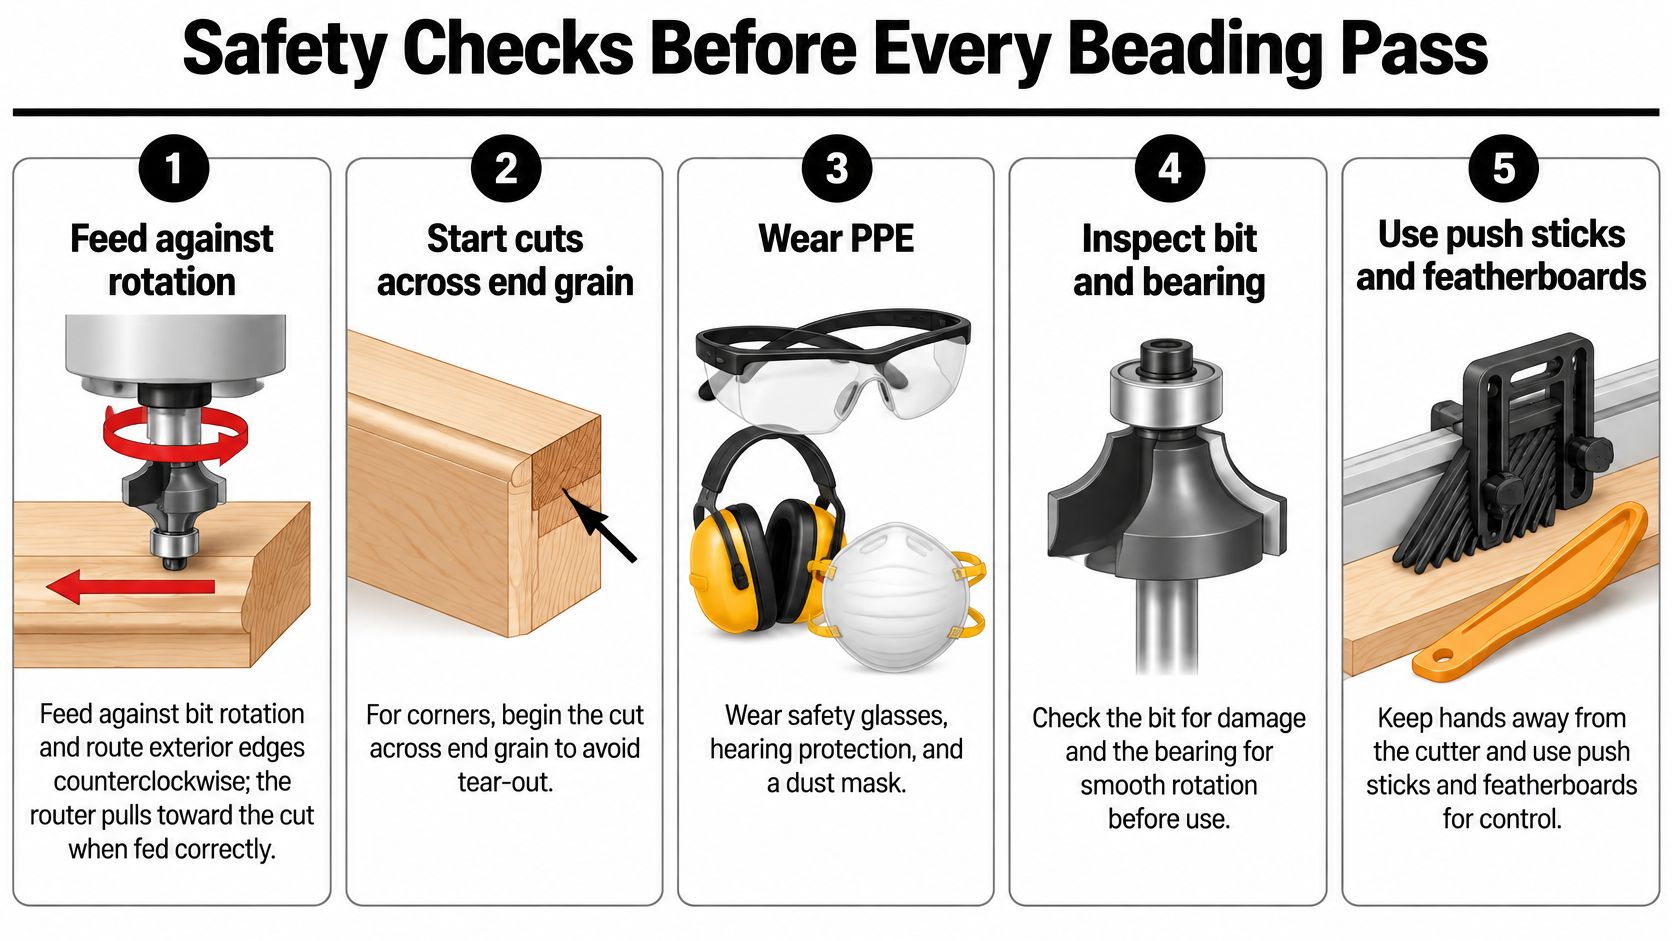
Control grain transitions and corner support
Route end grain before the adjoining long-grain edges where the workpiece geometry allows. Use a sacrificial backer at vulnerable exits and maintain bearing support as the router approaches a corner.
For softwood, avoid crushing fibers through excessive pressure. For hardwood and figured stock, test the grain transitions and leave a light finishing cut; on plywood, confirm that any edge band is thick enough for the intended profile.
Climb cutting can pull the router forward. It isn't a beginner's tear-out remedy; experienced operators may use tightly controlled local cuts at selected transitions, but changing workpiece orientation while preserving conventional feed is the safer starting point.
Bench checklist
- Power isolated: Unplug or remove the battery before changing cutters or bearings.
- Cutter inspected: Check carbide, shank engagement, collet tightness and bearing rotation.
- Operator protected: Wear eye and hearing protection, manage dust and keep loose clothing clear.
- Work supported: Use appropriate clamps, push devices and featherboards.
- Heat managed: Let hot equipment cool, keep stored bits out of direct sun and maintain clear ventilation.
Our power-tool safety tips cover the broader shop checks. Stop immediately if the cutter vibrates, the bearing binds or the work shifts.
Frequently Asked Questions About Beading Router Bits
What shank size do beading router bits use?
Quarter-inch shanks cover most of the commonly listed range, though larger profiles also come in bigger shanks. Match the shank exactly to the router collet and verify the individual listing before buying. Where the router accepts a heavier shank, it resists chatter on wide beads better than a slim one.
Can a beading bit be used in a handheld router?
Yes, if the router accepts the cutter's diameter, shank and operating speed. CMT's beading-bit documentation lists a model rated to 28,000 RPM and marks large-radius versions for router-table use only, so check each cutter rather than assuming every bead profile runs safely in a handheld router.
Why does my bead look uneven?
Start with the bearing. A dirty or binding bearing lets the cutter wander, and a cutting-height setting that shifted between passes leaves a shoulder that changes along the workpiece. An edge that is not flat produces the same symptom, as do router-base tilt and inconsistent support. Flatten and square the stock edge before blaming the bit, because a bead cut on a bowed edge will track the bow.
Does a smaller bearing change the bead?
Yes. An approved smaller bearing exposes more cutter and can deepen the bead's definition, which matters on narrow stock where a full-radius profile would look crowded. Recheck the cutting height and make a fresh test cut after swapping bearings.
Can I return a bit that does not fit?
Value Tools Co keeps a concise 2-day return window, which enables fast exchanges when a cutter arrives and the shank or radius turns out wrong for the job. Confirm your collet size and required radius before ordering so an exchange never becomes necessary.
Visit Value Tools Co to compare fully functional open-box and lightly used tools, with savings up to 55% off typical retail pricing, and choose equipment that matches your beading cutter and stock-preparation plan. Bring your required radius, router model and collet size to the purchase decision, because the cheapest or largest cutter on the shelf is rarely the one that leaves the cleanest bead on your stock.


