

A metal shear attachment for drill is a low-capacity scissor or nibbling head that cuts about 18-gauge galvanized steel, about 20-gauge stainless steel, and about 14-gauge aluminum, and thicker stock needs a different tool. Popular advice gets this backwards by starting with the drill you own. Read the gauge row first, the drill second, and the cut last, because the metal decides whether the attachment belongs on the job at all.
If your sheet is past the limit for its alloy, a stronger battery won't fix it. You'll get a stalled motor, a chewed edge, and blades that wear out early. I would buy this attachment only when the sheet, the drill's sustained speed, and your cut volume all pass.
What a Metal Shear Attachment for a Drill Can Cut
A metal shear attachment for drill turns a drill into a portable sheet cutter. It isn't an industrial shear, it isn't a grinder, and it won't pull plate through because your drill feels strong. It's a small opposed-blade head made for thin sheet you can guide by hand.
Start with the capacity table. If your material isn't inside the row for that metal, stop shopping for this head and look at a dedicated nibbler or powered shear instead.
Typical Cutting Limits for a Drill Metal Shear
| Material | Typical max gauge | Approx thickness | What changes the limit |
|---|---|---|---|
| Galvanized or mild steel | 18 gauge, some models 16 gauge | About 1.2 mm, 1.6 mm only if listed | Flat stock and sharp blades, 16 gauge isn't universal |
| Stainless steel | About 20 gauge | 0.8 to 0.9 mm | Hardness and work hardening, first metal to stall the drill |
| Aluminum | About 14 gauge | About 2.0 mm | Softer metal allows a higher thickness than steel |
The DEWALT 18GA shear attachment specification rates the class at approximately 18-gauge galvanized steel (about 1.2 mm), 20-gauge stainless steel (about 0.9 mm), and 14-gauge aluminum (about 2.0 mm). Treat those numbers as maximums on flat, clean stock with sharp blades. A curled edge, a hard alloy, or a dull cutter lowers what you can finish.
Stainless is the ceiling for a reason. Its higher strength and work-hardening tendency raise torque demand as the blade works, which slows your feed, heats the edge, and wears the cutters faster. Force it and a cordless drill stalls instead of cutting clean. Aluminum looks generous in the table only because it's softer and needs less force per stroke.
Some heads list 16-gauge mild steel. That's a model-specific rating, not permission to assume every 18-gauge head can do it. Check the printed rating on the exact head you're buying, then test on an offcut of the same alloy before you commit to a visible panel.
You'll usually see a 1/4-inch hex shank and hardened tool steel cutting components. Use those details to identify the tool and confirm it seats in your chuck. They don't raise the thickness limit by one gauge.
Practical rule: If you don't know the alloy or you can't measure the thickness, don't guess. Unidentified stainless is where cheap heads go to die.
Shearing also cuts differently from an abrasive wheel. It separates sheet without a continuous spark or chip stream, which matters in an occupied mechanical room or near finished surfaces. You still get sharp edges and small offcuts to control, but you don't get grinding dust across the room.
Verify three things before a production run. Confirm the alloy, check that the sheet is flat enough to feed without twisting, and inspect the blade edge under light. A nicked blade that still cuts thin galvanized may tear stainless on the first pass.
If the sheet is past the row for that metal, nothing later in setup makes the head stronger. Speed, technique, and a fresh battery help only inside the rating. Past it, you're just choosing how the cut fails.
How the Drill Turns Spin into a Shear Cut
Read the gauge row first, the drill second, and the cut last. The metal decides whether a shear attachment is the right tool. The drill's sustained RPM and battery only decide whether that stroke finishes clean instead of stalling halfway through the sheet.
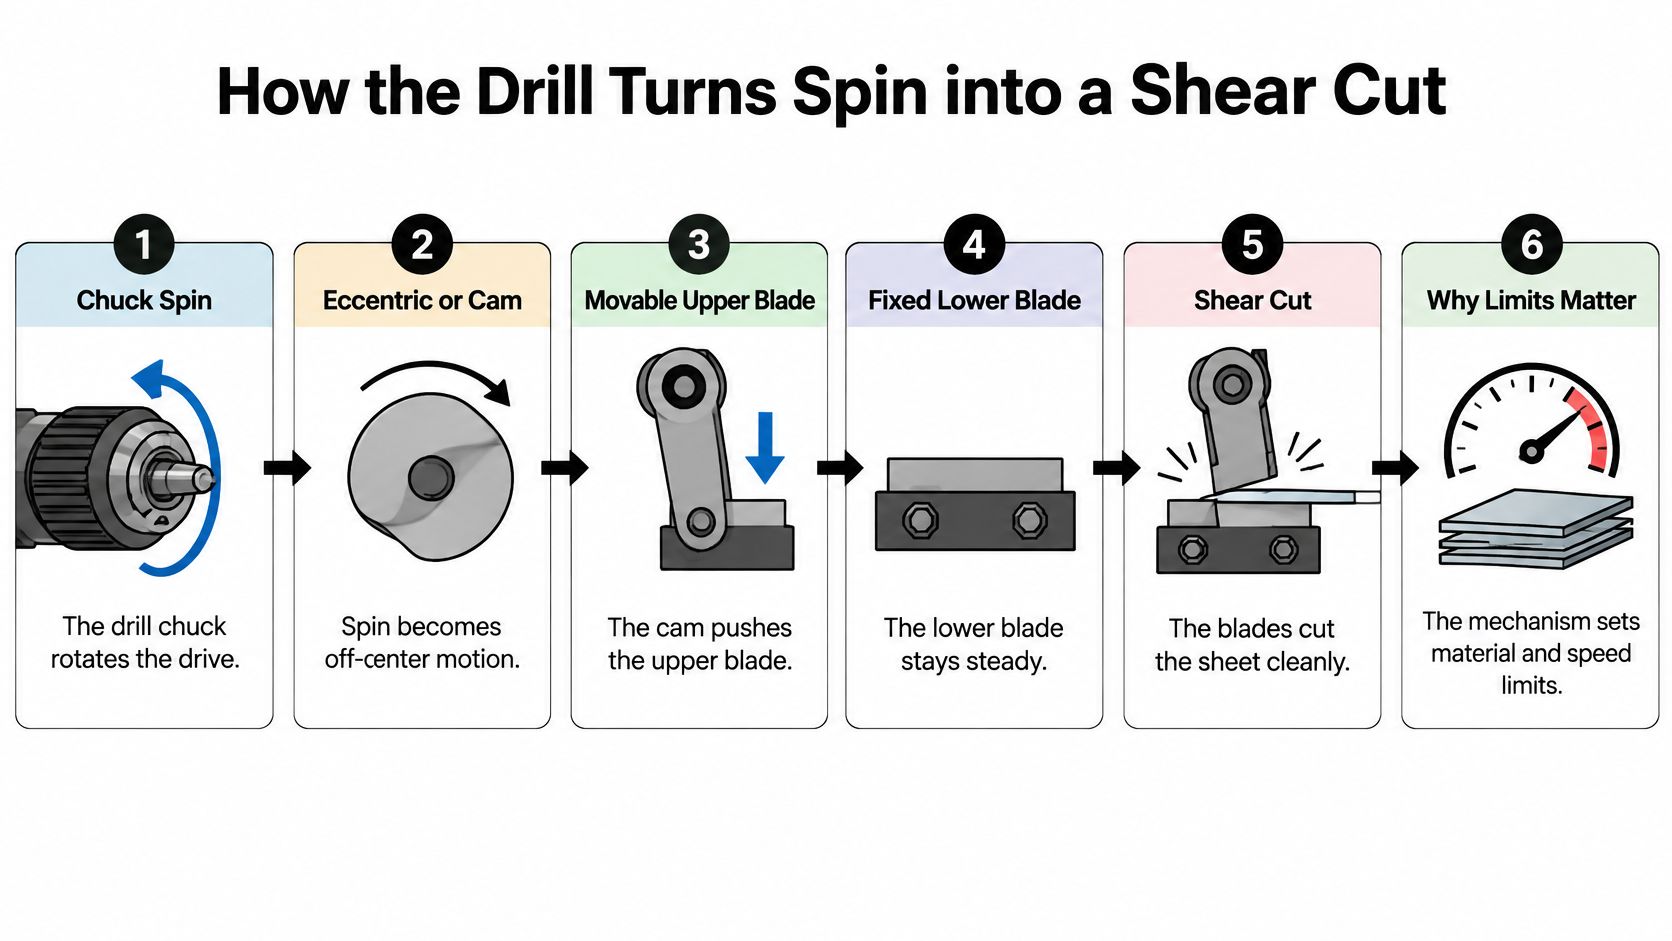
The chuck spins an eccentric or cam. That cam pushes a movable upper blade up and down against a fixed lower blade, and each stroke shears a short increment of sheet. The drill is the motor, the cam is the crank, and the blades work like tin snips that do not tire your hand. They still have a jaw opening, a fixed clearance, and an edge that dulls. Those three set the stop, not how hard you pull the trigger.
Scissor Heads and Nibbler Heads Cut Differently
The Lowe's listing for a 360-degree pivoting shear attachment describes scissor-style attachments with a stationary lower blade and a reciprocating upper blade, where drill rotation becomes the jaws' up-and-down cutting motion. That opposed-edge action locally deforms the sheet, fractures it, and separates it. You feed the head. Rotation only cycles the blades.
A scissor-style head leaves a slit with little kerf. A nibbler-style head punches out small chips as it advances, which makes interior cutouts easier. Some nibbler kits include a step-drill bit for starter holes sized to the opening the punch needs. That is how an HVAC tech starts a register opening in the middle of a duct cheek without an edge to enter from.
Many designs use a rotating collar or pivoting head that turns 360 degrees. You steer the blades along a straight line, a curve, or a circle while the drill body stays put. On a ladder or inside a closet, that collar is what keeps your brace. Spinning the whole drill to change direction is how the line wanders.
Blade Clearance Decides Edge Quality
Blade clearance has to match material thickness. Too tight and the head drags, burrs the edge, and loads the motor. Too loose and the edge rolls instead of fracturing clean. A wrong gap raises burrs, drag, and blade wear. Throttle will not close a gap the head was set with.
If the cam is still turning and the sheet wrinkles, or the drill RPM falls off and stays down, the jaw is no longer fracturing metal. It is stalling against a thickness the stroke cannot clear. I put the attachment down at that point. A fresh battery can hold speed only while the gauge is inside the head's rating and the edge is still sharp enough to finish each increment.
On a duct transition cut in place, the head fits where a corded shear does not, the collar follows the curve, and you stay on one tool. Move to thicker stock and the same head snags, because the cam stroke and jaw opening have not changed.
Clearance and blade condition change the edge more than the voltage printed on the battery. A sharp, correctly set head on a mid-range drill beats a dull head on a flagship drill every time.
Drill Speed Torque and Chuck Match
Read the gauge first, the drill second, and the cut last. The metal decides whether a shear attachment belongs on the job. Sustained RPM and a battery that does not sag decide whether the cut finishes clean. A 3/8-inch or 1/2-inch chuck only means the hex can seat.
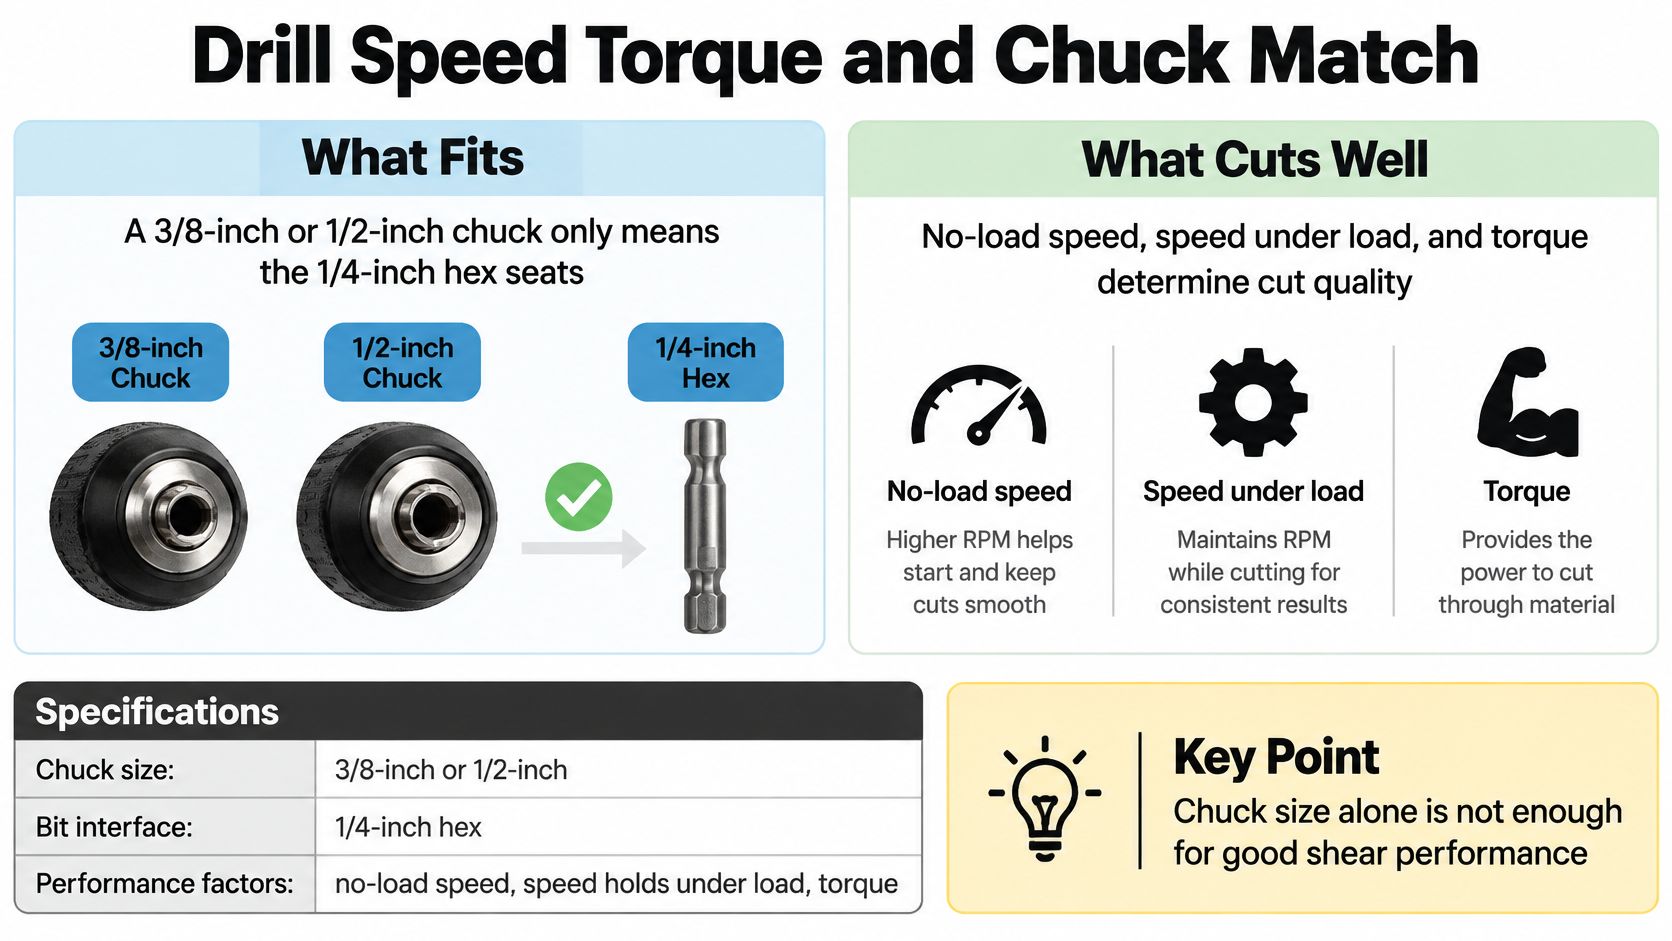
Typical guidance in the VEVOR electric metal shear category places compatible drill speeds around 1,500 to 3,000 RPM and warns that exceeding the attachment's material rating can cause rough edges, accelerated blade wear, or motor overload. After the gauge fits, cut quality hangs on whether that speed holds under load, how the clutch behaves, whether you have a side handle, and how healthy the pack is.
Use the table as a decision check, not a fit check. If the drill fails two rows, budget for the drill before you blame the head.
Drill Match for a Metal Shear Attachment
| Check | Target | If it is wrong | Who feels it first |
|---|---|---|---|
| No-load speed | Variable, about 1,500 to 3,000 RPM, start mid-low | Snag and wrinkle if slow, heat and loss of line if fast | Both DIY and trade on the first cut |
| Torque under load | Speed holds through the rated gauge without clutch chatter | Stall, torn edge, tripped thermal protection | Daily duct and roofing more than one patch |
| Chuck and shank | 3/8 or 1/2 in chuck, 1/4 in hex seated fully | Spin in the chuck, not a thicker cut | Anyone who judges by fit alone |
| Control | Side handle, two hands, braced head | Head yaws and overloads the hex | Ladder, roof, and overhead reach |
| Battery condition | Healthy pack, brushless preferred for repeat cuts | Bog, stall, or thermal cutoff mid-cut | Open-box drills and long hot afternoons |
| Impact driver | Do not use for shearing | Hammering loads the cam and blades | Anyone swapping an impact driver for the shear |
Start in the lower-middle of that speed band on variable speed. Too slow raises force per stroke, so the head snags or wrinkles light sheet. Too fast heats the blades, especially in stainless, and the cut gets harder to steer along a marked line.
Low-speed, high-torque ranges can bog if the motor can't hold RPM through the stroke. A high-speed setting with no trigger control overruns your line on curves. A brushless drill usually holds speed longer under repeat load, but the battery platform name doesn't prove sustained output. Runtime, thermal protection, and grip control matter more than nominal voltage.
A side handle isn't optional on longer cuts. The pivoting head can yaw if you hold the drill one-handed, and that side load goes straight into the hex connection. Brace the head, keep two hands on the tool, and let the collar steer.
On a hot afternoon, thermal shutdown often shows up before the gauge limit does. Rest a hot pack in shade. Don't wrap the drill in a towel or leave it on a hot roof deck, and rotate a second battery. A fading pack produces the same torn edge as a dull blade. I put the attachment down when the motor starts hunting RPM instead of shearing. Forcing it only chews the edge and cooks the pack.
Open-box buyers need extra care. A clean-looking head can hide dull blades, and a clean drill can hide a weak battery. When you're checking drill specs against this table, you can [find the GSB 180 LI](https://yasutrading.com/products/Bosch GSB 180- LI Professional Cordless Combi Drill) as one example of a cordless combi drill listing to compare speed ranges against. The cordless drill buying guide walks through chuck, speed, and battery checks in the same order.
Don't run this head on an impact driver just because the hex fits. The hammering action loads the cam and blades with impacts they weren't built for. The cheapest drill that barely fits often produces the most scrap and the shortest blade life, which makes it the most expensive choice by the second job.
How to Mount and Run the Shear
Use one procedure every time. Most bad cuts come from skipping step one or forcing step seven, not from a mystery defect in the head.
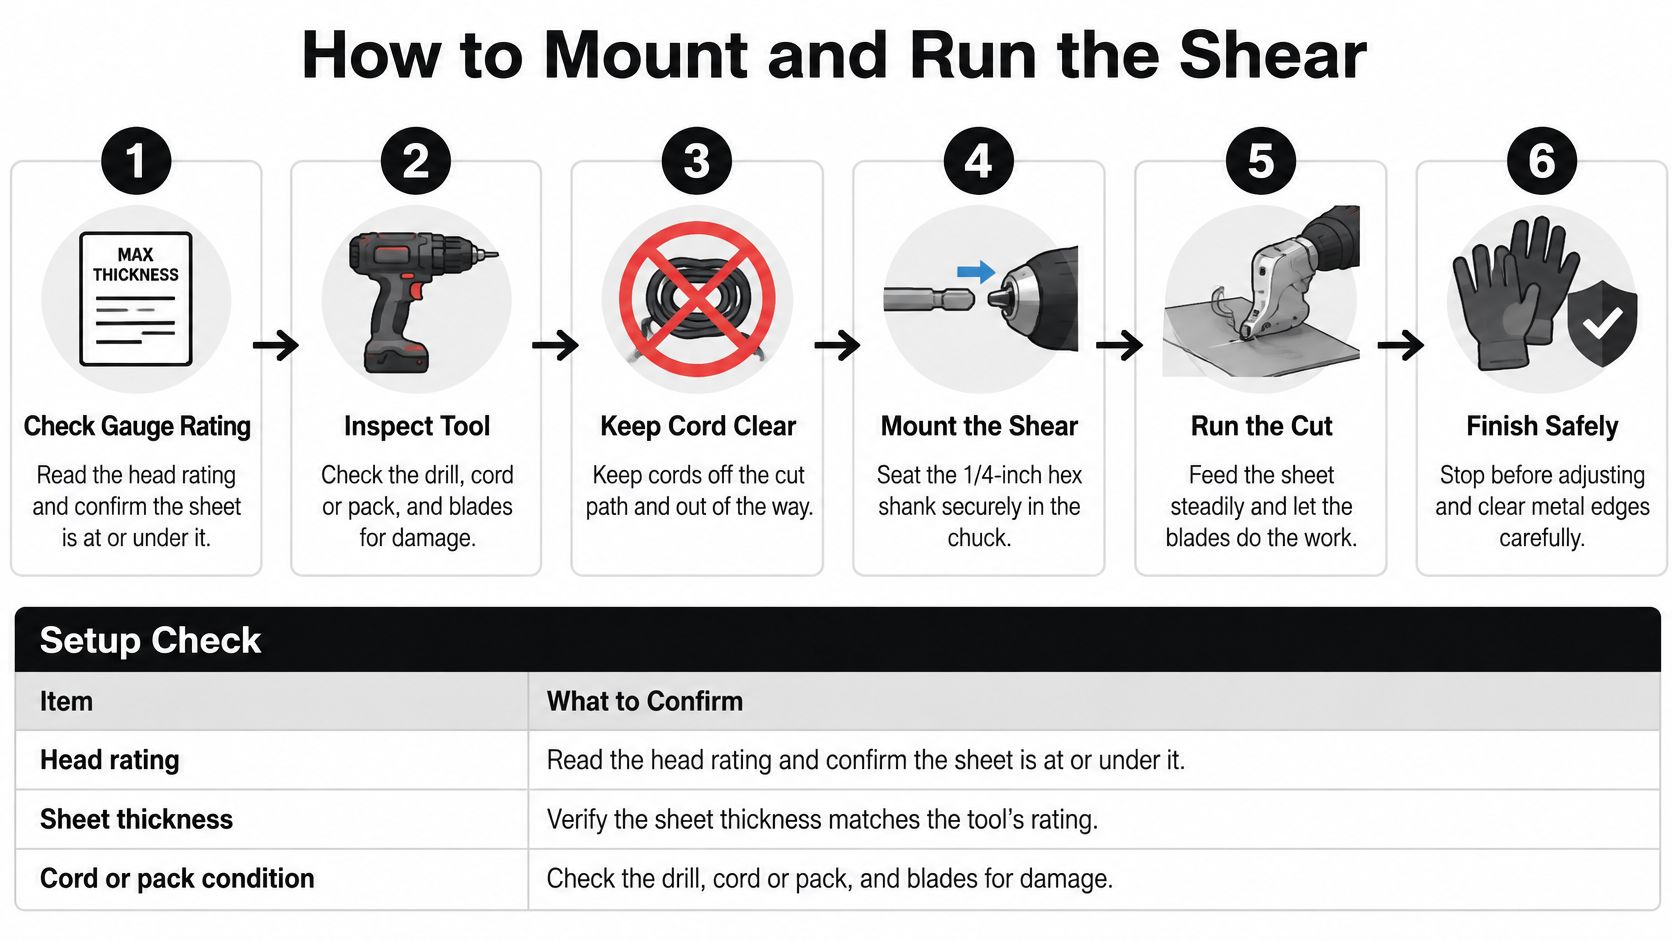
Mounting and Cutting Steps
- Read the gauge rating first: Confirm the sheet is at or under the head's listed limit for that metal, because every later step assumes the material fits.
- Inspect before you mount: Check the drill, cord or pack, and blades for damage, and keep cords away from sharp edges, heat, and oil.
- Seat the hex fully: Push the 1/4-inch hex shank in and tighten the chuck so the shank can't spin under load.
- Set speed and fit the handle: Put variable speed in the lower-middle of the stated range and attach a side handle for two-hand control.
- Support the sheet: Clamp or fully support the workpiece so it can't move, twist the head, and overload the hex connection.
- Mark and start correctly: Mark your line, and for an interior opening, drill the starter hole before the nibbler head enters.
- Feed steadily: Start the drill, let the blades bite, and feed with steady pressure without pushing the motor through the metal.
- Steer with the collar: Turn the pivoting head to follow curves while the drill body stays braced in both hands.
- Stop before you touch: Stop the drill before clearing offcuts, changing direction by hand, or adjusting blade clearance.
- Deburr last: Dress the edge only after the tool is still and the sheet is secured.
The Home Depot listing for a 360-degree pivoting shear attachment specifies roughly 1,500 to 3,000 RPM and a 360-degree pivoting head for straight cuts, curves, circles, and irregular profiles without rotating the drill body. At the lower end, the shear advances slowly and snagging or deformation gets more likely. At excessive speed, frictional heating and blade wear increase, particularly in stainless. Begin near the lower-middle, keep feed pressure steady, and let the blades cut.
If you have to shove the head to keep it moving, the setup is wrong. Back off and find out why before you wrinkle the sheet or burn the edge.
Safety on a portable head is about control, since a fixed guard can't cover every curve. Wear eye protection, wear gloves suited to sharp sheet edges, and keep both hands out of the blade path. Don't reach under the jaws to catch an offcut. Our power tool safety tips cover the inspection and cord habits that apply here.
The pivoting head is a steering aid, not a free joint. If it isn't braced, it can redirect the cut when the blade catches a rib or a curled edge. Keep the head against your guide hand pressure and stop before you reposition.
Use this stop rule. A rough edge, a stall, or heat at the blade means you back off, not add throttle. Check thickness, clearance, and battery charge in that order, then test on scrap.
Sheet Metal Jobs That Fit the Attachment
Judge this tool by real cuts, not by the photo on the box. The VEVOR electric metal shear specifications list limits of 0.8 mm stainless steel, 1.2 mm galvanized steel, and 2.0 mm aluminum plate, with some models reaching 16 gauge or 1.6 mm in mild steel. Those numbers fit light sheet work. They don't fit structural steel.
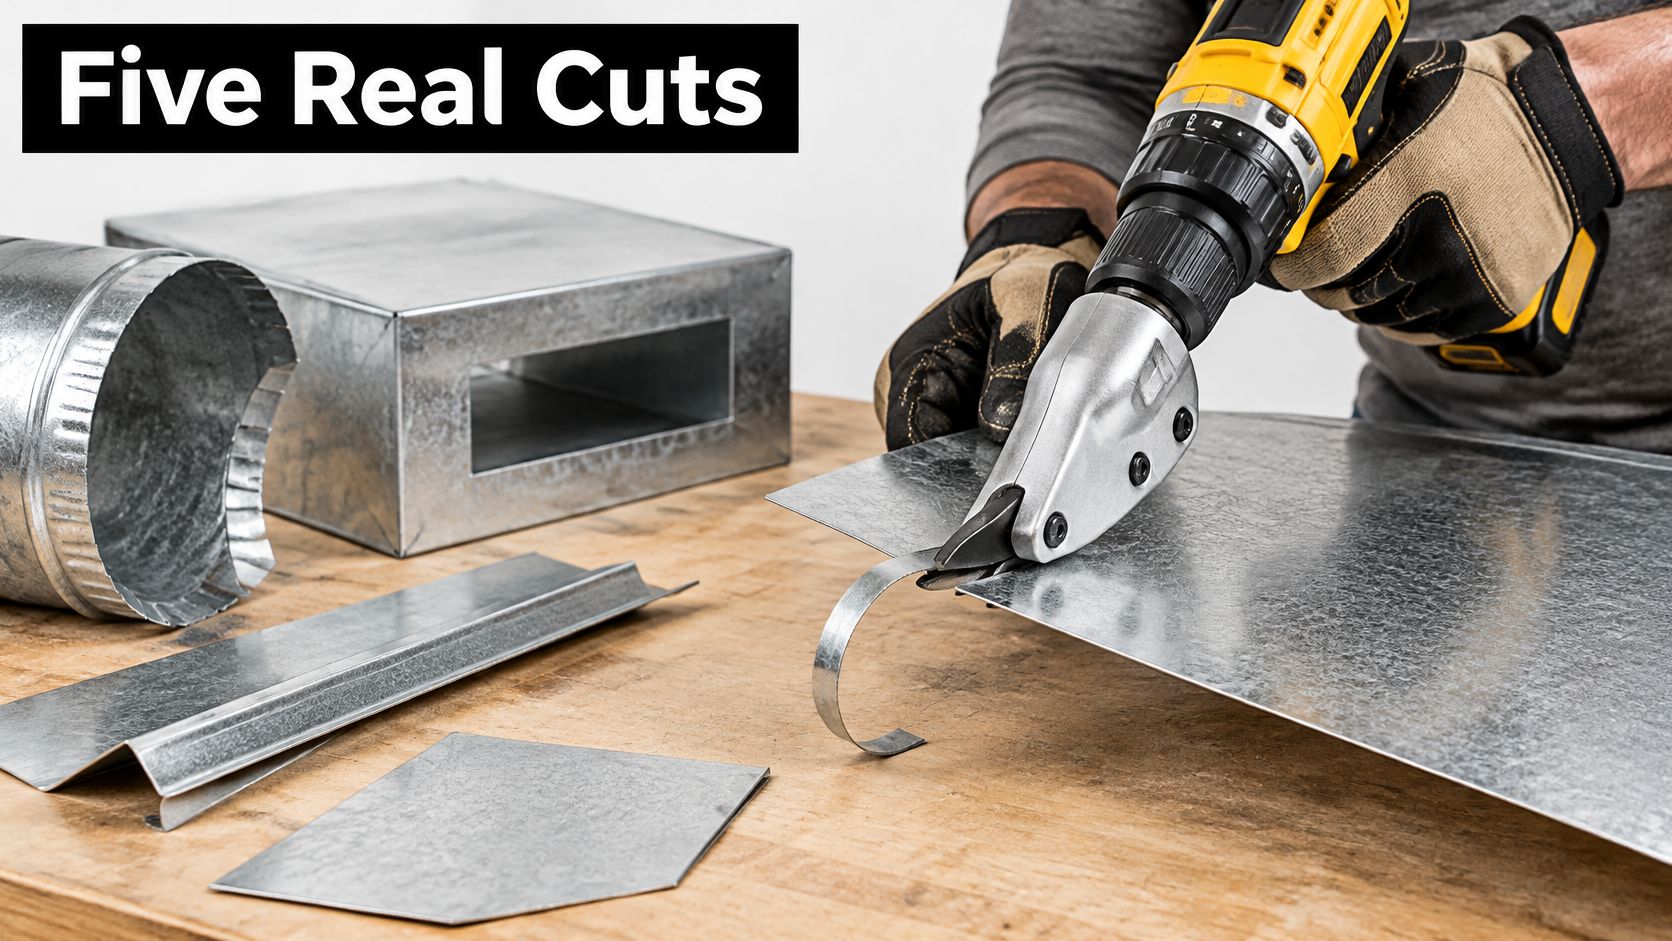
Jobs Where the Attachment Earns Its Place
- HVAC ductwork: Trim a duct cheek or start a register opening in a closet, where the pivoting collar steers the curve and a separate electric shear is one more cord. It stops fitting when a stalled feed wrinkles the cheek or the run becomes a stack of fittings.
- Roofing and flashing: Shorten a panel or cut a penetration on the roof without a spark stream near underlayment, staying inside the listed gauge. If you're weighing panel materials for that roof, compare zinc roofing material options before you assume your head's rating covers the sheet you pick.
- Siding and fabrication trim: Follow a marked line on aluminum, which the capacity row allows thicker than steel. It stops fitting when trim becomes repeated full-length rips all day.
- Auto and maintenance panels: Patch thin skin or cut wire mesh for a guard or vent. Frame steel and thick brackets belong on a different cutter.
- In-place repair: The drill that just ran the fasteners becomes the cutter for one short shear cut. That's the whole point of the platform, and it stops fitting the moment the repair turns into production.
Stainless should be treated as the limiting material on every one of these jobs because its hardness and abrasion load increase motor strain and blade wear. A stainless cap that fights you on the test cut should go to a dedicated nibbler. Don't burn a set of blades proving the table right.
Northern California heat changes how you stage the work. Attic and rooftop duct jobs around Sacramento and the Central Valley in 100°F+ weather punish a hot battery faster than the blades, so stage your cuts, keep a second pack in shade, and don't force a fading drill through the last foot. Repeated heavy-gauge runs belong on a dedicated powered shear regardless of temperature.
After gritty roof work, wipe the jaws and check clearance before the next cut. Embedded grit changes the gap and chews the next edge.
Maintenance and Troubleshooting for Drill Metal Shears
Start with the blade, because most edge complaints trace there. After each job, stop the drill, wipe chips and grit from the jaws, and check the pivot for play. A head that rattles won't hold clearance, and a head that won't hold clearance won't cut clean no matter what drill drives it.
Clearance is the adjustment most users skip. Set it to the sheet thickness, test on an offcut, and reset it after a gritty roof cut. Replace blades when a previously clean line starts to burr, not when the head stops cutting, because a dull edge loads the drill and heats the work long before it fails outright.
Store the head dry with a light film of oil on the blades. Keep the hex shank and chuck jaws clean so the shank seats fully every time. In 100°F+ Sacramento and Central Valley heat, let batteries cool between runs, since thermal cutoff often arrives before any blade problem shows.
Symptom to Fix Lookup
| Symptom | Likely cause | Fix |
|---|---|---|
| Burred or rolled edge | Clearance wrong for thickness or dull blades | Reset clearance, test on scrap, replace blades if burr stays |
| Head snags or stalls | Sheet over rating, speed too low, weak battery | Confirm gauge, raise speed within range, swap in a charged pack |
| Wrinkled light sheet | Feed forced or sheet unsupported | Clamp the sheet, slow your feed, let the blades bite |
| Heat at the blade | Speed too high, stainless work hardening, dull edge | Drop speed, rest the tool, inspect or replace blades |
| Shank spins in chuck | Hex not seated or chuck jaws dirty | Clean the jaws, seat the hex fully, retighten |
| Cut wanders off line | Pivoting head not braced or one-hand grip | Fit the side handle, brace the head, steer with the collar |
Stop rule: If the head stalls, heats, or tears the sheet twice in one run, stop. Cut scrap to confirm the setup and reduce thickness rather than adding throttle.
Budget blade replacement as part of owning the head, not as a surprise. Occasional stainless work shortens blade life even when you stay inside the rating. If you're replacing blades every few jobs, the work has outgrown the attachment.
Who This Is For and Who Should Avoid This
This attachment fits HVAC installers, roofers, maintenance techs, and DIYers who already own a sound variable-speed drill and cut thin sheet occasionally. Duct, flashing, siding, wire mesh, and trim inside the rated gauge are its home territory. If that's your week, it's a sensible buy.
The OSHA directive on point-of-operation safeguarding for shears treats safeguarding at the cutting point as central and recognizes awareness barriers where fixed guards can't accommodate varied shear operations. In practice that means you clamp or support the sheet, keep both hands away from the blade path, wear eye protection and cut-resistant gloves, and stop the drill before clearing offcuts. A rotating head improves access, but it can redirect the cut if it isn't braced.
Pros Cons and Ideal Users
- Pros: One less dedicated tool on the truck, curves without spinning the drill body, a cleaner edge than a cutoff wheel in occupied space, and low added cost when your drill is already in service.
- Cons: A hard thickness ceiling, fast blade wear in stainless, edge quality that collapses with a weak battery, a pivoting head that demands two-hand control, and slower pace than a dedicated shear.
- Ideal user one: A service tech cutting a few duct or flashing openings a week with a drill already on the truck.
- Ideal user two: A homeowner replacing a panel or flashing piece in aluminum or light galvanized, once or twice a season.
Avoid it if you cut plate or unidentified stainless, run a production shop, or cut thick stock all day. Avoid it for uncontrolled overhead work with an unsupported sheet. Avoid it if your only driver is an impact driver. For thicker metal, our guide to the best saw for cutting metal covers tools built for that work.
Between the three options, pick by cut type. A scissor head is the better everyday edge slit. A nibbler head is better for interior openings where a starter hole is part of the job. A dedicated powered shear wins when the day holds dozens of cuts or the gauge sits above the attachment rating.
Choose the Shear and the Drill Together
The sheet decides whether a shear head is the right tool. The drill only decides whether that head finishes clean. Buying the head first is how you end up with a cutter your drill cannot run, or a drill wasted on a head the metal never needed.
Read the gauge row before anything else. Note the alloy and the thickness on the next real job, and reject any head whose listed limit is thinner than that sheet. Mild galvanized and aluminum stay inside many heads. Stainless work-hardens, wears blades fast, and asks for a slower feed. If stainless shows up even occasionally, add replacement blade cost to the price before you commit.
Check the drill second. You need variable speed you can hold, a side handle, and a battery that still delivers under load. A tired pack drops speed mid-cut, the blades heat, and the line wanders. If the drill cannot sustain speed through the gauge you wrote down, budget the drill first. A bare tool makes sense when you already own healthy batteries on that platform.
Pick the cut last. A scissor head is the better everyday edge slit. A nibbler head fits interior openings where a starter hole is already part of the job. Prefer a head with a printed gauge limit and hardened tool-steel blades over an unmarked casting. An unmarked body gives you no ceiling to match against the sheet.
I recommend the attachment only when the sheet, the drill's sustained speed, and how often you cut all pass. If any one fails, buy the dedicated cutter and keep the drill for holes and fasteners. Scrap, a pile of blades, and a burned motor cost more than the right tool.
Value Tools Co stocks Hand tools, Power tools, and Drills & Drivers from DeWalt, Husky, Milwaukee, Makita, Ridgid, and Ryobi. Open-box and lightly used tools are fully functional, at up to 55% off retail, with free U.S. shipping on qualifying orders and a concise 2-day return window.
Frequently Asked Questions
Can a metal shear attachment for drill cut stainless steel, and how thick? Only when that head's rating row covers the stainless you are holding. Stainless work-hardens and wears blades fast, so expect a slower feed than galvanized. If the row is blank or thinner than the sheet, put the attachment down.
Can an impact driver run a drill shear attachment? No. The hammering action loads the cam and blades with impacts they are not built for, even though the hex fits.
What RPM should the drill use with a shear attachment? Use variable speed and start in the lower-middle of the drill's working range, not wide open and not a crawl. Too slow snags and wrinkles the sheet. Too fast heats the blades and walks off the line. Hold a steady speed the battery can sustain for the whole cut.
When is a dedicated shear the better buy? When the sheet exceeds the attachment's rated gauge, when you cut all day, or when you replace blades every few jobs. At that point the attachment costs more in blades and scrap than the dedicated tool.
If the gauge row and the drill's sustained speed both pass, browse Drills & Drivers at Value Tools Co. Open-box and lightly used, fully functional tools are listed at up to 55% off retail, with free U.S. shipping on qualifying orders and a 2-day return window.


