

The angle grinder guard must sit between you and the wheel, match the wheel type, and limit exposed wheel circumference to no more than 180 degrees, with the covered side toward you. The fastest check is to disconnect power, confirm the guard won't turn under hand pressure, and check that its opening faces away from your body.
You might be changing from weld cleanup to cutting fence rail, or checking an open-box grinder before putting it on the truck. Either way, a guard that fitted the last accessory isn't automatically right for the next one. Choose the wheel first, then match and position the guard for the actual cut.
Angle Grinder Guard Types and the Wheels They Fit
The wheel's profile and working surface determine which guard arrangement fits the task. A grinding wheel works on its face; a cutoff wheel cuts with its edge; wire accessories need clearance for projecting bristles. Changing accessories can therefore change the guard you need, even when the grinder stays the same.
| Guard type | Wheel it fits | Coverage toward operator | Ideal task |
|---|---|---|---|
| Standard grinding guard | Type 27 depressed-center grinding wheel | Covered side toward the operator, with no more than 180 degrees of the wheel exposed | Surface grinding, weld prep |
| Cutoff guard | Type 1 cutoff wheel | Operator-side containment, with no more than 180 degrees of the wheel exposed | Cutting pipe, rebar, angle iron |
| Wire-wheel guard | Wire cup or wire wheel approved for the tool | As specified by the guard maker | Stripping paint, rust, and weld scale |
| Flap disc guard | Flap disc approved for the tool | As specified by the guard maker | Blending, finishing, and deburring |
OSHA's abrasive-wheel machinery rule sets requirements for guard coverage and positioning. The guard maker's specifications determine accessory compatibility, exact coverage, and any required attachments; use the table as a guide, not as a substitute for those instructions.
Grinding guards versus cutoff guards
A standard grinding guard is intended for approved depressed-center wheels used for weld preparation and stock removal. Its shape gives access to the working face while shielding the operator side. That arrangement does not automatically provide the containment needed for a thin cutoff wheel.
For cutting pipe, rebar, or angle iron, use the guard or manufacturer-approved cutting attachment specified for the cutoff wheel and grinder. The added enclosure may restrict access in a tight spot, but removing it to gain clearance leaves the wheel without its intended protection.
A grinding guard may fit around a cutoff wheel and still be the wrong guard. Physical clearance alone does not establish compatibility.
Wire accessories and flap discs
Wire cups and wire wheels have distinct shapes and clearance requirements. Use only the guard arrangement approved for the accessory and grinder. Projecting wire bristles also call for appropriate personal protection.
Flap discs are used for blending, finishing, and deburring. Some grinders allow them with a standard grinding guard, but confirm the pairing in the tool and accessory instructions. The angle grinder disc guide explains how to distinguish accessory types before you choose a guard.
Before buying, check the disc's rated speed against the grinder's operating speed. Match the listed wheel type and diameter to the grinder model and guard mounting interface.
Installing and Replacing a Guard Step by Step
A guard that fits the grinder can still be installed incorrectly. Disconnect the plug or remove the battery before touching the wheel, clamp, or guard. For a replacement, note how the old guard mounts, then remove the wheel and guard.
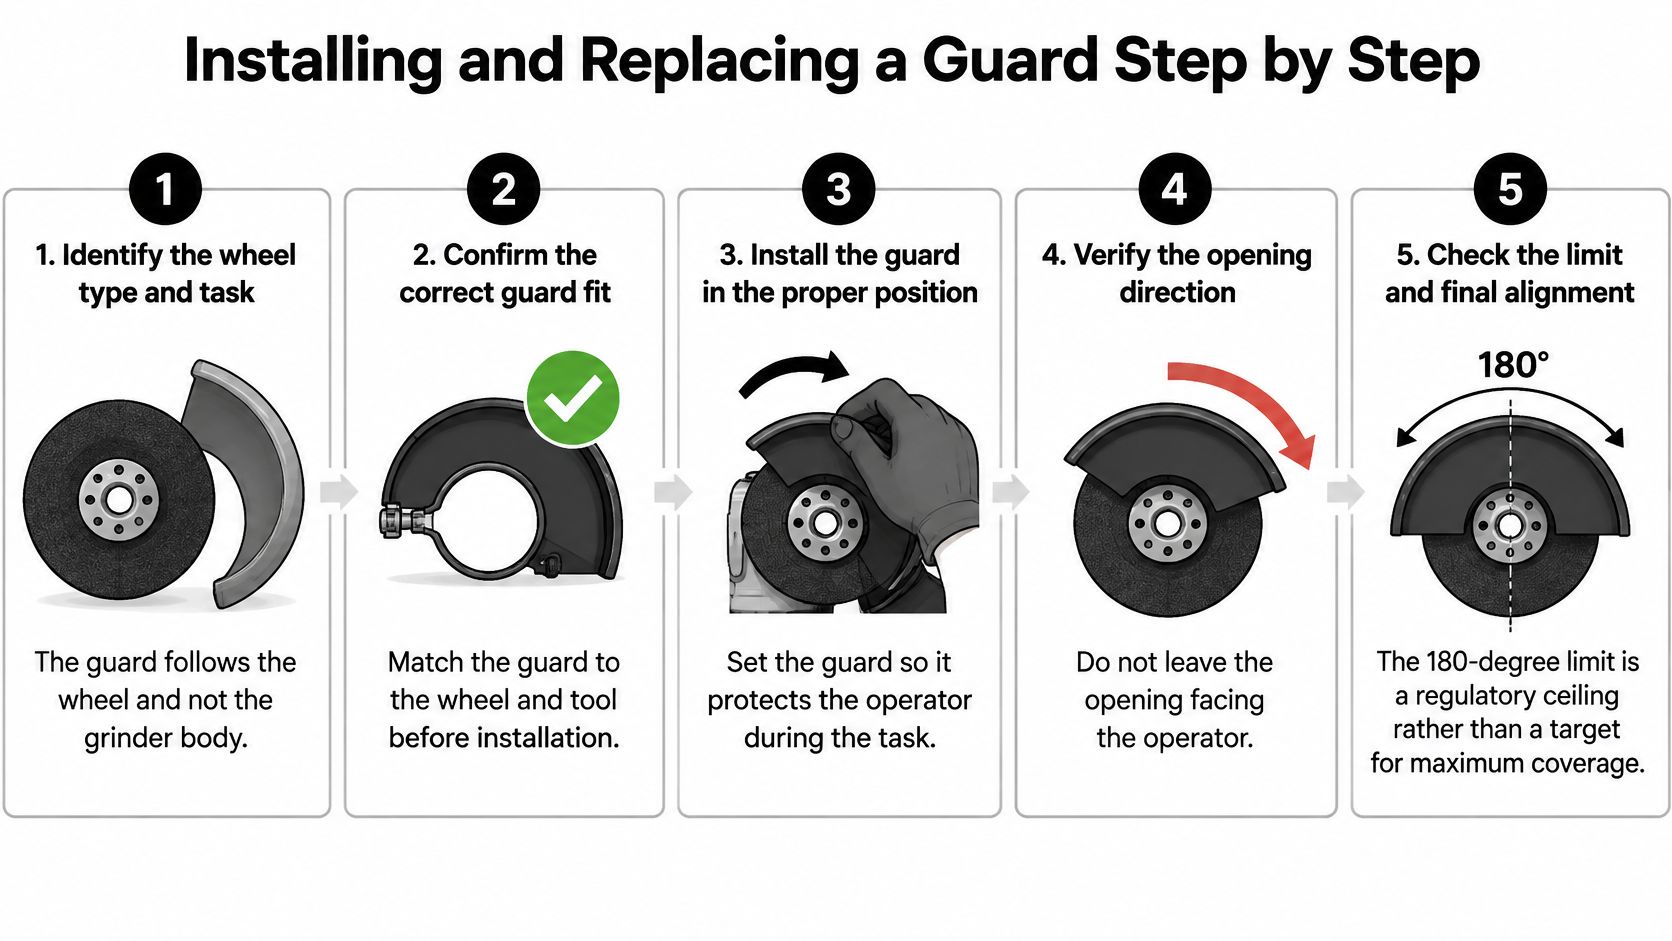
- Identify the accessory and task. Read the wheel label. A cutting disc and a grinding wheel have different operating requirements.
- Confirm the replacement part. Match the guard to the wheel and grinder model. Check whether it mounts with a quick-release collar, locating tabs, or a screw clamp.
- Seat and align the guard. Engage its locating features fully. Don't force a collar that does not fit the gear housing.
- Check coverage and clearance. Confirm the required coverage around the spindle end, nut, and flange projections. With power disconnected, turn the wheel by hand and check for rubbing.
- Secure the clamp. Use the specified fastener tool or locking lever. Tighten according to the manual, then test whether the guard moves under firm hand pressure.
- Perform the prescribed no-load check. Clear the area, stand in a protected position, and follow the manufacturer's startup procedure. Stop if the wheel wobbles, vibrates unusually, or contacts the guard.
OSHA's abrasive-wheel machinery rule covers guard alignment, spindle and flange coverage, fragment-retaining strength, and fastener strength. A similar-looking shield is not necessarily an equivalent replacement.
Replacement and cordless preparation
Replace guards with cracks, distorted retaining lips, damaged mounting features, or stripped clamp threads. Straightening a damaged shield does not restore its original strength. The angle grinder wheel-changing walkthrough explains the accessory-removal steps.
For the cordless tool covered by the operator manual, the stated limits are no use, storage, or charging below 50°F or above 100°F, and no exposure to temperatures above 265°F.
Setting the Guard Position for Cutting and Grinding
Keep the closed portion between your body and the wheel throughout the operation. A guard can be attached securely yet offer poor protection because you changed stance and left its opening facing your torso.
OSHA's angle grinder safety guidance directs users to position the guard between the worker and wheel and adjust it to deflect flying particles away. The 180-degree maximum exposure is a ceiling, not an instruction to uncover as much wheel as possible.
Guard opening direction by task
| Task | Guard opening points | Check before starting |
|---|---|---|
| Cutting with a cutoff wheel | Away from the body, with the guard between operator and wheel | Required spindle nut and flange coverage; wheel rated at or above grinder speed |
| Surface grinding, grinder held flat relative to the work | Away from the body, with discharged particles directed into a safe area | Guard resists hand pressure and clears the workpiece |
| Grinding at a low angle near the body | Rotate the guard so its opening remains away from the body | Clamp locked after adjustment; covered portion still faces operator |
Cutting pipe or fence rail
For a cutting operation, look at the tool from your working stance, not from the bench where you fitted the wheel. Your chest, face, and supporting arm shouldn't face the open sector. Keep the disc aligned with the cut instead of twisting the grinder to steer a binding wheel.
Say you move around a fence post to finish a rail cut. The opening that originally faced away now points toward your jacket, and the spark stream follows the changed orientation. Stop, isolate power, and reposition the guard before continuing.
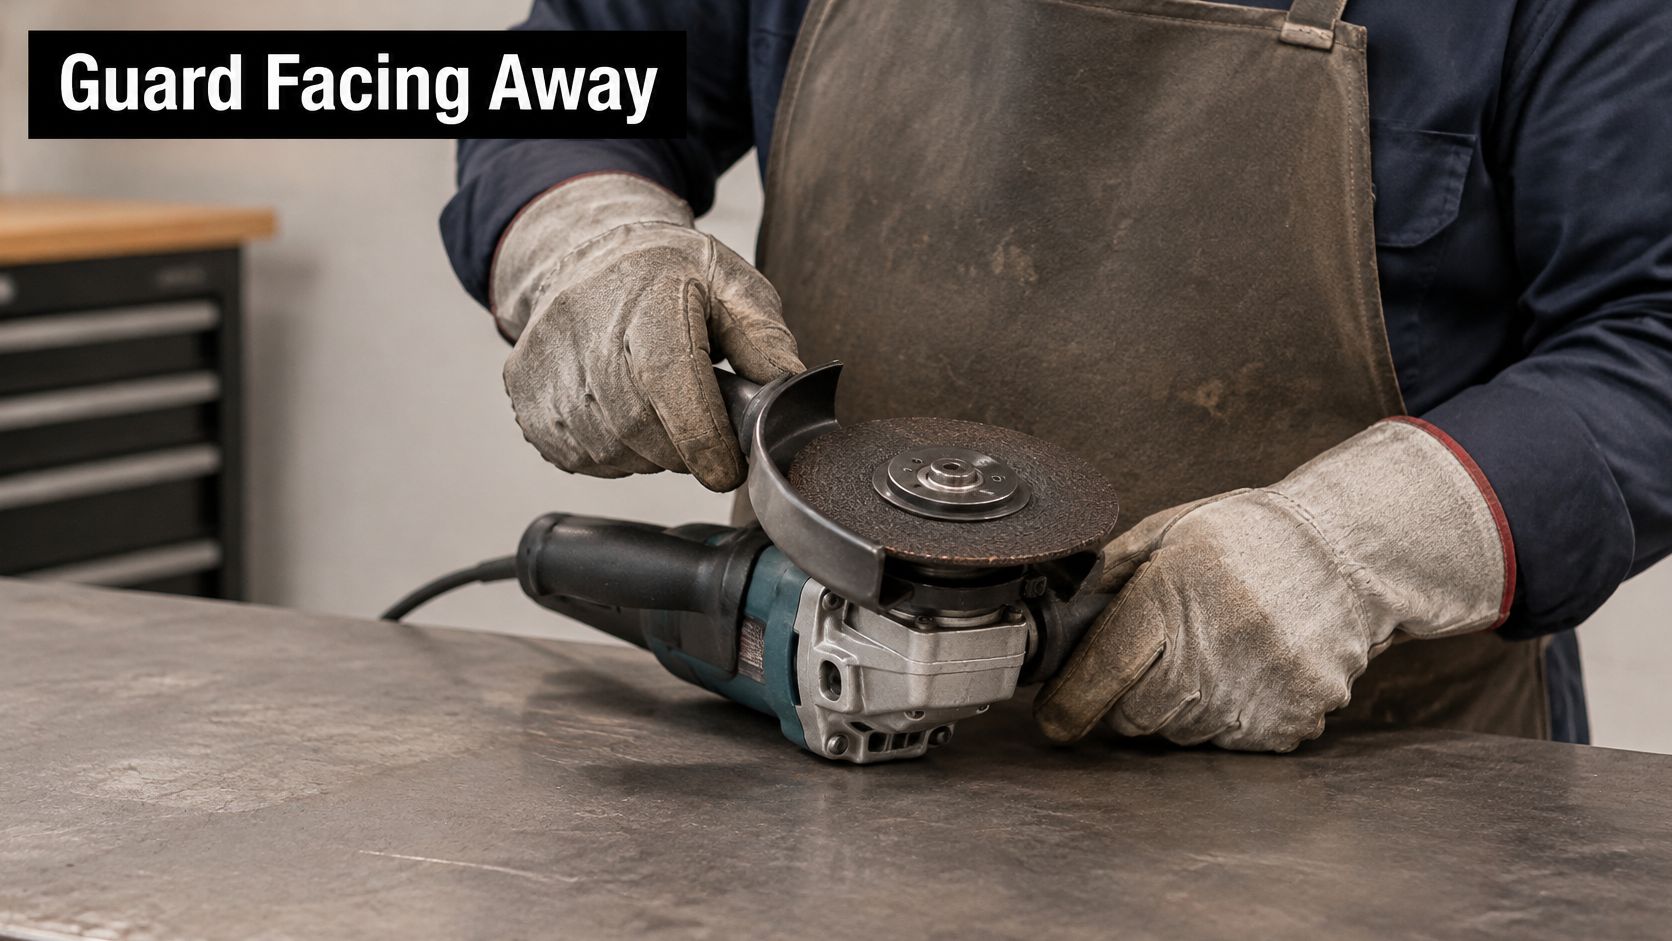
The visible spark stream can reveal an unsuitable setup, but it isn't a complete test of fragment protection. Judge the actual guard position and accessory enclosure, not just where the sparks land.
Surface grinding and close work
Holding the grinder over a flat surface doesn't mean every wheel should run flat against it. Use the working angle specified for that accessory, then orient the guard around your actual hand and body position. Check that the shield won't strike a weld, corner, or raised edge during the intended pass.
A correctly positioned guard can reduce access in a tight corner. Reposition the workpiece or choose another tool instead of exposing the operator-facing sector.
A loose clamp lets a good setup drift as you work. Side-loading a cutoff wheel creates a different problem: the guard doesn't make that loading acceptable or prevent the wheel from breaking. Stop when the cut binds, support the work properly, and correct the approach before restarting.
Checking a Used or Open-Box Grinder Guard
Inspect the shell and clamp before powering up a used grinder. Look closely around mounting tabs, folded edges, and screw holes, where damage can be harder to see in listing photos.
A peer-reviewed angle-grinder injury case series and literature review identifies shattered abrasive wheels as a major injury mechanism and recommends protective guards. A damaged shield isn't merely a cosmetic reason to negotiate the price.
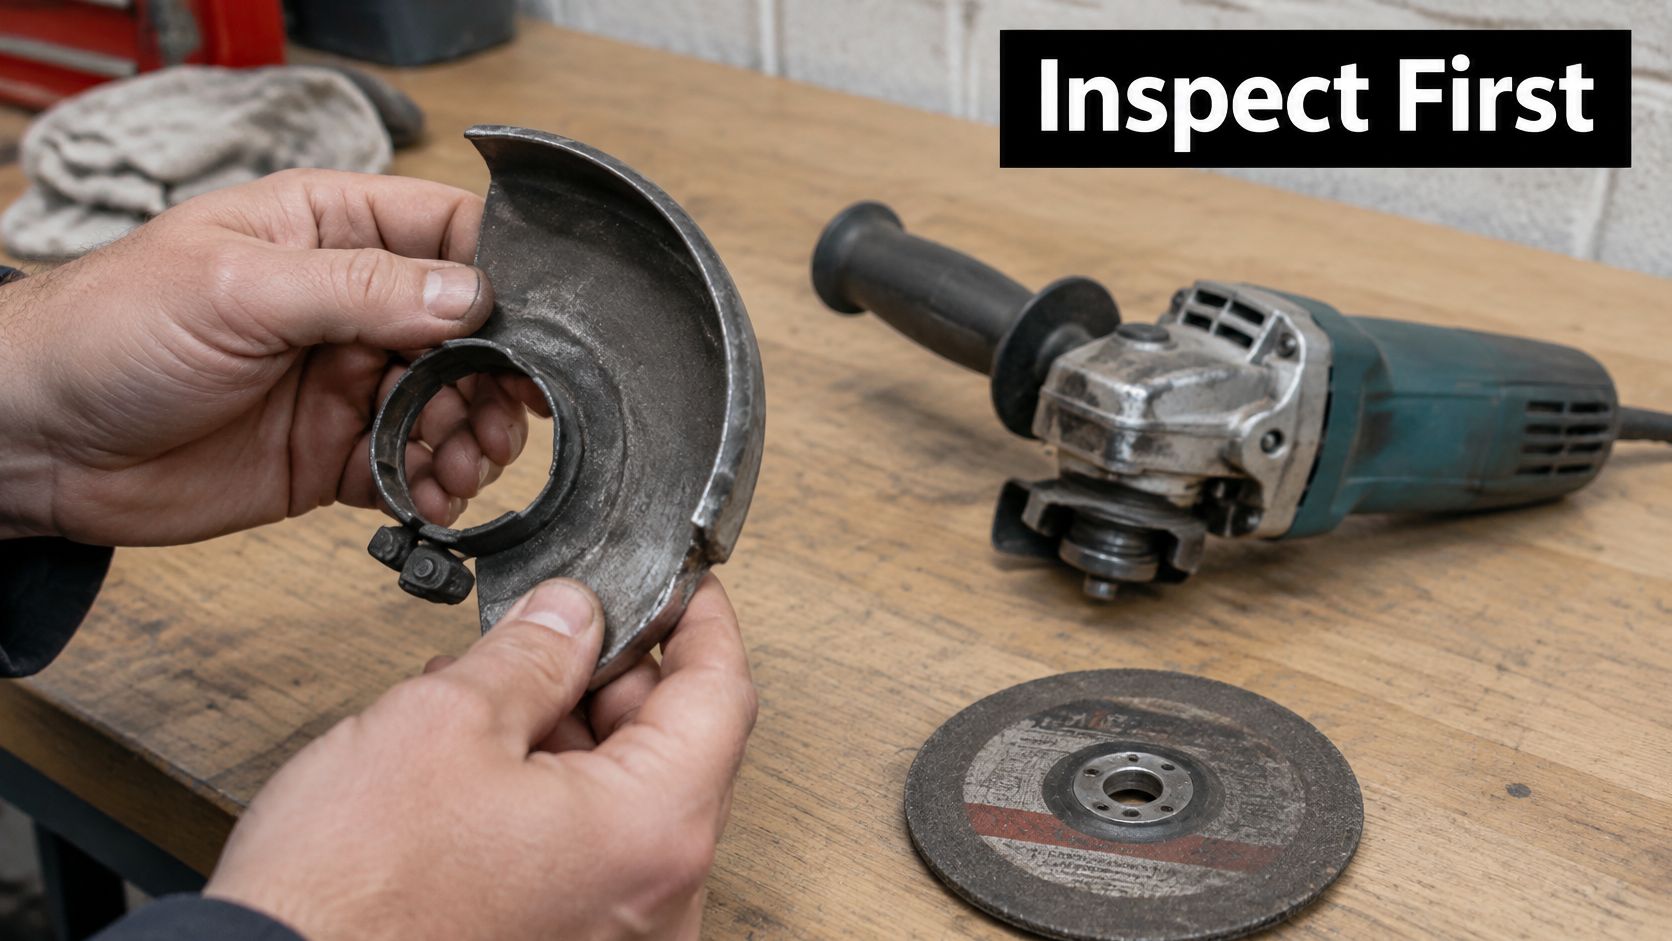
Guard defect check before use
| Defect | Why it matters | Action |
|---|---|---|
| Cracked or bent guard shell | Damaged containment can allow fragments through | Reject; fit a new guard |
| Stripped or bent clamp | Guard can drift out of alignment | Reject; replace damaged hardware or guard assembly |
| Missing nut or bolt | Guard cannot retain its intended position | Fit specified hardware before use |
| Guard turns freely by hand | Opening can shift toward the operator | Reject until the clamp holds |
| Rust or deformed mounting tabs | Significant corrosion or deformation can weaken retention | Replace a structurally damaged guard |
| Wrong model for grinder or wheel diameter | Fit and coverage don't match the assembly | Source a matching guard |
With power disconnected, mount the guard without a wheel and test its adjustment and locking mechanism. Install the approved wheel assembly afterward to verify final clearance and coverage. Confirm all specified clamp hardware is present rather than substituting whatever bolt fits.
What to request before buying
Ask for close photos of the guard collar, locking mechanism, identification marks, and included hardware. Check that a matching replacement is available if the supplied guard fails inspection. Don't run the grinder while waiting for the missing safety part.
Heat Storage and Charging for Cordless Grinders
Follow the battery and charger temperature limits for your specific model, not a general assumption that a shaded truck is cool enough. In Sacramento and the Central Valley, summer heat makes storage and charging part of job planning, especially when the grinder spends the day moving between rebar, pipe, and masonry work.
The operating limits stated in one cordless manual aren't universal battery specifications. Check the instructions for your battery platform, including any charger warning lights or temperature-delay functions.
A practical hot-weather routine
- Unload the battery. Don't leave packs or the grinder in a closed truck or direct sun while the crew works elsewhere.
- Use suitable storage. Move equipment to a shaded, temperature-controlled location within its specified range.
- Allow cooling before charging. Don't repeatedly reseat an overheated pack to try to override a charger's refusal to charge.
- Plan the charging window. Charge during cooler conditions and keep spare packs protected from heat between tasks.
Keep spare batteries cool, not merely fully charged. A hot spare can interrupt the job just as effectively as an empty one.
Heavy grinding can leave a pack warm even when the surrounding air feels comfortable. Rotate suitable packs and allow cooling time rather than treating reduced runtime as a reason to keep pushing the same battery.
For an open-box battery, inspect the case, terminals, and fit before its first charge. Reject swelling, cracks, leakage, melted areas, or other damage, and don't assume an undamaged exterior proves a harmless storage history. An occasional user without suitable battery storage may find a corded grinder simpler to own.
Who This Guide Fits and When a Guard Alone Is Not Enough
Contractors cutting pipe, rebar, and angle iron benefit most from treating guard setup as part of each accessory change. Property managers and maintenance workers in Elk Grove and Sacramento need the same discipline when moving between fence repairs, rust removal, and weld cleanup.
DIY homeowners also need a deliberate setup, even if the grinder only comes out for occasional tile or fencing work. Infrequent use makes checking the manual more valuable, not less. Open-box buyers should resolve accessory compatibility before the tool reaches the jobsite.
Who This Is For
- Daily metalworkers: Keep approved cutting and grinding guard arrangements available so production pressure doesn't encourage an unsafe substitution.
- Maintenance crews: Choose an adjustment mechanism that locks positively and is straightforward to operate between tasks.
- Budget-conscious homeowners: Compare the complete usable package, including the correct guard, battery, charger, and side handle.
- Bare-tool buyers: A bare tool can be good value if you already own compatible batteries, but confirm exactly which accessories are included.
Tool-free adjustment can make frequent repositioning easier. A screw-clamp guard may be perfectly serviceable for a consistent setup, but it needs the correct tightening tool. Neither design compensates for worn locking surfaces or incompatible parts.
Who Should Avoid This
Anyone planning to remove the guard for access should choose a different tool or cutting approach instead. An unlisted universal guard isn't a dependable substitute for the correct wheel-specific assembly.
A guard alone also doesn't resolve overhead exposure, an unsupported workpiece, combustible material in the discharge path, or poor control. OSHA's abrasive-wheel guidance reinforces the need for suitable guarding alongside the rest of a safe setup. Secure the work, use appropriate eye and face protection, and maintain two-hand control.
Safety Space's explanation of the hierarchy of controls is useful when choosing a safer process rather than relying on protective equipment alone. For task-specific hazards, our angle grinder accident guide explains additional failure points.
Can I use a grinding guard for cutting?
Only when the manufacturer explicitly approves that configuration, including any required cutting cover. Don't infer approval from clearance around the disc.
Does a guard prevent kickback?
No. It provides shielding, but it doesn't eliminate binding, unsafe wheel loading, or loss of control.
Is an aftermarket angle grinder guard safe?
It needs documented compatibility with the grinder and accessory. Appearance and collar diameter alone aren't enough.
Confirm Your Guard Before Your Next Cut
A guard that fits one wheel may not suit another. Check the grinder model, intended wheel, and task together before buying a replacement. A low-cost guard that will not lock onto the grinder is not a usable substitute.
Before putting the tool to work, inspect the guard assembly. Check the shell, mounting features, locking mechanism, and clearance around the accessory. If a part is damaged or missing, leave the grinder disconnected until the correct replacement is fitted.
Make the purchase usable, not just inexpensive
- Identify the combination: Record the grinder model and wheel specification before ordering.
- Inspect the assembly: Check the shell, mounting features, locking mechanism, and accessory clearance.
- Resolve defects first: Fit a matching replacement before using the grinder.
Value Tools Co lists products in Air Tools, Hand tools, Lawn Care, and Power tools. Its open-box and lightly used items are fully functional, with savings of up to 55% off typical retail pricing. Compare what each listing includes rather than assuming every grinder comes with the guard or other accessories you need.
Browse Value Tools Co's open-box and bare-tool listings with your grinder model and wheel specification in hand. Confirm which guard is included and whether it matches the task before buying. The store's 2-day return window supports fast exchanges, but the guard still needs to be checked before use.
Visit Value Tools Co to compare open-box and bare-tool options for your grinding or cutting job. Choose the guard for the wheel and task, then confirm its fit before the next cut.


