

You've got a small paint repair, a curved wooden edge, or a cloudy plastic surface in front of you, and setting up a full-size sander feels excessive. A drill sanding pad can handle that kind of localized work quickly, especially on edges, small panels, spot repairs, and curved surfaces. It's not a replacement for a random-orbit sander, though. The rotating pad can gouge, swirl, overheat, and throw dust when you use too much pressure or treat maximum RPM as a working speed.
The right choice depends on pad diameter, attachment style, abrasive grain, grit, backing flexibility, drill speed, and dust control. Use a small pad for controlled repair work, start slowly, keep it moving, and match the pad's maximum RPM to the drill's no-load RPM before you pull the trigger.
What Sanding Pads for Drills Do Best on Real Jobs
A Sacramento maintenance technician is repairing a damaged cabinet edge. The defect is localized, the cabinet is already installed, and bringing out a full-size random-orbit sander would mean more setup, more masking, and less control around the adjoining finish. A small sanding pad mounted in a drill reaches the edge, removes the damaged coating, and lets the technician feather the repair without sanding the entire panel.
That's where sanding pads for drills earn their place. The backing pad holds an abrasive disc while the drill supplies rotation. The setup works especially well for small panels, corners, curved parts, paint touch-ups, oxidation removal, and edges where a large sander is awkward. It also suits DIY homeowners, property-maintenance crews, repair technicians, and contractors handling localized surface preparation.
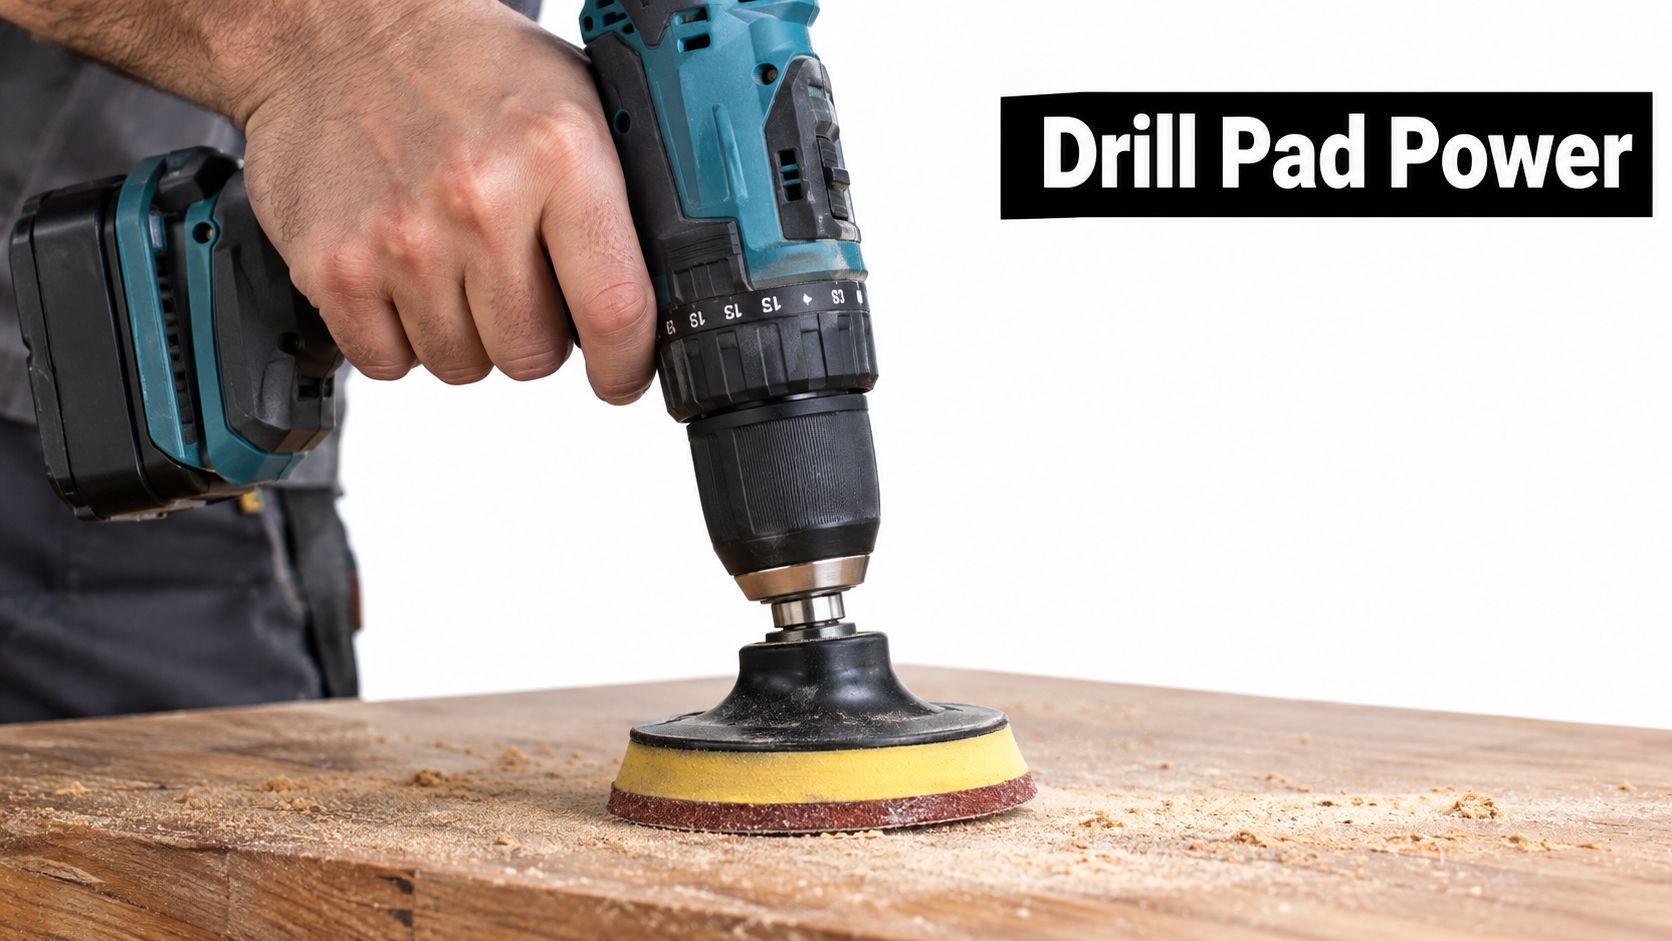
Where the drill attachment saves time
A drill pad has less setup than a dedicated sander, and a small backing plate can follow a curved surface more naturally than a rigid large disc. It's useful for removing old paint from a narrow repair area, smoothing filler before repainting, cleaning oxidation from a small metal part, or refining a wooden edge after cutting.
The coated-abrasive idea is much older than the modern power tool. Historical evidence places the earliest recorded coated abrasive in 13th-century China, where craftsmen attached crushed shells, seeds, and abrasive particles to parchment with natural gum. Abrasive paper was sold in Paris by 1769, an abrasive manufacturing process was described in 1808, and a U.S. coated-abrasive machine patent followed in 1835. The modern drill pad still uses the same basic principle, abrasive grains fixed to a flexible backing and used to remove material through controlled friction. These historical milestones are documented in this history of sandpaper and coated abrasives.
Practical rule: A drill pad is a spot-repair tool first. It becomes a poor substitute for a dedicated sander when the surface is large, flat, or highly visible.
Where it falls short
A drill's pad rotates in one direction, so it can leave circular marks more readily than a random-orbit sander. Side pressure also loads the drill chuck, arbor, and backing interface in ways a purpose-built sander is designed to manage more effectively. If the disc sits off-center, the vibration becomes obvious and the finish gets worse quickly.
Use a drill pad when setup time and access matter more than perfectly uniform coverage. For broad walls, full cabinet doors, floors, or large flat automotive panels, a random-orbit or detail sander normally gives better consistency and dust management. Before repainting a room, combine the repair work with reliable interior painting tips and tricks, especially where feathered edges need to disappear under the new coating.
Backing Types Abrasive Grains and How They Cut
A grit number only tells part of the story. Two discs with the same grit can behave differently because their abrasive mineral, coating density, backing stiffness, and attachment system change how they cut, load, flex, and shed heat.
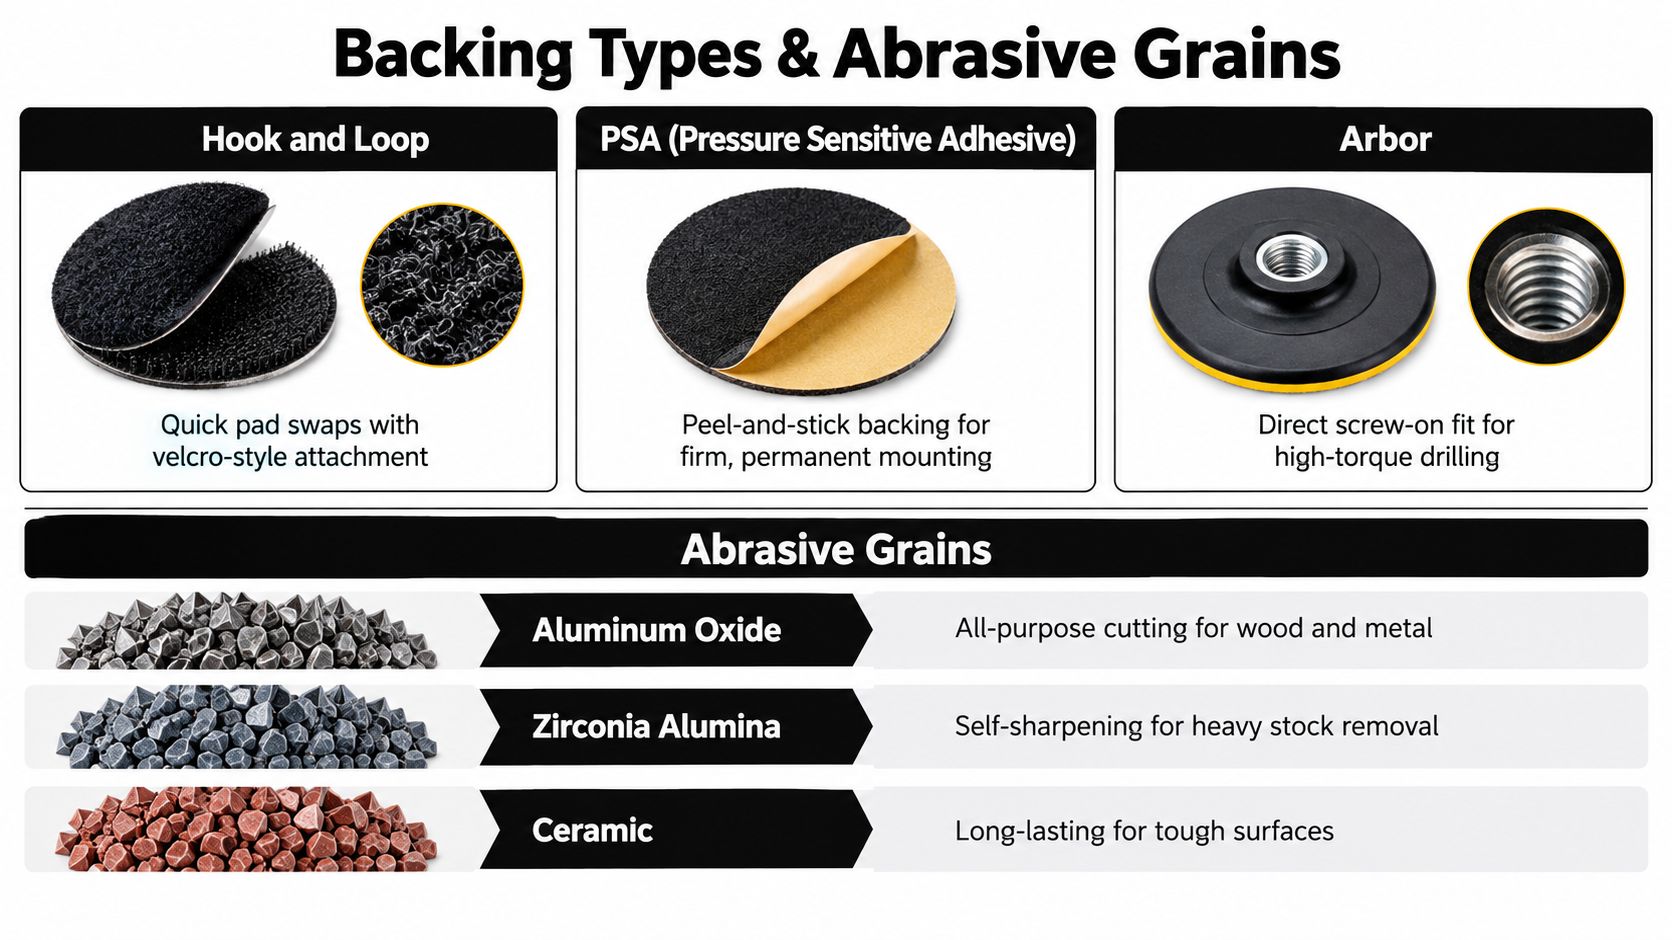
Attachment and backing choices
Hook and loop discs are the easiest for repeated grit changes. The abrasive attaches to a fabric interface, so you can remove a loaded disc and switch grits without replacing the backing pad. They're convenient for wood repair, paint preparation, and mixed-grit jobs, but a worn hook surface or poorly centered disc can create vibration.
PSA, or pressure-sensitive adhesive, discs peel and stick to a compatible pad. They can feel firm and direct, which helps on flat work, but removing them can be slower and a reused pad may not hold as reliably. PSA is a good choice when you want a disc to stay put for a defined operation rather than changing abrasives constantly.
Arbor-mounted pads screw or lock directly onto the drill attachment. This construction can be useful for high-torque drilling and compact accessories, but the arbor must match the chuck or adapter and the backing plate must be rated for the intended speed.
Rigid backings keep the abrasive flatter and suit flat stock. Flexible foam or interface pads conform better to curves, but they also make it easier to tilt the disc and concentrate pressure on one edge. For a broader explanation of pad systems and sandpaper compatibility, see this guide to random orbital sander sandpaper.
Choosing abrasive grain by material
Aluminum oxide is the practical general-purpose choice for wood, paint, soft metals, and mild steel. It's relatively tough and tolerates demanding contact, which is why it remains a dependable workshop abrasive.
Silicon carbide is harder and sharper. It's commonly selected for glass, paint, fiberglass, and other hard or nonmetallic materials where a cleaner cut matters. Synthetic silicon carbide was developed by Edward Acheson in 1891, and brown fused aluminum oxide followed in 1905, milestones that helped move abrasives toward consistent engineered grains. The development is described in this 3M abrasive grain technical paper.
Zirconia is better suited to tougher stock removal on mild steel and other demanding materials. Ceramic grain is aimed at hardened, alloyed, and stainless steel because it maintains cutting performance under more severe conditions.
Coating density also matters. Closed-coat abrasives place approximately 95% of the backing surface under abrasive grain, maximizing cut rate on hard materials such as steel and hardwood. Open-coat products cover about 50–70%, leaving more space between grains and resisting clogging on soft wood, pine, paint, and other loading-prone materials. Those figures and the material guidance come from this sanding disc construction guide.
How to Choose Size Grit and Drill Compatibility
Choose the smallest pad that handles the repair efficiently without becoming difficult to control. Small discs are useful around edges and curves, while larger discs cover more area but place greater side load on the drill and make it easier to lose control. A flexible interface helps on curves, whereas a firmer backing is more predictable on flat stock.
Grit should follow the surface condition, not the number of discs in a bargain kit. 40–60 grit removes paint, adhesive, filler, oxidation, and damaged material quickly, but it leaves deeper scratches. 80–120 grit handles shaping and general preparation. 180–240 grit refines the surface before paint, while 320–400 grit or higher suits fine finishing and polishing. Those grit ranges are outlined in this abrasive disc grit and compatibility guide.
Drill sanding pad selector by job
| Job type | Pad size and backing | Grit progression | Best abrasive |
|---|---|---|---|
| Small wood repair or edge sanding | Small flexible pad | 80 → 120 → 180 → 240 | Aluminum oxide |
| Paint and filler removal | Small or medium pad, preferably open coat | 40–60 → 80 → 120 | Aluminum oxide |
| Pre-paint smoothing | Flexible interface on curves, firmer pad on flats | 120 → 180 → 240 | Aluminum oxide or silicon carbide |
| Glass, fiberglass, or hard plastic preparation | Small controlled pad, compatible flexible backing | Start conservatively, then refine through finer grits | Silicon carbide |
| Mild-steel stock removal | Firm backing with secure arbor | Coarse grit, then moderate finishing grit | Zirconia or aluminum oxide |
| Stainless or hardened alloy work | Firm, heat-managed backing | Coarse to fine without dwelling | Ceramic |
For wood, the progression 80 → 120 → 180 → 240 prevents the common mistake of jumping from a coarse disc straight to a fine one. The fine disc can polish the tops of deep scratches without removing them efficiently. If you're preparing painted trim, this guide to sanding between coats is useful for understanding why surface refinement should happen in stages.
Check the attachment before buying
Confirm the arbor diameter, chuck capacity, thread style, pad diameter, and whether the backing is hook and loop, PSA, or direct mount. A brushless, or sin escobillas, drill may offer better electronic control and runtime, but it still needs to stay within the accessory's speed rating. A bare tool, or herramienta sola, can be a sensible purchase if you already own compatible batteries and chargers.
The pad's maximum RPM must meet or exceed the drill's no-load RPM. A pad rated at 10,000 RPM must not be used on a drill capable of 12,000 RPM, even if you expect to run the drill more slowly. Treat the rating as a hard ceiling, not a performance target.
Attaching Your Pad and Sanding With Control
Mounting determines whether the pad cuts evenly or fights you. In a shop bay, the first check is always the same: unplug the corded drill or remove the battery, inspect the arbor and chuck, and make sure the threads or shank seat cleanly before tightening.
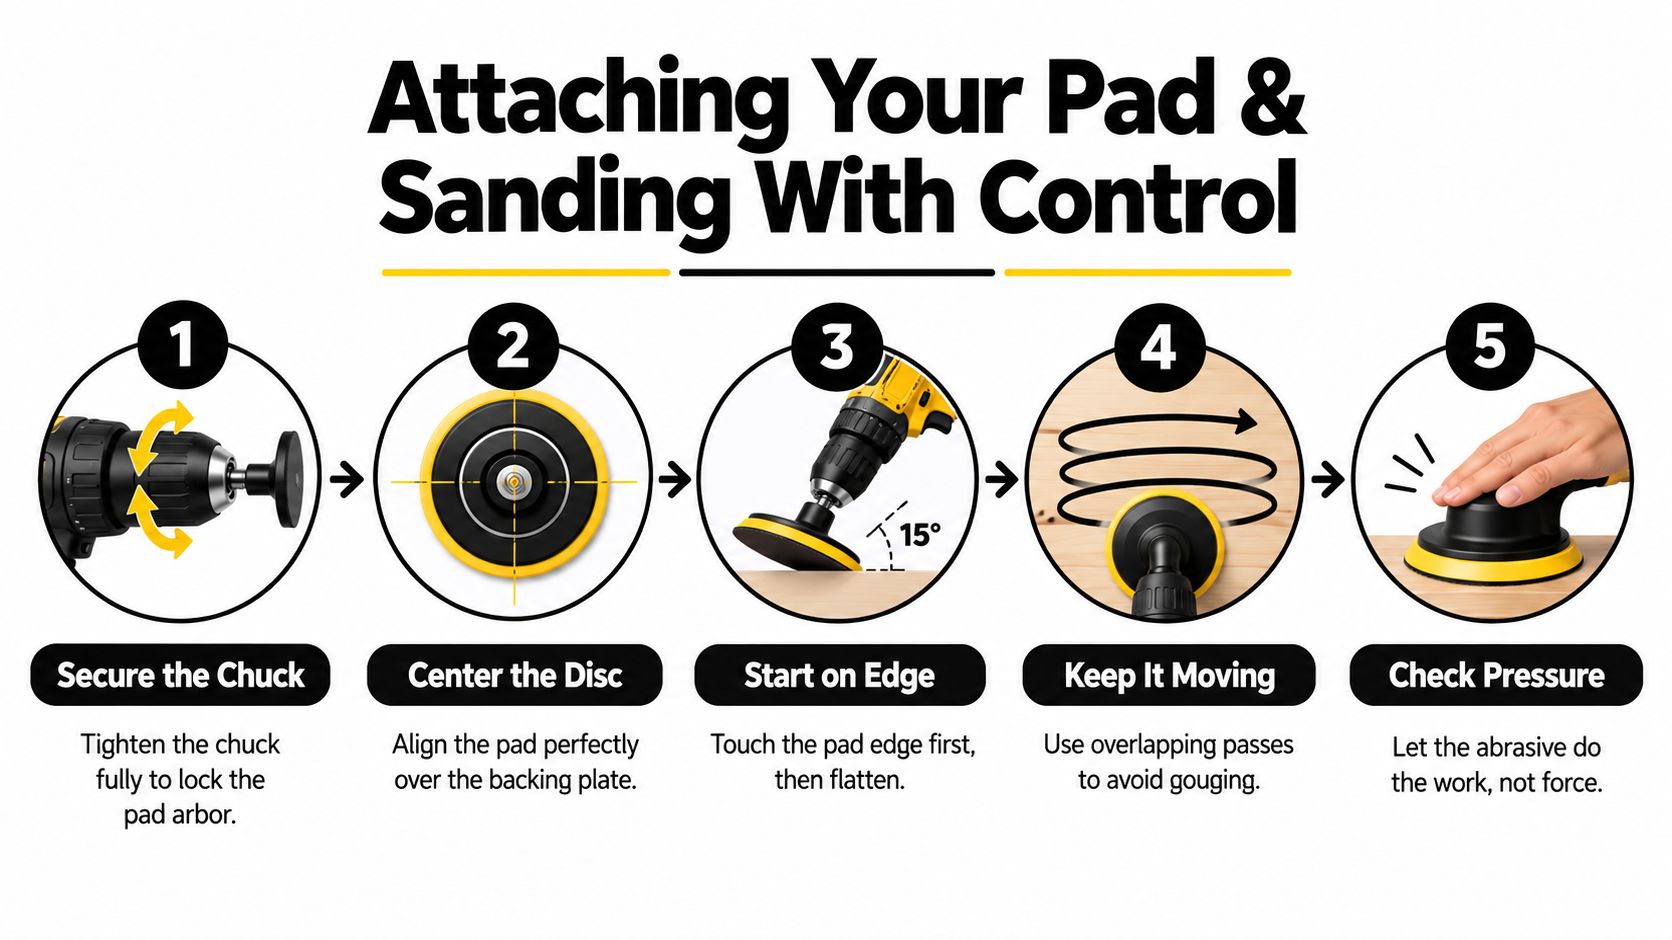
Mount the pad in job order
- Secure the chuck. Insert the arbor fully and tighten the chuck evenly. A loose arbor can walk off-center and create vibration before the abrasive does any useful work.
- Center the disc. Align the abrasive over the backing plate. The disc should sit concentrically, without a raised edge or folded section. The 3M technical manual requires the abrasive to be centered and recommends starting the tool while it's already contacting the workpiece, which reduces gouging from sudden contact. Follow the 3M mini random-orbit tool safety manual for the same basic control principle.
- Secure the work. Clamp a board, brace a cabinet part, or use a non-slip surface. A rotating pad can catch an edge and pull the drill sideways before you can correct it.
- Start slowly on the workpiece. Bring the pad into contact before applying rotation, then begin at a low speed. Start with the pad nearly flat, unless the attachment instructions call for a specific edge approach.
- Keep moving. Use overlapping passes and light pressure. Let the abrasive cut instead of forcing the drill into the surface.
The embedded demonstration below shows the movement and hand position in practice.
Control speed and heat
Maximum RPM is a limit. It isn't a target, and higher speed doesn't automatically produce a better finish. Excessive speed can shorten abrasive life, increase heat, and make swirl marks harder to avoid. A drill without variable-speed control deserves extra caution because the trigger may take the pad immediately into an aggressive operating range.
Paint, plastic, thin edges, and laminated surfaces heat quickly. Stop when the pad, backing, or workpiece becomes hot, then let the parts cool before continuing. Sacramento and Central Valley crews also need to account for 100°F-plus summer conditions, especially when using cordless tools. Let the drill and battery cool between passes rather than burying a warm pack in a tool bag.
For related work around corners and profiles, this guide to oscillating multi-tool sanding explains when a reciprocating detail motion offers better control than a rotating disc.
Wear eye protection, hearing protection during prolonged use, and respiratory protection selected for the material. Replace the pad if it cracks, tears, delaminates, or begins vibrating excessively.
Dust Control Safety Limits and When Not to Dry Sand
A cheap drill and sanding disc can be the wrong choice indoors when dust has nowhere to go. The lower purchase cost can disappear into cleanup, airborne exposure, room containment, and compliance work, especially on a remodel or occupied property.
Identify the material before sanding. Wood dust, cured paint, filler, fiberglass, and metal residue present different exposure concerns, so a disposable mask is not universal protection. Use local extraction or a compatible vacuum where possible. This guide to drill dust collection attachments explains point-of-generation capture. Ventilate the work area and seal nearby rooms against dust migration.
The lead-paint boundary
Dry sanding old lead-painted surfaces can produce airborne lead above the permissible exposure limit, according to the U.S. Department of Labor. OSHA recommends shrouded tools connected to vacuum systems with suitable HEPA filtration to capture dust at the point of generation. The OSHA construction operations guidance explains why that capture method matters.
A suspect coating changes the process:
- Identify the coating first. Do not dry sand an unknown old painted surface because the attachment fits.
- Use controlled extraction. A shroud and properly filtered vacuum provide better control than room ventilation alone.
- Select respiratory protection for the exposure. Wood dust and lead-paint dust require different hazard decisions.
- Stop when containment is impractical. Use a dust-managed sander or a qualified surface-preparation service when the area cannot be controlled.
Wet sanding can reduce airborne dust in suitable applications, but it does not make every setup safe. Keep water away from electrical connections, battery contacts, switches, and components not designed for wet operation. An impact driver with a sanding pad also is not automatically suitable for wet work, because water can reach the motor housing and battery contacts.
A drill pad earns its place on small, controlled jobs. Once dust, heat, or containment becomes difficult to manage, a shrouded sander and proper extraction are the safer choice.
The least expensive sanding setup can become the most expensive indoor choice when a small repair turns into uncontrolled dust work.
Fixing Swirls Clogging Tearing and Vibration Fast
Most sanding failures show up before the surface is ruined. The disc loads, the tool chatters, or the finish develops circular marks. Stop rather than pushing through, because pressure usually hides the cause while increasing heat and wear.
Read the symptom
| Symptom | Likely cause | Field correction |
|---|---|---|
| Circular swirl marks | Pad held in one place or pressure concentrated on one edge | Reduce pressure, lower speed, and use overlapping passes |
| Disc clogs quickly | Soft material, paint, or excessive pressure | Switch to open coat, ease pressure, and clean or replace the disc |
| Pad vibrates | Off-center disc, loose arbor, or damaged backing | Remove the disc, inspect the interface, recenter, and retighten |
| Edge tears or delaminates | Excessive speed, tilted contact, or worn abrasive | Stop immediately and install a sound pad within the RPM rating |
| Surface gets hot | Dwelling, high speed, or aggressive grain | Keep moving, reduce speed, and allow cooling breaks |
A soft backing can flex under pressure, concentrating the contact area and creating swirls. Excessive pressure also packs debris into the abrasive, especially on paint, pine, and other loading-prone surfaces. Open-coat construction gives those materials more space between grains, while closed-coat discs cut harder stock more aggressively.
Abrasive performance depends on grit size, mineral, pressure, rotational speed, and workpiece material, not just the pad. Research on coated abrasives links material-removal rate to factors including wood species, sanding pressure, abrasive type, grit size, and feed speed. Higher pressure and speed can increase removal, but they also increase heat, loading, surface defects, and premature wear, as explained in this coated-abrasive sanding efficiency research.
Shop diagnosis: If the finish changes when you lighten your hand, the problem is usually technique or operating range, not a shortage of abrasive.
Step down through grits instead of asking a fine disc to erase coarse scratches. On a damaged wood surface, use the planned progression, then reduce pressure as the finish improves. On plastic or paint, stop as soon as the defect is removed because additional dwell time often creates more heat than improvement.
Who This Is For Who Should Avoid This and Smart Buying
Who this is for
A drill sanding pad suits DIY homeowners, maintenance technicians, property managers, furniture repairers, and contractors working on small, localized surfaces. It handles edges, curves, trim repairs, small metal parts, paint touch-ups, and occasional restoration jobs where setting up a dedicated sander would take longer than the sanding itself.
The main advantage is convenience. The attachment is compact, familiar, and compatible with a drill already in the toolbox. Hook-and-loop systems speed up grit changes, flexible backing follows curves, and material-specific discs let you choose among aluminum oxide, silicon carbide, zirconia, and ceramic abrasives.
A cheap drill pad can beat a sander for a short repair, awkward edge, or small panel. It also avoids buying another powered tool for occasional work. Treat the drill's maximum RPM as a ceiling, not a target. Lower speed, light pressure, and short passes usually give better control and less heat.
Who should avoid this
Choose another tool for large flat areas, consistent orbital finishing, or jobs where dust control matters. A random-orbit sander is usually the better choice for broad panels and paint preparation. A detail sander fits tight corners where a rotating disc could mark adjoining surfaces.
Avoid the pad when the drill has no suitable speed control, the accessory's RPM limit is unclear, or the work requires sustained side loading. A dedicated sander is built for controlled sanding, and no drill attachment matches its ergonomics, dust handling, or long-duration durability.
Check the backing system, stated RPM limit, attachment security, and return terms before buying. A cheap multipack is poor value if the backing tears, the abrasive clogs quickly, or the pad runs off-center. Delivery or pickup convenience can help when a repair is delaying a job, but the pad still has to suit the material, drill, and finish.
For a budget-conscious purchase, Value Tools Co offers tested and inspected open-box and bare tools, with up to 55% savings on those categories. Its published return terms should be checked before purchase, particularly for open-box condition and defective items. That comparison can make sense when the choice is between a low-cost drill attachment and a dedicated sander, provided tool condition and support meet the job's demands.
If you are handling spot repairs, curved edges, or small panels, shop Value Tools Co for compatible sanding pads, drills, open-box tools, and bare tool options. Choose by abrasive, backing, grit, and RPM limit, then put the remaining budget toward dust-control equipment that protects the finish and your lungs.


